
Fig. 1:
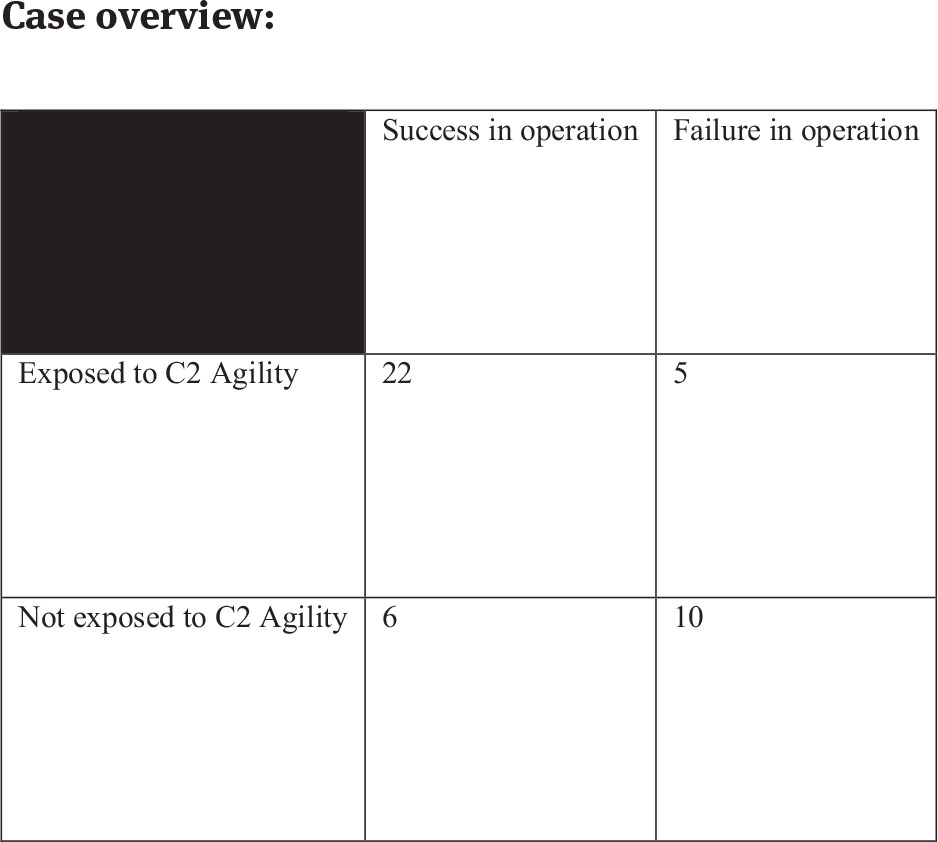
This figure shows the cases quantified by which case featured C2 Agility (at the coordinated, collaborated or edge approach) and which cases which did not feature C2 Agility. It also cross-references the cases in which were successful in achieving their objectives and which were unsuccessful.
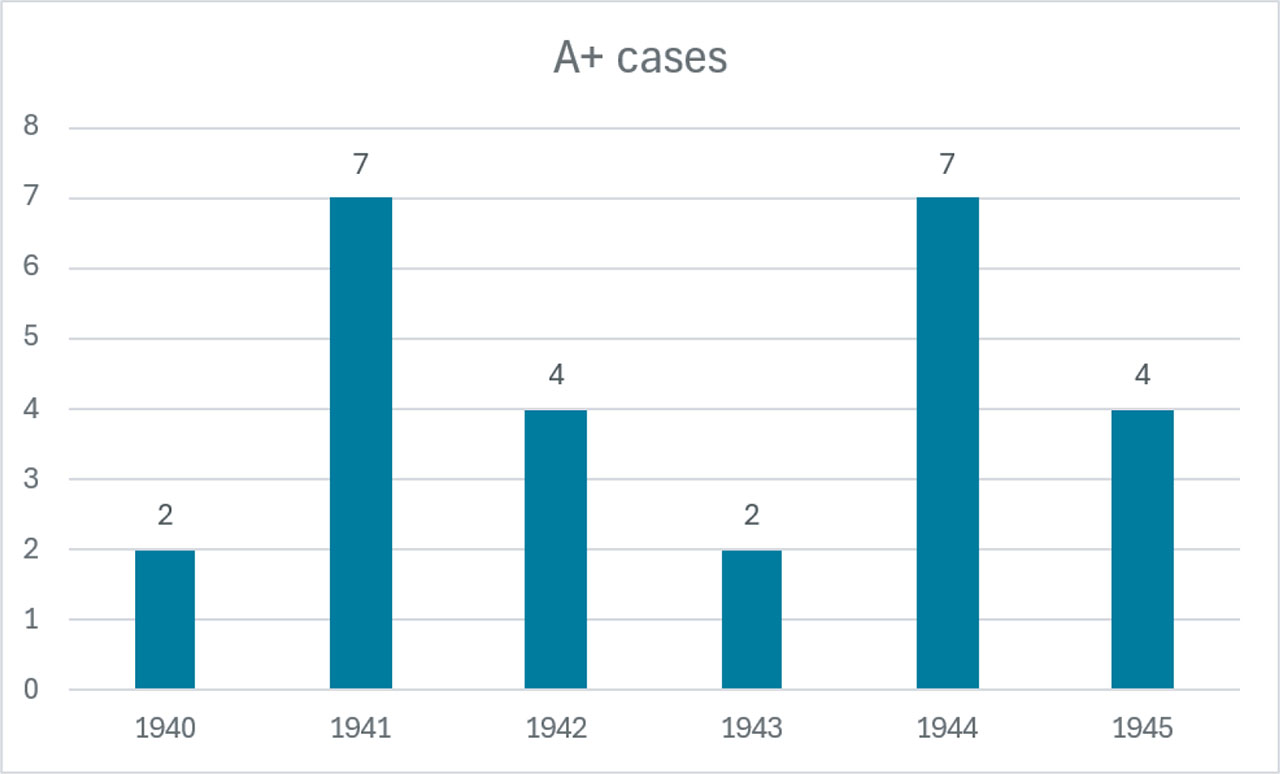
Fig. 2:
Illustrates all cases in which Agility was observed divided by year.
| All cases | Year | A+/A− | S/F |
|---|---|---|---|
| Operation Sickle | 1940 | A− | F |
| Operation Rubert | 1940 | A− | S |
| Operation Dynamo | 1940 | A+ | S |
| Operation Cycle | 1940 | A− | S |
| Operation Aerial | 1940 | A+ | S |
| Operation Menace | 1941 | A− | F |
| Operation Abstention | 1941 | A− | F |
| Operations in Greece | 1941 | A− | F |
| Defense of Crete | 1941 | A+ | F |
| Operation Sabine | 1941 | A+ | S |
| Operation Exporter | 1941 | A+ | S |
| Litani River | 1941 | A+ | S |
| Operation Chronometer | 1941 | A+ | S |
| Operation Matador Malaya | 1941 | A− | F |
| Operation Archery | 1941 | A+ | S |
| Hong Kong | 1941 | A+ | F |
| Operation Chariot | 1942 | A+ | S |
| Operation Ironclad | 1942 | A+ | S |
| Operation Jubilee | 1942 | A− | F |
| Operation Agreement | 1942 | A− | F |
| Operations Stream, Line and Jane | 1942 | A+ | S |
| Operation Torch | 1942 | A− | S |
| Airborne Assault Beja | 1942 | A+ | S |
| Airborne Assault Oudna | 1942 | A− | F |
| Operation Husky | 1943 | A− | S |
| Operation Ladbroke | 1943 | A− | S |
| Operation Fustain | 1943 | A+ | F |
| Operation Slapstick | 1943 | A+ | F |
| Operation Avalanche | 1943 | A− | S |
| Operation Shingle | 1944 | A− | F |
| Operation Neptune | 1944 | A+ | S |
| Operations Tonga and Mallard | 1944 | A+ | S |
| Operation Rugby | 1944 | A− | S |
| Operation Market Garden | 1944 | A− | F |
| Operation Astonia | 1944 | A+ | F |
| Operation Manna | 1944 | A+ | S |
| Operation Switchback | 1944 | A+ | S |
| Operation Vitality | 1944 | A+ | S |
| Operation Infatuate | 1944 | A+ | S |
| Operation Romulus | 1945 | A+ | S |
| Operation Talon | 1945 | A+ | S |
| Operation Plunder | 1945 | A+ | S |
| Operation Varsity | 1945 | A+ | S |
| A+ cases | Year | S/F |
|---|---|---|
| Operation Dynamo | 1940 | S |
| Operation Aerial | 1940 | S |
| Defence of Crete | 1941 | F |
| Operation Sabine | 1941 | S |
| Operation Exporter | 1941 | S |
| Litani River | 1941 | S |
| Operation Chronometer | 1941 | S |
| Operation Archery | 1941 | S |
| Hong Kong | 1941 | F |
| Operation Chariot | 1942 | S |
| Operation Ironclad | 1942 | S |
| Operations Stream, Line and Jane | 1942 | S |
| Airborne Assault Beja | 1942 | S |
| Operation Fustain | 1943 | F |
| Operation Slapstick | 1943 | F |
| Operation Neptune | 1944 | S |
| Operations Tonga and Mallard | 1944 | S |
| Operation Astonia | 1944 | F |
| Operation Manna | 1944 | S |
| Operation Switchback | 1944 | S |
| Operation Vitality | 1944 | S |
| Operation Infatuate | 1944 | S |
| Operation Romulus | 1945 | S |
| Operation Talon | 1945 | S |
| Operation Plunder | 1945 | S |
| Operation Varsity | 1945 | S |
| A− Cases | Year | S/F |
|---|---|---|
| Operation Sickle | 1940 | F |
| Operation Rubert | 1940 | S |
| Operation Cycle | 1940 | S |
| Operation Menace | 1941 | F |
| Operation Abstention | 1941 | F |
| Operations in Greece | 1941 | F |
| Operation Matador Malaya | 1941 | F |
| Operation Jubilee | 1942 | F |
| Operation Agreement | 1942 | F |
| Operation Torch | 1942 | S |
| Airborne Assault Oudna | 1942 | F |
| Operation Husky | 1943 | S |
| Operation Ladbroke | 1943 | S |
| Operation Avalanche | 1943 | S |
| Operation Shingle | 1944 | F |
| Operation Rugby | 1944 | S |
| Operation Market Garden | 1944 | F |
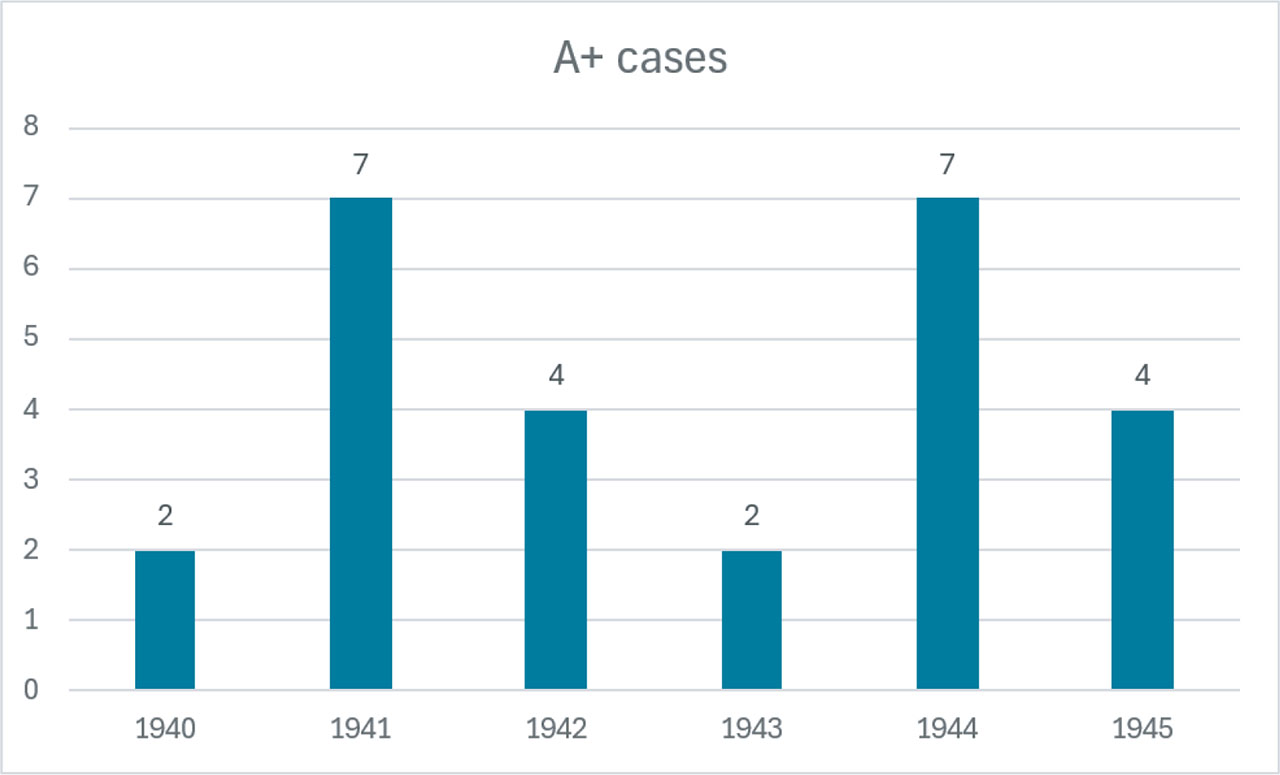
Fig. 3:
This figure illustrates all cases in which Agility was not observed divided by year.
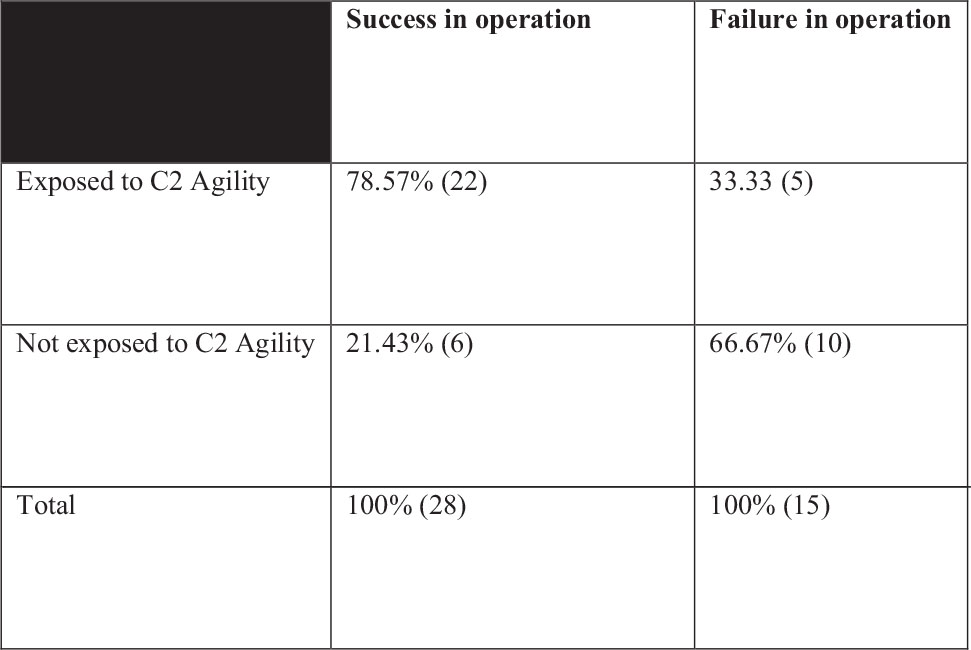
Fig. 4:
The column percentage of the outcome. It shows that, based on the case findings, that when one achieves success in joint operations there is a 78.57% chance of achieving that success with an Agile approach to C2. Likewise, it shows that if one failed in joint operations, there was a 66.67% chance that one did not have an Agile approach to C2.
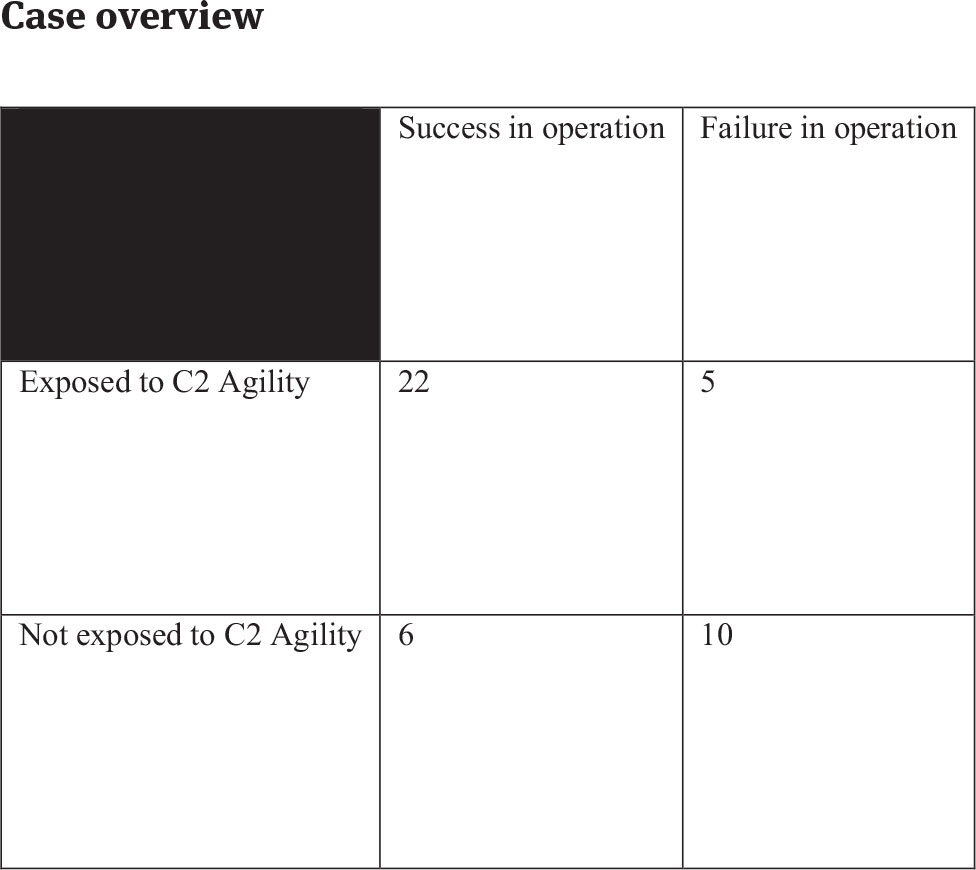
Figure 1 repeated 1:
This figure shows the cases quantified by which case featured C2 Agility (at the coordinated, collaborated or edge approach) and which cases which did not feature C2 Agility. It also cross-references the cases in which were successful in achieving their objectives and which were unsuccessful.
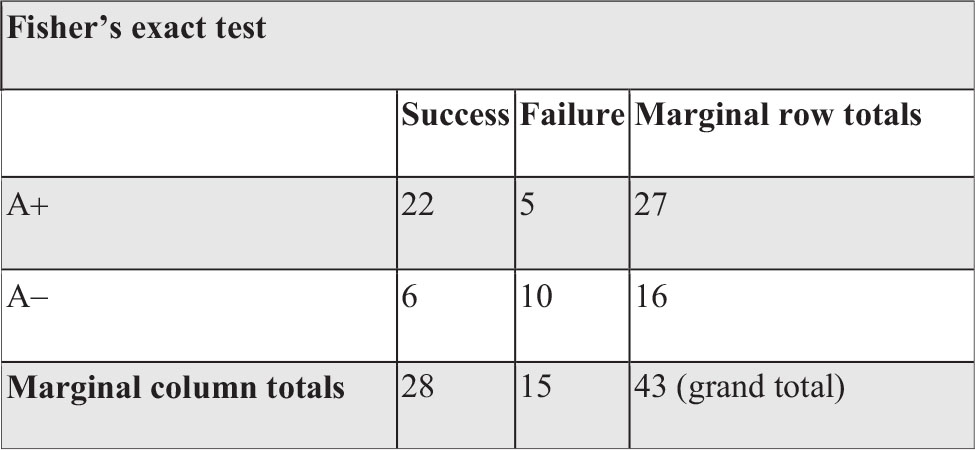
Fig. 5:
The Fisher’s exact test helps to determine whether there is a significant relationship between two categorical variables, especially when sample sizes are small. In this study it is used as an extra validation of the result.