

Table 1:
Bridge data
| Bridge type | Girder and truss bridges |
| Located | Pasirjengkol – Wanaraja |
| Bridge length | 41.055 m |
| Bridge width | 1.30 m; 3.60 m; 1.30 m |
| Width between rails | 1.20 m |
| Number of spans | 3 spans |
| Span configuration | 9.485 m; 21.930 m; 9.635 m |
| Bottom structure type | Stone masonry |
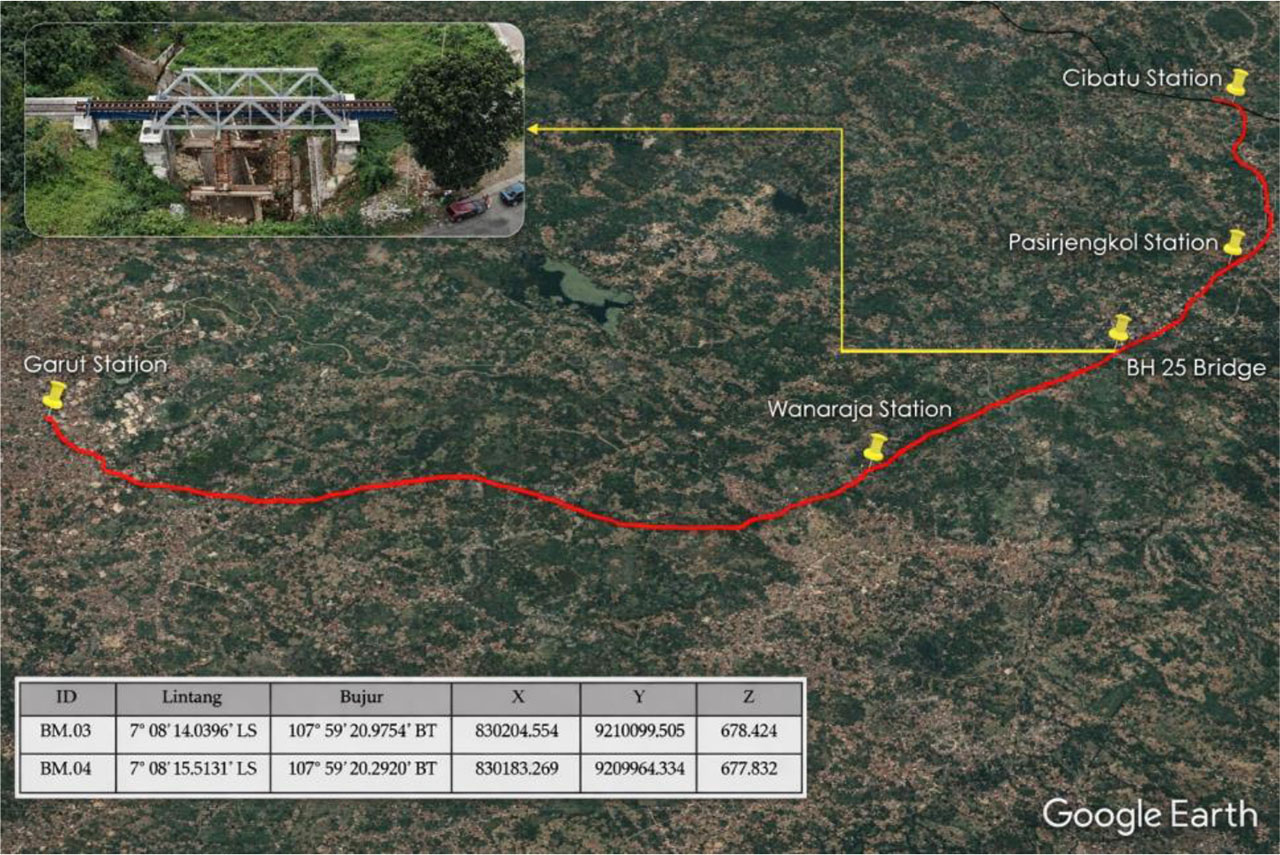
Figure 1:
Cibatu - Garut Railway Map
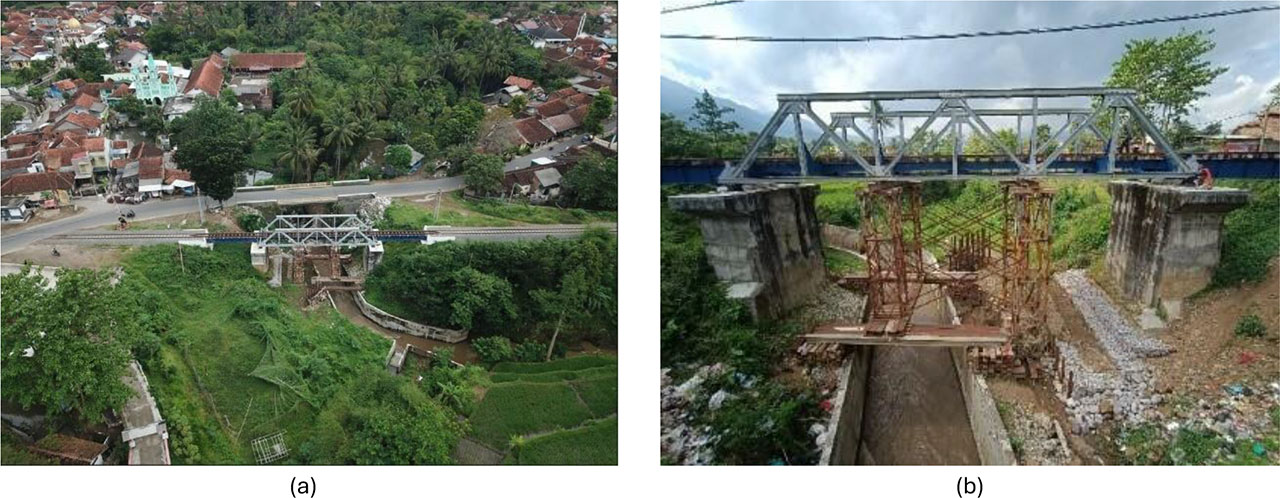
Figure 2:
(a) Aerial view of the bridge, (b) Steel structure of the bridge
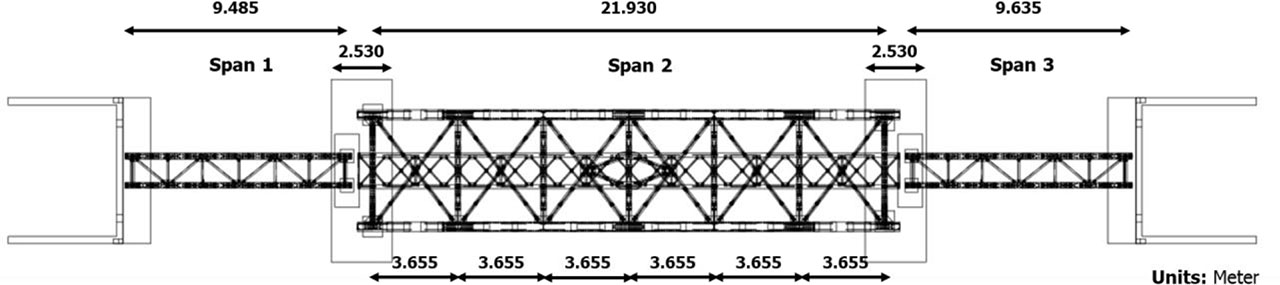
Figure 3:
Top view of the bridge
Table 2:
CC206 Locomotive specifications
| Technical data | |
| Locomotive | CC 206 13 21 |
| Power source | Diesel electric |
| Model | GE CM20EMP |
| Wheel specifications | |
| Whyte notation | 0-6-6-0 |
| AAR wheel setup | C-C |
| UIC classification | Co’Co’ |
| Dimensions | |
| Track width | 1.067 m (3 ft 6 in) |
| Length | 15.849 m (17 yd 1 ft 0 in) |
| Width | 2.743 m (3 yd 0 ft 0 in) |
| Maximum height | 3.695 m (4 yd 0 ft 0 in) |
| Axle load | 15 tons (15 tons length; 17 tons short) |
| Weight | |
| Empty weight | 88.2 tons (86.8 tons length; 97.2 tons short) |
| Ready weight | 90 tons (89 tons length; 99 tons short) |
| Performance | |
| Maximum speed | 160 km/h (44 m/s) Original Speed; 120 km/h (33 m/s) Operational Speed |
| Engine power | 1.680 kW (2.250 hp) |
| Tractive force | 248 kN (56.000 lbf) |
Table 3:
Dimension of bridge structure
| No. | Bridge Structure (A) | Span | Profil type | Truss Structure (B) | Profil type |
|---|---|---|---|---|---|
| 1 | Longitudinal girder | S1 & S3 | Steel joist 970.250.10.10 | Top & bottom chord | 2UNP 220.80.10 |
| 2 | Longitudinal girder | S2 | WF 425.170.18.10 | Vertical member | 2UNP 220.80.10 |
| 3 | Transverse girder (top) | S1 & S3 | 2L 75.75.8 | Diagonal 1 | 2UNP 220.80.10 |
| 4 | Transverse girder (bottom) | S1 & S3 | UNP 140.60.10 | Diagonal 2 | 2UNP 200.75.10.10 |
| 5 | Transverse girder (mid) | S1 & S3 | L 75.75.8 | Diagonal 3 | 2UNP 200.65.10.10 |
| 6 | Bracing (end) | S1 & S3 | 2L 75.75.8 | - | - |
| 7 | Bracing (bottom) | S1 & S3 | L 75.75.8 | - | - |
| 8 | Transverse girder | S2 | Steel joist 870.220.10.10 | - | - |
| 9 | Bracing (bottom) | S2 | 2L 60.60.8 | - | - |
| 10 | Bracing (top) | S2 | L 55.55.8 | - | - |
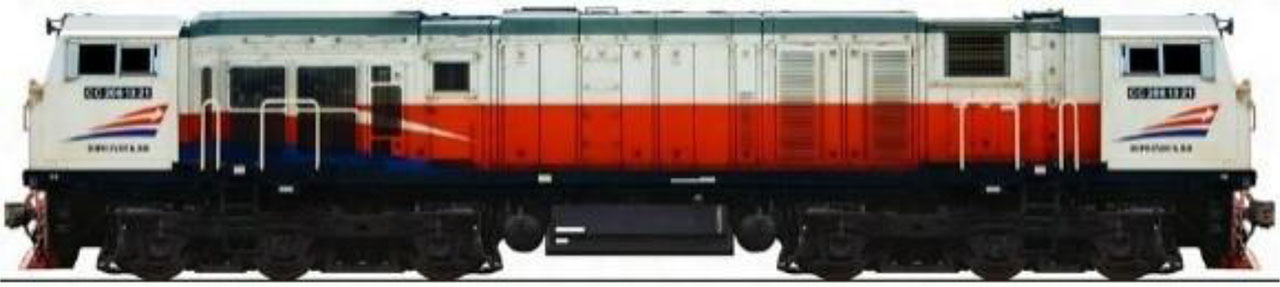
Figure 4:
CC206 locomotive used in the load testing program

Figure 5:
Static load scheme applied to Span 2 of the bridge
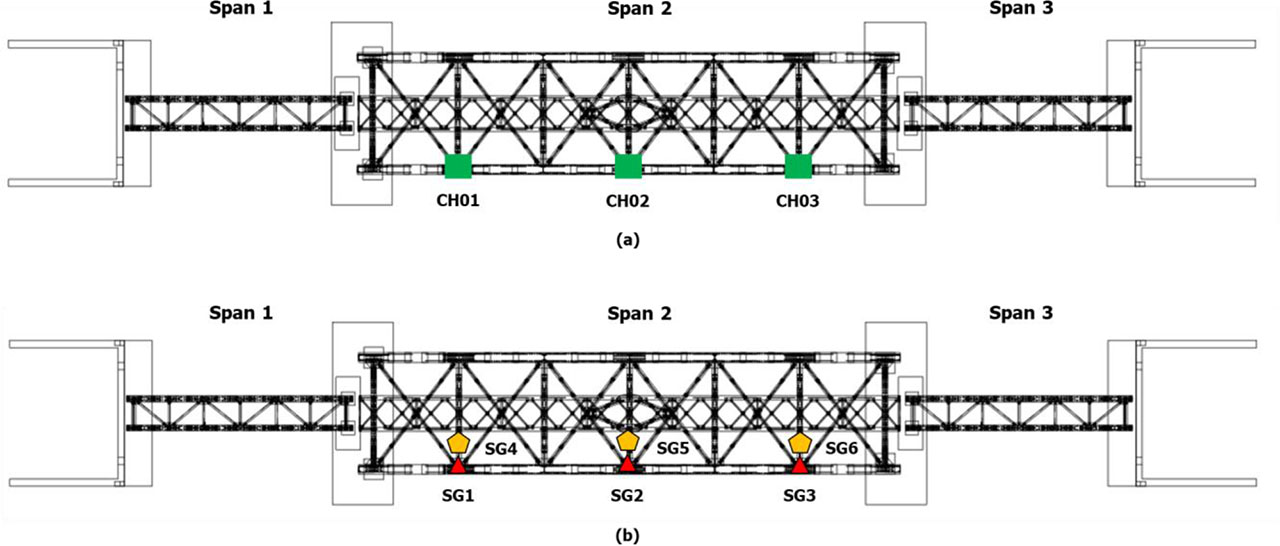
Figure 6:
(a) Installation of the LVDT sensor on the bridge superstructure; (b) Installation of the strain gauge sensor on the bridge superstructure

Figure 7:
Installation of accelerometer sensors on the bridge structure
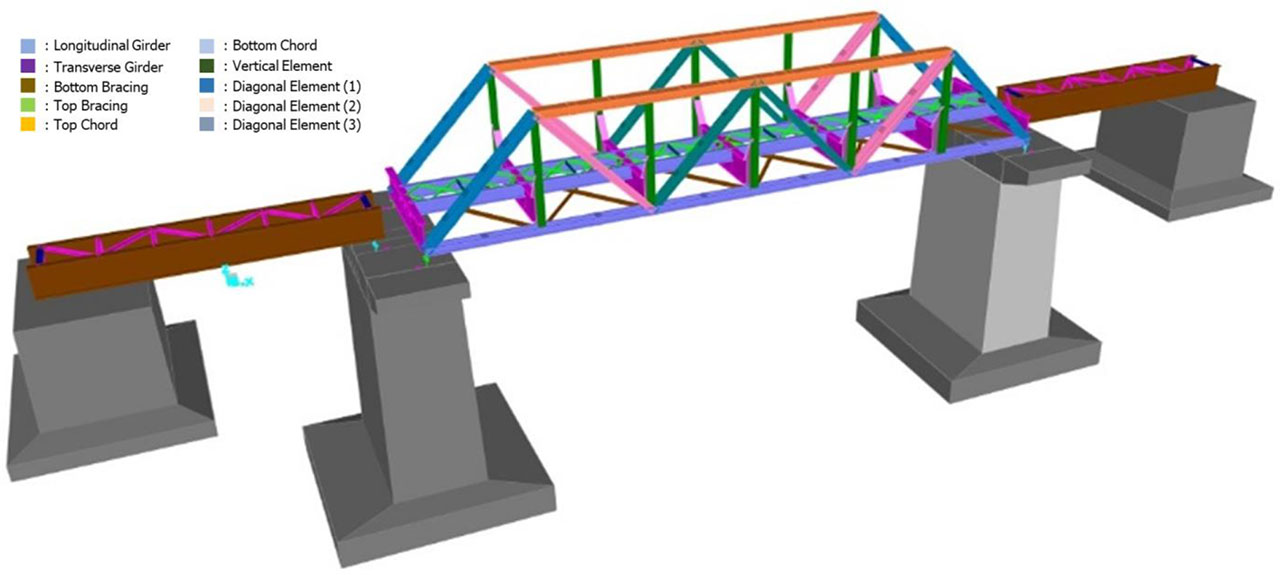
Figure 8:
Three-dimensional model of bridge structure
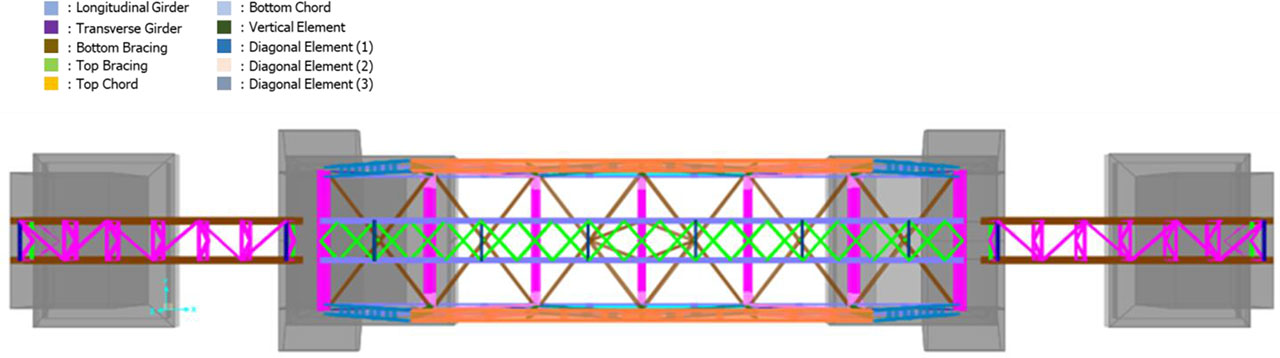
Figure 9:
Top view of the bridge structure model
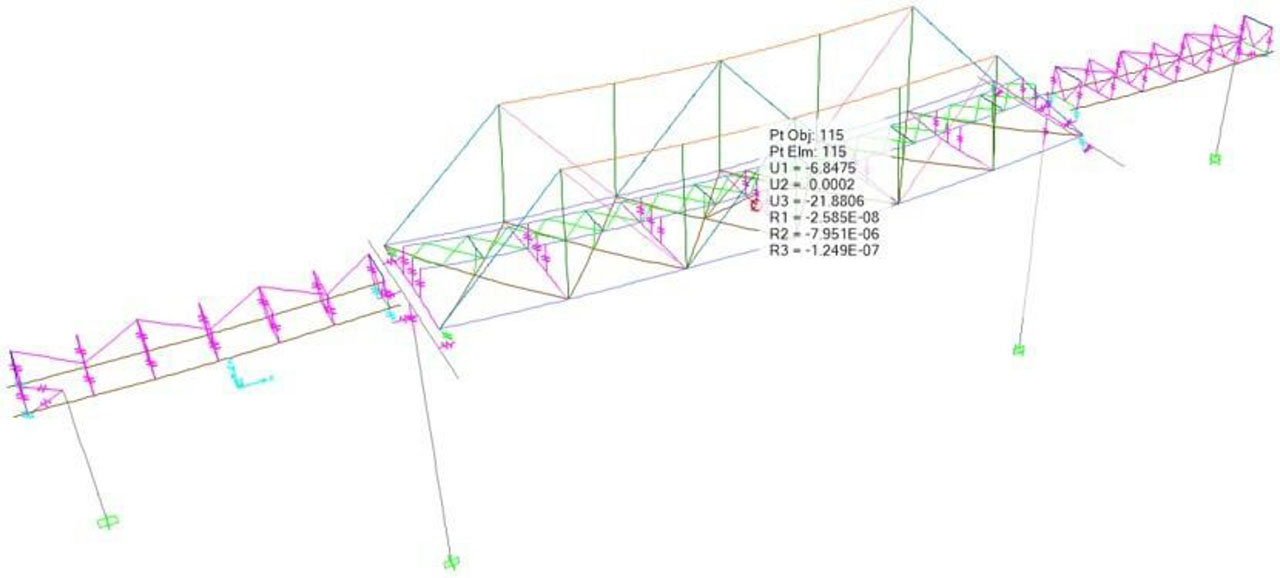
Figure 10:
Deflection at midspan (1/2L) of Span 2 under service load: ‒21.88 mm
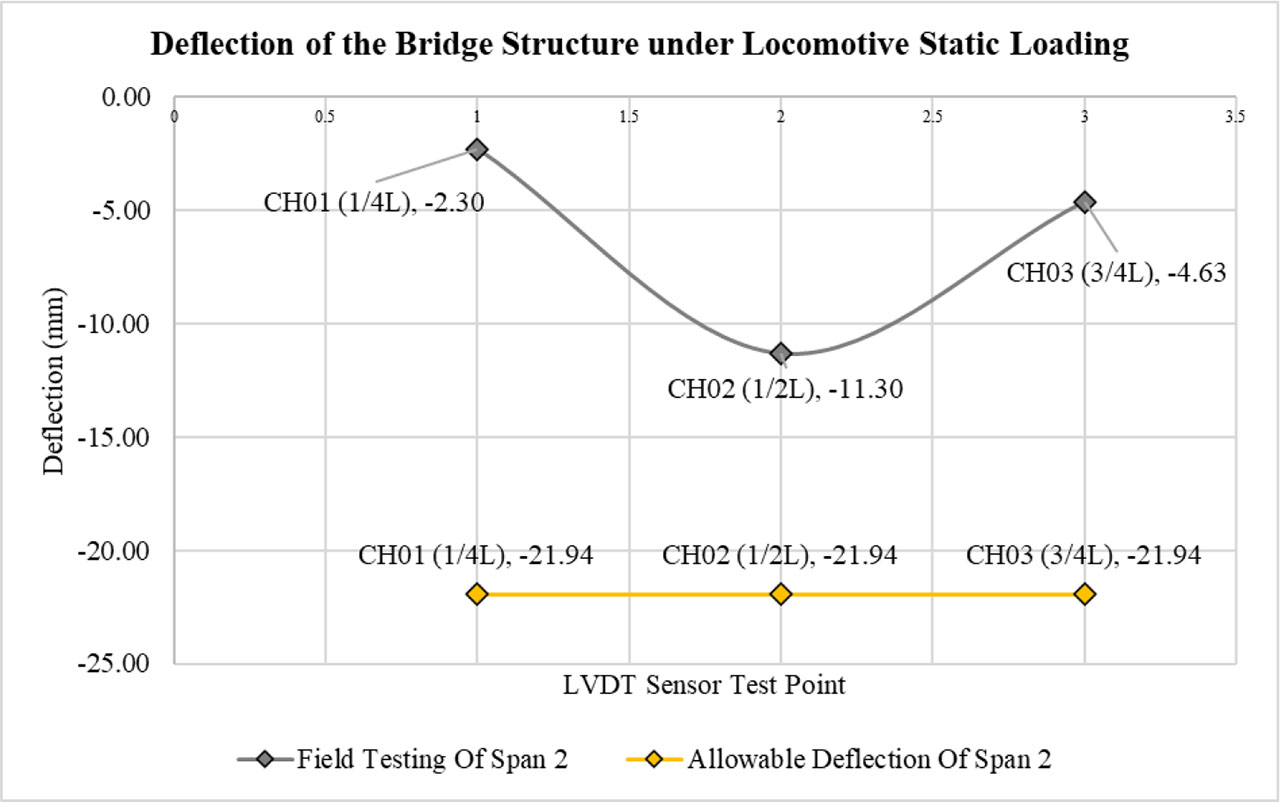
Figure 11:
Deflection of the bridge structure under locomotive static loading
Table 4:
Field vs. FEM comparison
| Parameter | Field measurement | FEM prediction | Difference [%] |
|---|---|---|---|
| Midspan deflection [mm] | −11.30 | −21.88 | 48.4% |
| Dominant frequency [Hz] | 14.65 | 14.98 | 2.25% |
Table 5:
Calculated strain values of the Span-2 bridge girder based on strain gauge measurements
| Field testing scheme | Static load [ton] | Testing points | Strain [mm/mm] |
|---|---|---|---|
| Static load B2 | 90,00 | SG1 (1/4L) B2 RB | 0.00026 |
| SG2 (1/2L) B2 RB | 0.00019 | ||
| SG3 (3/4L) B2 RB | 0.00056 | ||
| SG4 (1/4L) B2 RA | −0.00062 | ||
| SG5 (1/2L) B2 RA | −0.00051 | ||
| SG6 (3/4L) B2 RA | −0.00050 |
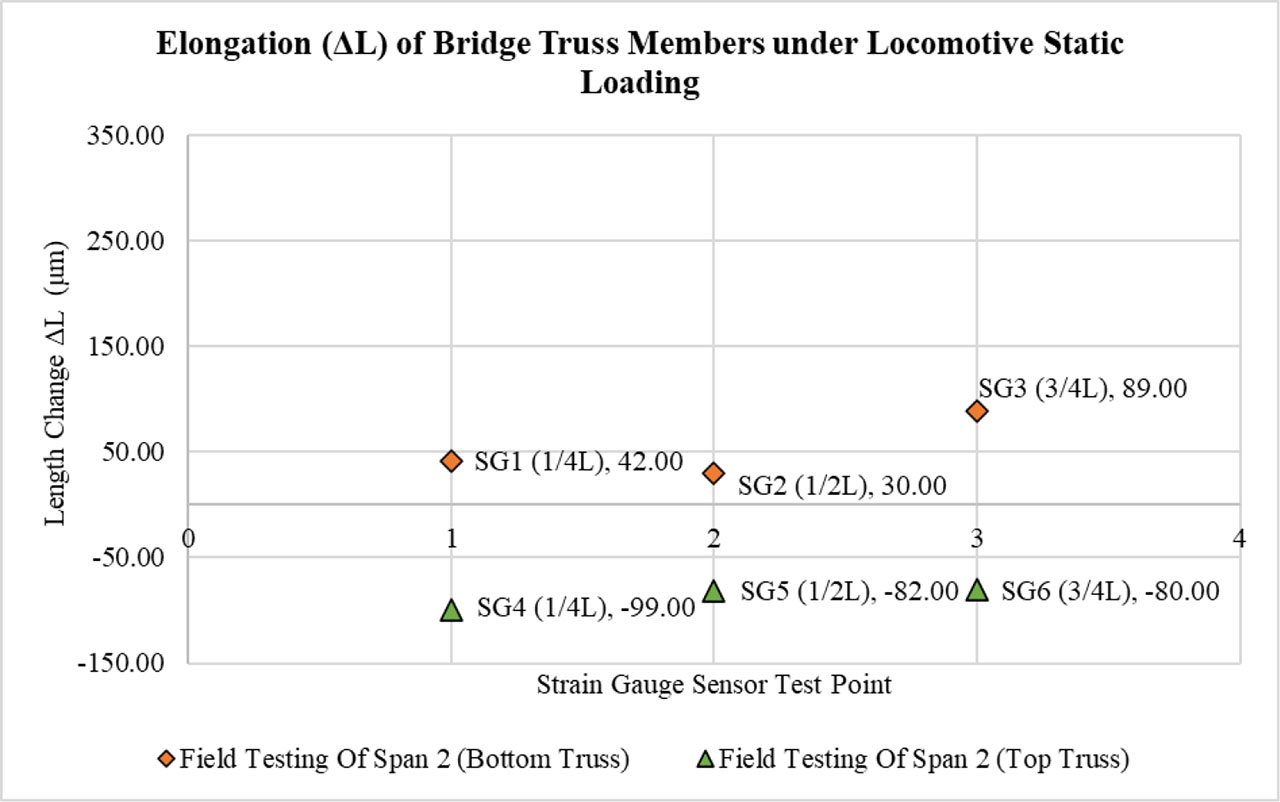
Figure 12:
Measured elongation (ΔL) distribution of the Span-2 bridge girder under static locomotive loading
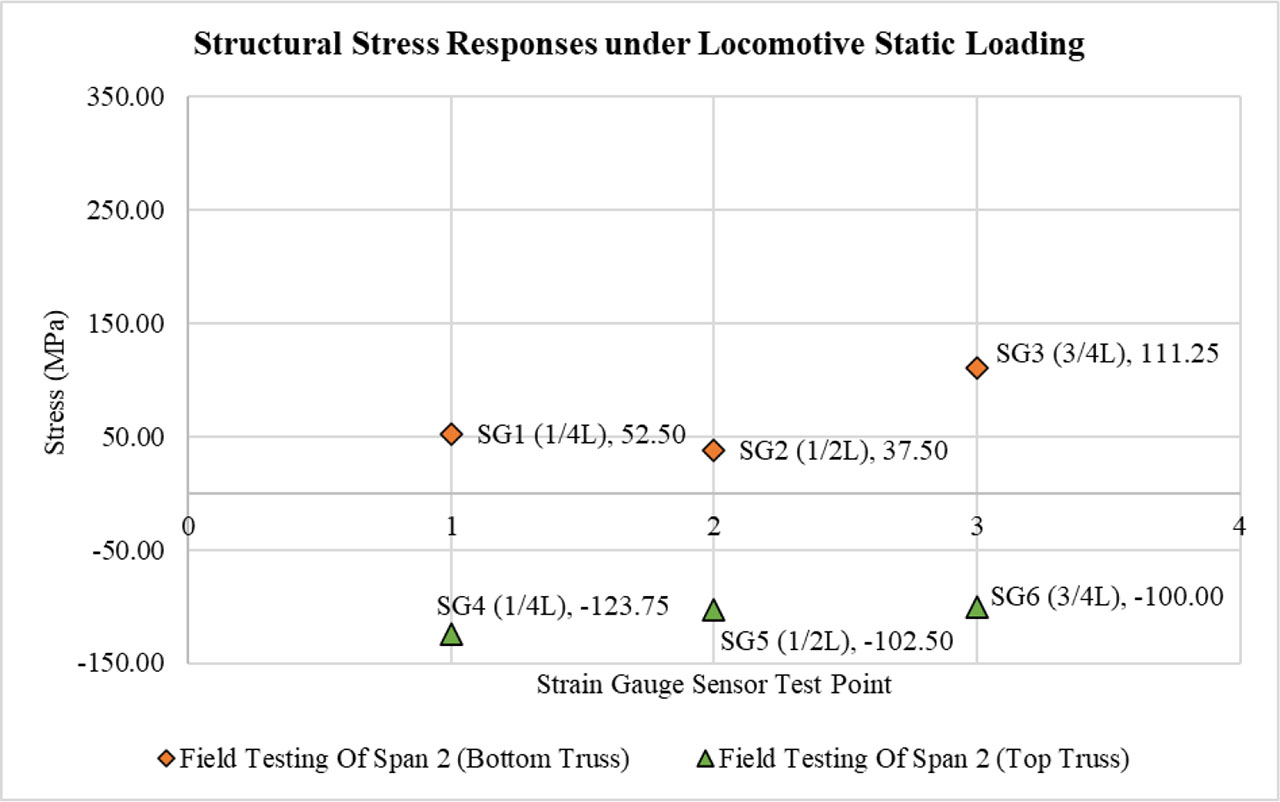
Figure 13:
Stress distribution of the Span-2 bridge girder derived from strain gauge measurements
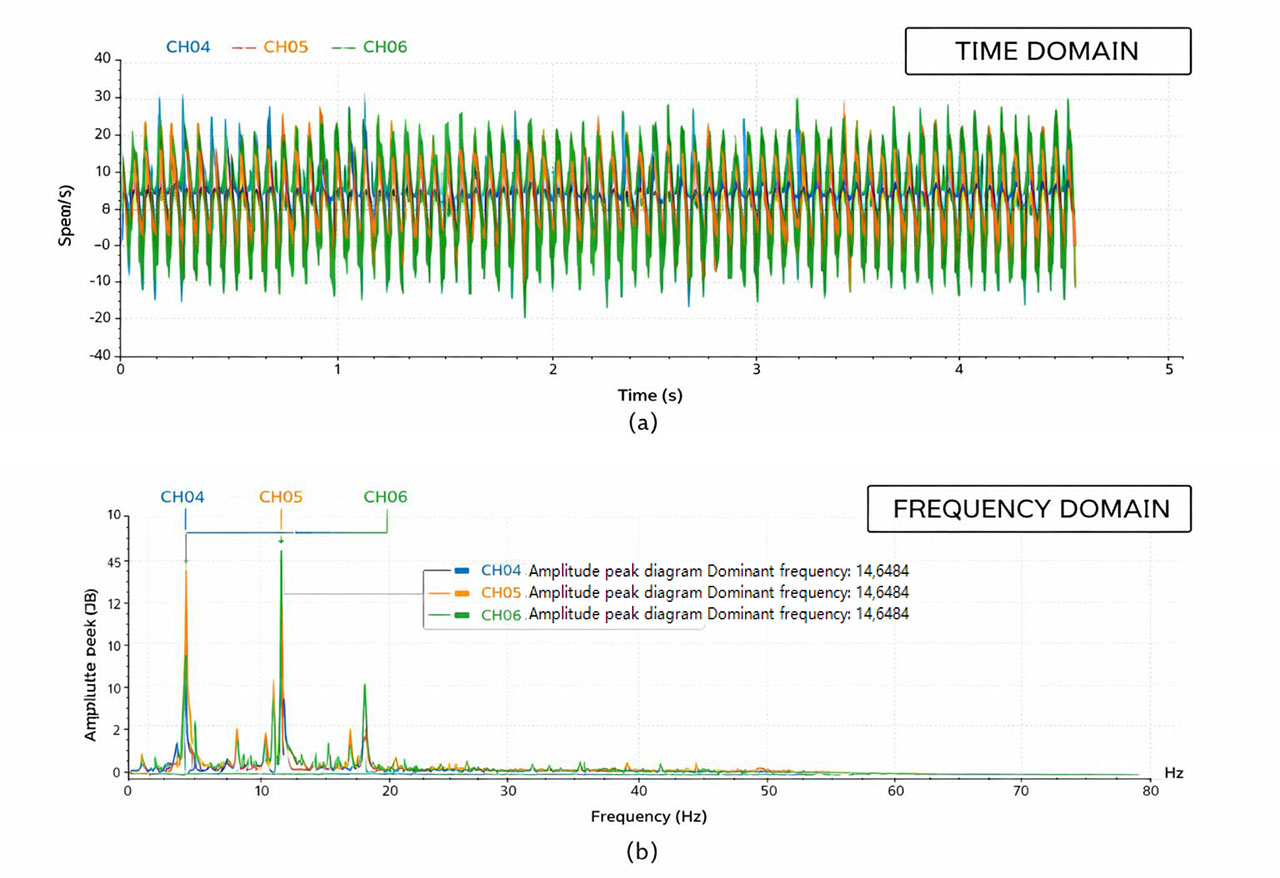
Figure 14:
Dominant vertical (z-Direction) frequency of the bridge girders: (a) Time-domain response; (b) Frequency-domain response
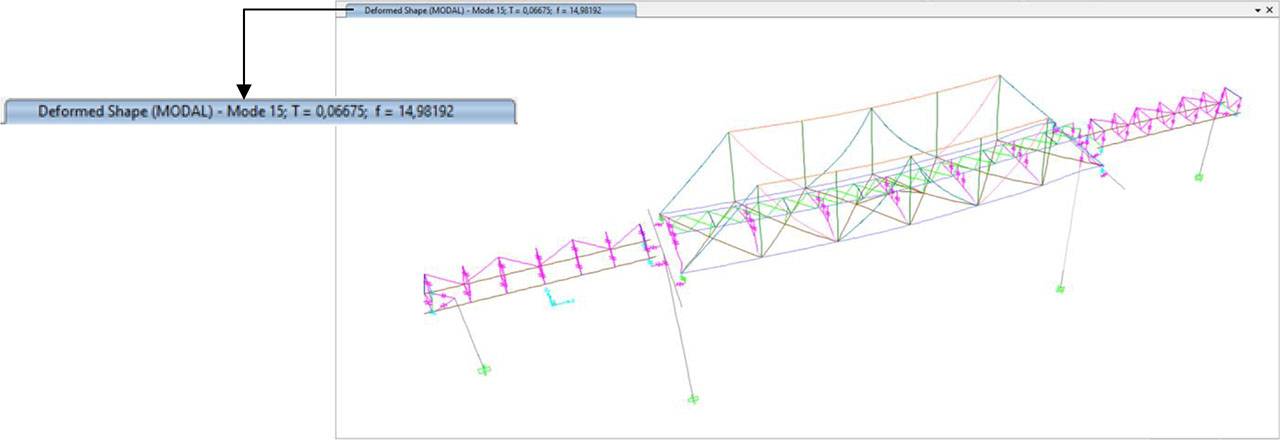
Figure 15:
Dominant vertical mode (Mode 15) of the bridge structure with a frequency of 14.98 Hz
Table 6:
Demand-to-capacity ratios of structural elements in Span 2 under governing load combinations
| No. | Structural elements | Profil type | Capacity ratio | Allowable capacity ratio | Description |
|---|---|---|---|---|---|
| 1 | Longitudinal girder | WF 425.170.18.10 | 0.597 | 1.0 | OK |
| 2 | Transverse girder | 870.220.10.10 | 1.683 | 1.0 | Not OK |
| 3 | Bottom bracing | 2L 60.60.8 | 1.045 | 1.0 | Not OK |
| 4 | Top bracing | L 55.55.8 | 0.579 | 1.0 | OK |
| 5 | Top chord | 2UNP 220.80.10 | 0.697 | 1.0 | OK |
| 6 | Bottom chord | 2UNP 220.80.10 | 2.856 | 1.0 | Not OK |
| 7 | Vertical element | 2UNP 220.80.10 | 0.620 | 1.0 | OK |
| 8 | Diagonal element 1 | 2UNP 220.80.10.10 | 0.571 | 1.0 | OK |
| 9 | Diagonal element 2 | 2UNP 220.75.10.10 | 0.476 | 1.0 | OK |
| 10 | Diagonal element 3 | 2UNP 220.65.10.10 | 0.122 | 1.0 | OK |
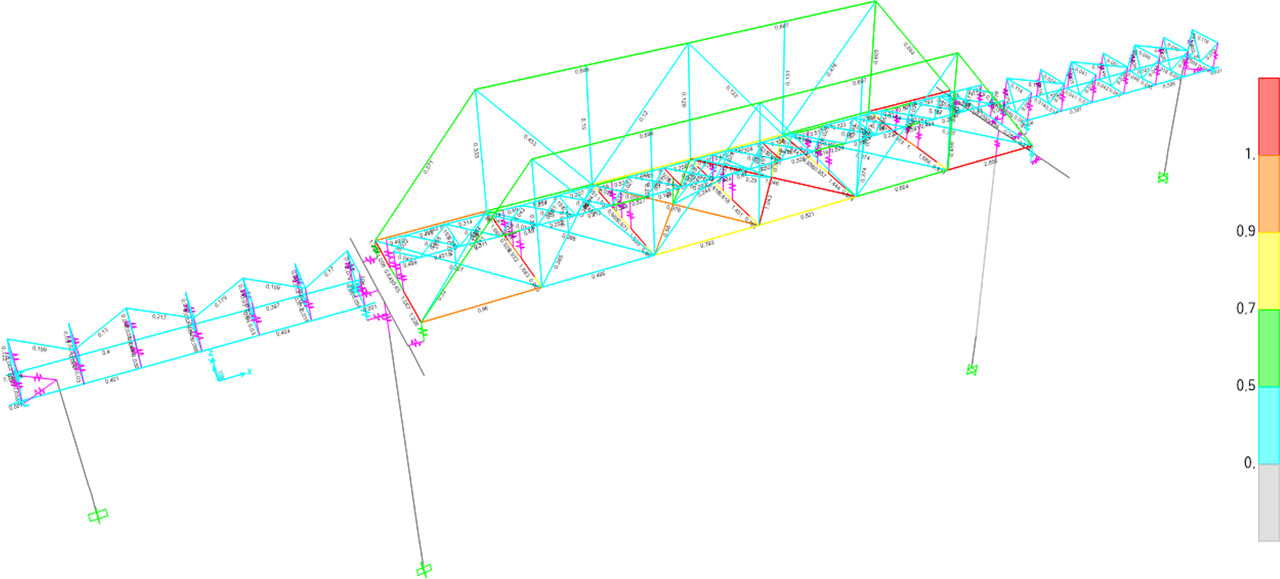
Figure 16:
Capacity ratios of the bridge structure elements
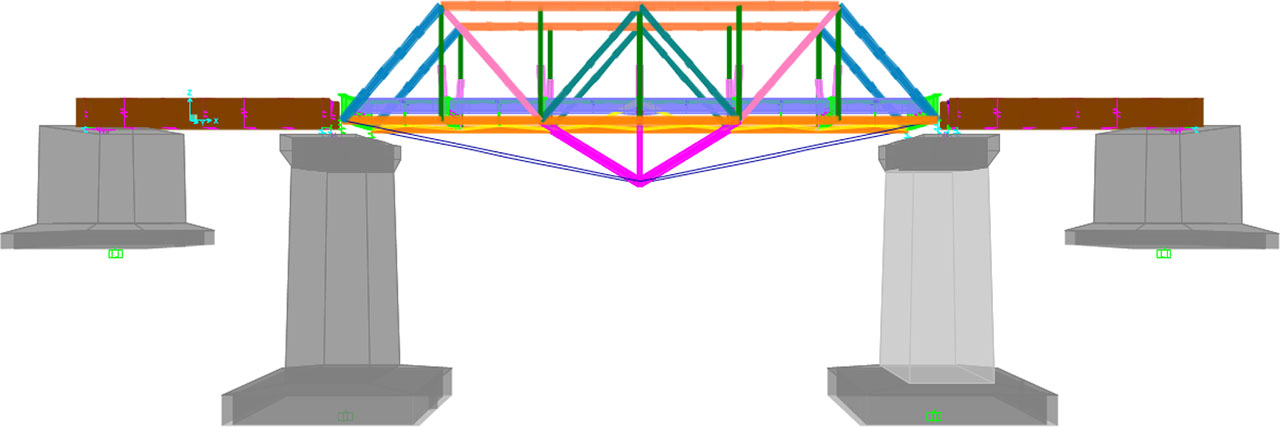
Figure 17:
Side view of the external prestressing reinforcement model of the bridge structure
Table 7:
Modelling criteria for bridge structure reinforcement
| Tendon diameter | 43.575 mm |
| Tendon area | 1491.334 mm2 |
| Strand type | 7-wire strand |
| Dimensions of deviator profile | H 200.200.8.12 |
| Prestressing force | 1942 kN |
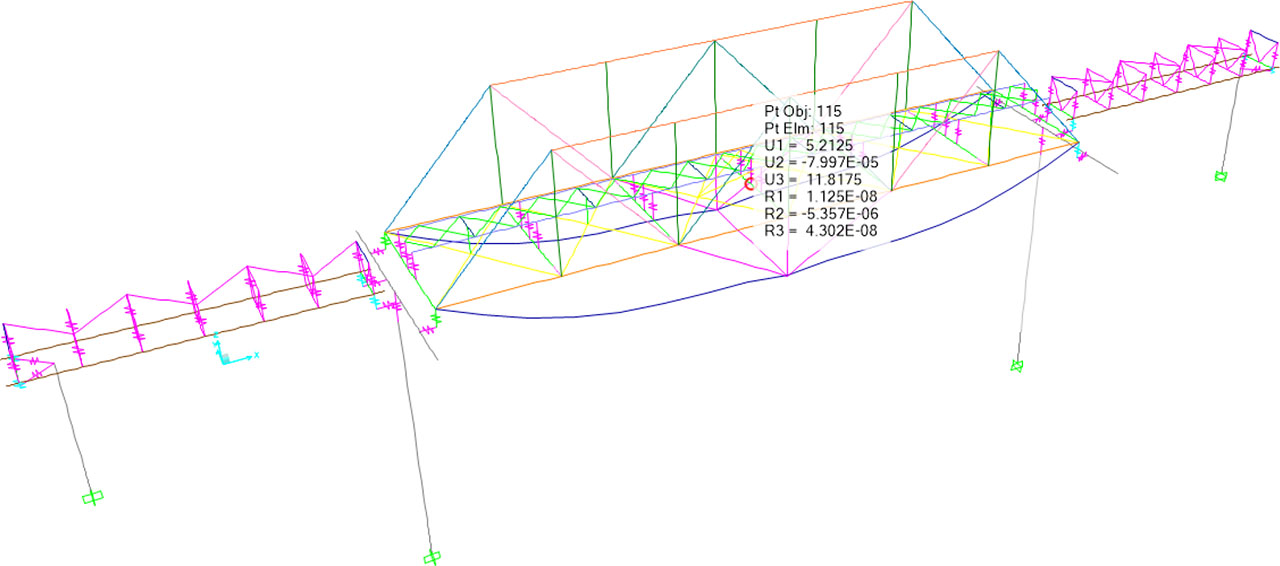
Figure 18:
Midspan (1/2L) deflection of the bridge structure after external prestressing under the load combination 1.0D + 1.0SD + 1.0PR
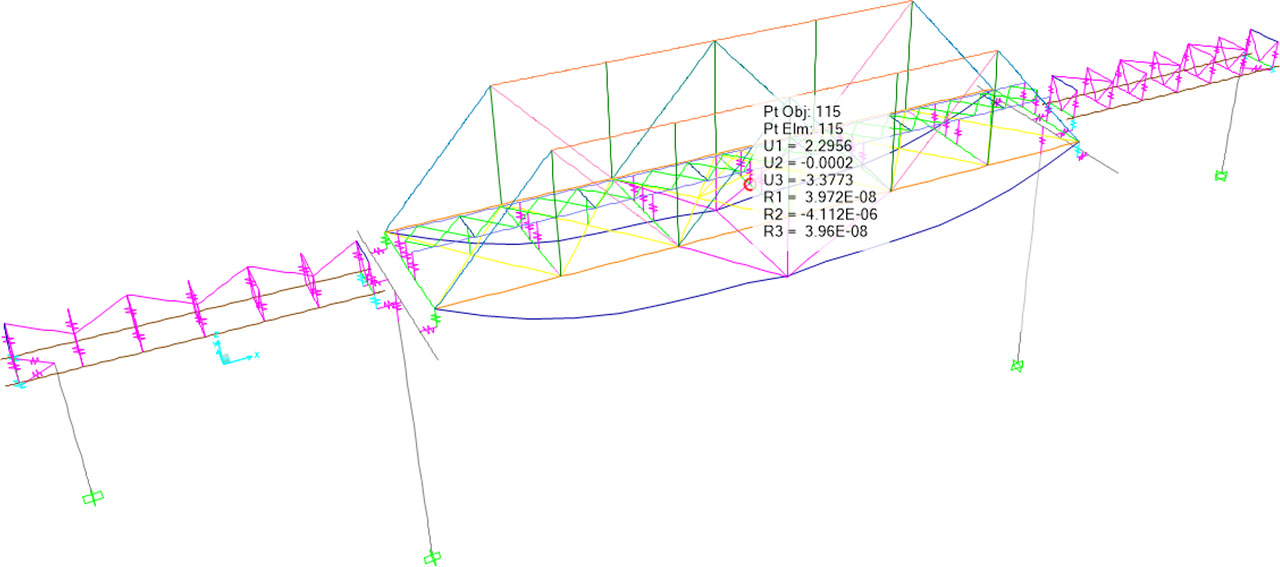
Figure 19:
Midspan (1/2L) deflection of the bridge structure after external prestressing under the load combination 1.0D + 1.0SD + 1.0LL + 1.0PR
Table 8:
Comparison of midspan deflections before and after external prestressing
| Description | Load combination | Deflection structure [mm] |
|---|---|---|
| 1/2L | ||
| Field testing | 1.0 D + 1.0 SD + 1.0 LL | −11.30 |
| External prestressing reinforcement | 1.0 D + 1.0 SD + 1.0 PR | 11.82 |
| 1.0 D + 1.0 SD + 1.0 LL + 1.0 PR | −3.38 |
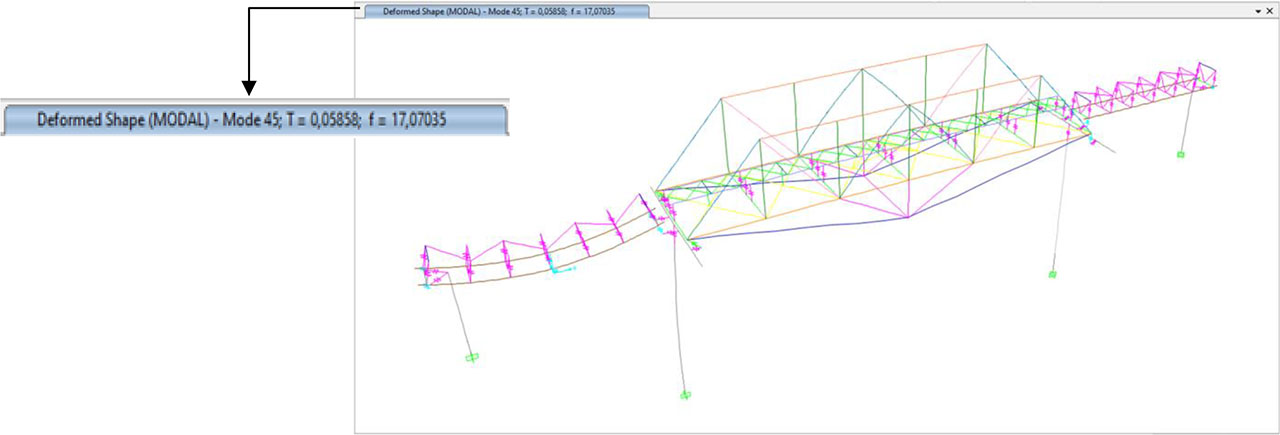
Figure 20:
Dominant vertical (z-Direction) vibration mode (Mode 45) of the bridge structure after external prestressing and plate reinforcement, with a frequency of 17.07 Hz
Table 9:
Capacity ratios of bridge elements after external prestressing and plate reinforcement
| No. | Structural elements | Profil type | Capacity ratio | Allowable capacity ratio | Description |
|---|---|---|---|---|---|
| 1 | Longitudinal girder | WF 425.170.18.10 | 0.570 | 1.0 | OK |
| 2 | Transverse girder | 870.220.10.10 | 0.975 | 1.0 | OK |
| 3 | Bottom bracing | 2L 60.60.8 | 0.677 | 1.0 | OK |
| 4 | Top Bracing | L 55.55.8 | 0.291 | 1.0 | OK |
| 5 | Top chord | 2UNP 220.80.10 | 0.334 | 1.0 | OK |
| 6 | Bottom chord | 2UNP 220.80.10 | 0.949 | 1.0 | OK |
| 7 | Vertical element | 2UNP 220.80.10 | 0.235 | 1.0 | OK |
| 8 | Diagonal element 1 | 2UNP 220.80.10.10 | 0.332 | 1.0 | OK |
| 9 | Diagonal element 2 | 2UNP 220.75.10.10 | 0.322 | 1.0 | OK |
| 10 | Diagonal element 3 | 2UNP 220.65.10.10 | 0.044 | 1.0 | OK |
| 11 | Deviator | H 200.200.8.12 | 0.542 | 1.0 | OK |
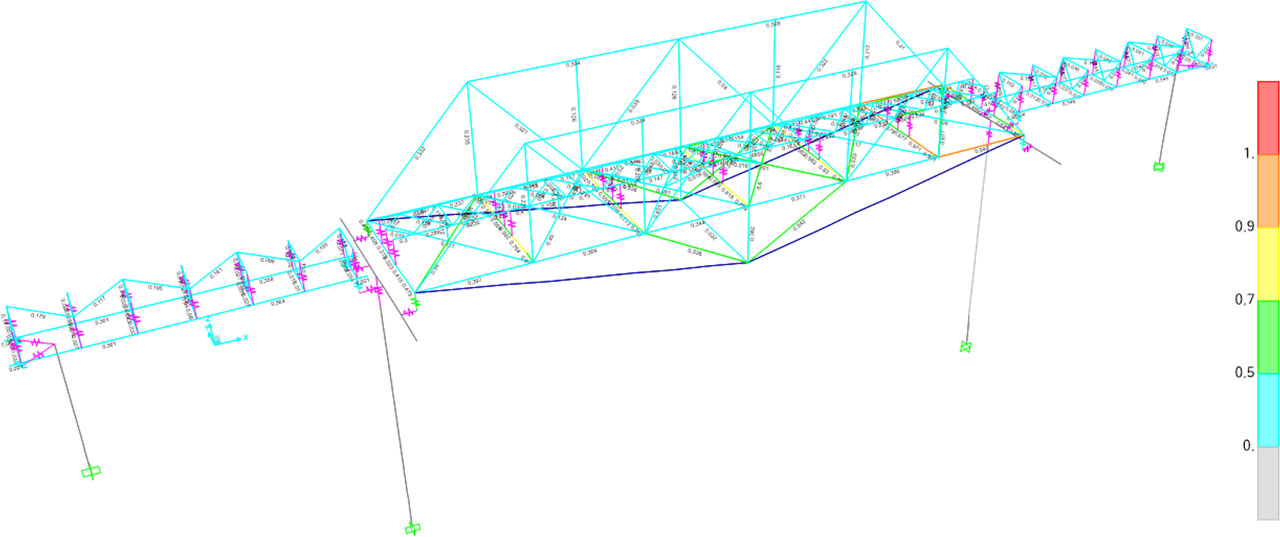
Figure 21:
Capacity ratios of bridge elements after external prestressing and plate reinforcement