
Introduction
The effective labeling of silicone molds in museum collections has presented challenges for decades. Existing labeling techniques either cannot be altered when mistakes are identified, suffer from issues with legibility, or are prohibitively expensive (see Background). The identification of a labeling technique that addresses these issues would therefore aid collections management professionals in organizing silicone molds and retaining the data associated with them. The purpose of this study was to determine whether labels administered with commercial tattoo equipment and archival ink could improve upon other labeling techniques by being a) theoretically longer lasting, b) easier to modify/replace when mistakes are identified, c) more legible, d) less expensive, and e) minimally damaging to the molds themselves.
The production of three-dimensional (3D) replicas of paleontological and anthropological specimens is frequently required for display, education, or research (Waters and Savage 1971: 123; Bene et al. 1983: 32; Davis et al. 1998: 233; Cerda et al. 2020: 20). Traditionally, the most widespread replication method has been molding and casting (Waters and Savage 1971; Kelly and McLachlan 1980; Bene et al. 1983; Waters 1983; Chaney and Goodwin 1989; Davis et al. 1998). Because a single mold can yield multiple casts (Davis et al. 1998: 233), it has been practical for institutions to maintain large collections of molds for future cast production. Producing a cast from a pre-made mold remains a quick, inexpensive way to produce a 3D replica (Waters and Savage 1971: 129–131). In recent years, however, the use of 3D imaging and printing to produce replicas has increased (Johnson and Carter 2019: 1). A high-quality 3D scanner can cost thousands or even tens of thousands of US$ (Otero et al. 2020: 3), a cost that is prohibitively expensive for many institutions. Photogrammetry and light detection and ranging (LiDAR) scanners, such as those in Apple’s iPad Pro, are inexpensive alternatives. However, the quality of photogrammetric models depends greatly on software, which can be expensive (Ziegler et al. 2020: 6), and the iPad’s LiDAR scanner’s error (± 1 cm absolute accuracy) is insufficient for detailed study (Luetzenburg et al. 2021: 2). A range of human, animal, and in vitro cell studies have also demonstrated various health risks associated with emissions produced by 3D resin printing, such as increased asthma risk, negative impacts on embryo development, and inflammatory responses (reviewed in Min et al. 2021). As a result of these cost and health concerns, many institutions continue to produce and/or maintain large collections of molds.
Any large collection necessitates careful labeling to maintain the accessibility and usability of its objects, and molds are no exception. Room temperature vulcanizing (RTV) silicone compounds are the preferred molding material owing to their capacity for detail, as well as their durability and longevity (Waters 1983: 37; Davis et al. 1998: 233). However, silicone molds have proven exceedingly difficult to label (Kelly and McLachlan 1980: 451–452). RTV silicone is hydrophobic (Chang and Gorur 1994: 266), and marker pigments fail to penetrate it effectively (Person and Baker 2007). This results in labels that can smear illegibly with minimal contact even when fully dry (Figure 1A). Impermanent labeling causes information loss, disorganization, and even unusability of objects over time.
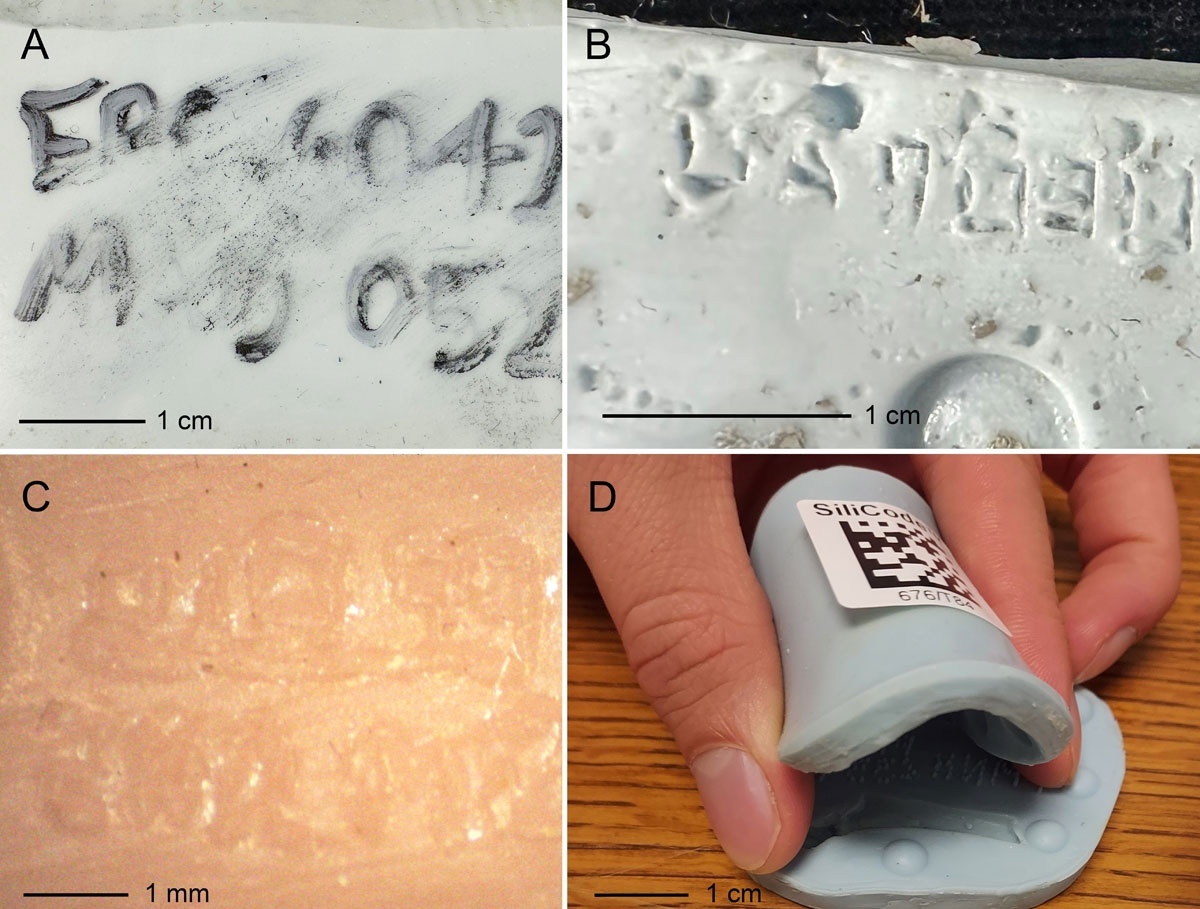
Figure 1
Issues with previous methods for labeling RTV silicone molds. (A) Marker label smeared illegibly. (B) Stamped label, which is legible but difficult to read. (C) Illegible stamped label. (D) SiliCode sticker separating from silicone during flexion of mold.
These issues were evident in a collection of over 700 RTV silicone molds of Late Cretaceous vertebrate fossils from Madagascar1 housed at the Denver Museum of Nature & Science (DMNS). Marker labels were often illegible, and stamped labels used inconsistent numbering and were occasionally illegible (see below). As a result, molds were difficult to find or associate with the specimens they were molded from. The organization and relabeling of the molds took place from 2023 to 2024, funded by the National Science Foundation (grant DBI-2242716) as part of the Madagascar Project’s goal of returning specimens to Madagascar. Tattoo label testing was conducted in collaboration with tattoo artists from Nest Art Collective in Wheat Ridge, Colorado.
Background
Historically, the most effective method for labeling silicone molds has been to ‘stamp’ text into the surface before the silicone sets (Waters 1983: 127; Person and Baker 2007). The mold maker typically writes or stamps the label into clay (Person and Baker 2007) or places a strip of label tape face up before the silicone is poured (Waters 1983: 127). Labels produced in this manner can be effective and long-lasting, but they are not always legible (Figure 1B–C). The inability to label a mold after it sets also creates problems when mistakes are made in the stamped label or when molds are made from specimens that have not yet been cataloged. In the DMNS collection, molds of uncataloged specimens are stamped with field numbers (rather than catalog numbers), which lead to inconsistency in the type of number used to identify each mold in the collection. To address these challenges, various authors have proposed methods to label silicone molds after the silicone has cured (Kelly and McLachlan 1980: 451–452; Davidson et al. 2006; Person and Baker 2007). These methods have varied in their effectiveness, and some have proven expensive to apply on a large scale.
Person and Baker (2007) tested a variety of methods to label molds and recommended the use of vinyl polysiloxane (VPS), applied with a dental syringe and subsequently allowed to set atop the mold’s surface. Although the VPS label withstood flexing and multiple removal attempts, Person and Baker (2007) reported that it was impossible to write in small characters. The present authors were unable to find vinyl polysiloxane available for purchase for less than US$80.00 per 100 mL. Assuming a single label requires at least 2 mL, this method costs over US$1.00 per label and is thus prohibitively expensive for large mold collections.
An additional alternative considered was SiliCode, a heat-transfer printed sticker designed for adhesion to silicone by Electronic Imaging Materials, Inc. A free sample of SiliCode stickers was acquired from the manufacturer’s website for testing. The adhesion of the stickers to the silicone was effective, but the edges separated considerably when the mold was flexed (Figure 1D), increasing the risk of the stickers dislodging and detaching. Edge separation during flexion is especially problematic because flexion of molds is necessary to dislodge casts and original fossils from them safely. Additionally, the cost of 300 pre-printed SiliCode stickers was quoted by the manufacturer at US$408.00. Purchasing a heat-transfer printer to print stickers on blank SiliCode sheets in-house was considered as a cost-lowering alternative, but even a low-end heat-transfer printer costs several hundred US$.
Kelly and McLachlan (1980: 451–452) incised labels into molds with a scalpel and rubbed ink into them. Similarly, Davidson et al. (2006) tattooed labels into silicone molds with sharp hand tools and India ink. However, the use of a rotary tattoo pen to apply labels has not previously been reported in the literature. In this study, the authors qualitatively evaluate a methodology for applying labels to silicone molds with commercial tattoo equipment and archival ink based on five criteria: theoretical longevity, modification, legibility/size, cost, and damage (see Methods for further description).
Materials
Initial materials
Tattoo labels were tested on the Madagascar mold collection held by DMNS, including molds composed of three different products: 1) Dow Silicone HS III, 2) Silicones, Inc. GI-1000, and 3) Silicones, Inc. GI-1100 with GI-2020A catalyst. The majority of these molds had either the catalog or field number stamped into them as described above, which permitted identification of additional label information from electronic databases in most cases. Some were unlabeled or illegible, and these had to be identified by physically matching the molds with their original specimens. Molds were selected for tattoo label testing based on size (between 5 cm and 15 cm in width) to ensure they were large enough to receive all three lines of label text, but small enough to facilitate transport and photography.
Initially, the WTK085 tattoo pen kit2 from Wormhole Tattoo Supply was purchased for US$32.99. The kit included a rotary tattoo pen (Wormhole C3-C), RCA cord, power cords, and a foot pedal. It also included ten needle cartridges, 40 tattoo ink cups, one pair of nitrile gloves, one sheet of faux practice skin, one piece of tattoo transfer paper, and eight bottles of tattoo ink of various colors. The tattoo pen was made of an aluminum alloy, with a recommended working voltage of 6–8 volts, a stroke of 3–5 mm, a 1–4.5 mm needle depth, and a weight of 6.2 oz. The included needle cartridges comprised five each of 5RM (round magnum) and 5RL (round liner), where five refers to the number of individual sharps constituting the entire needle cluster. Three five-fl.-oz. bottles of Ranger Archival Ink in Jet Black3 were also purchased for US$4.49 each.
Expanded materials
After initial tests with the materials described above, licensed tattoo artist and coauthor L. D. Bird contributed additional products for evaluation, including an FK Irons Spektra Flux 2 tattoo pen (approximately US$1,100 with extra battery)4 and a series of round liner needle cartridges. Tattooing needles are available in two forms: cartridge and on the bar. The rotary tattoo machine used in this project is compatible only with needle cartridges. Cartridges are available in a variety of configurations; 7RL, 5RL, and 3RL needles were tested for this project (Figure 2). Needle spacing also differs between cartridges: configurations include regular, tight, and bugpin, with regular denoting the most spacing between needles and bugpin denoting the least (Figure 2). Needle cartridges are labeled on the back of the package and on the cartridge itself for identification of the configuration. Package labels indicate the number of pins in each needle grouping and their arrangement. The cartridge itself bears only the number of pins, labeled near the reservoir opening.
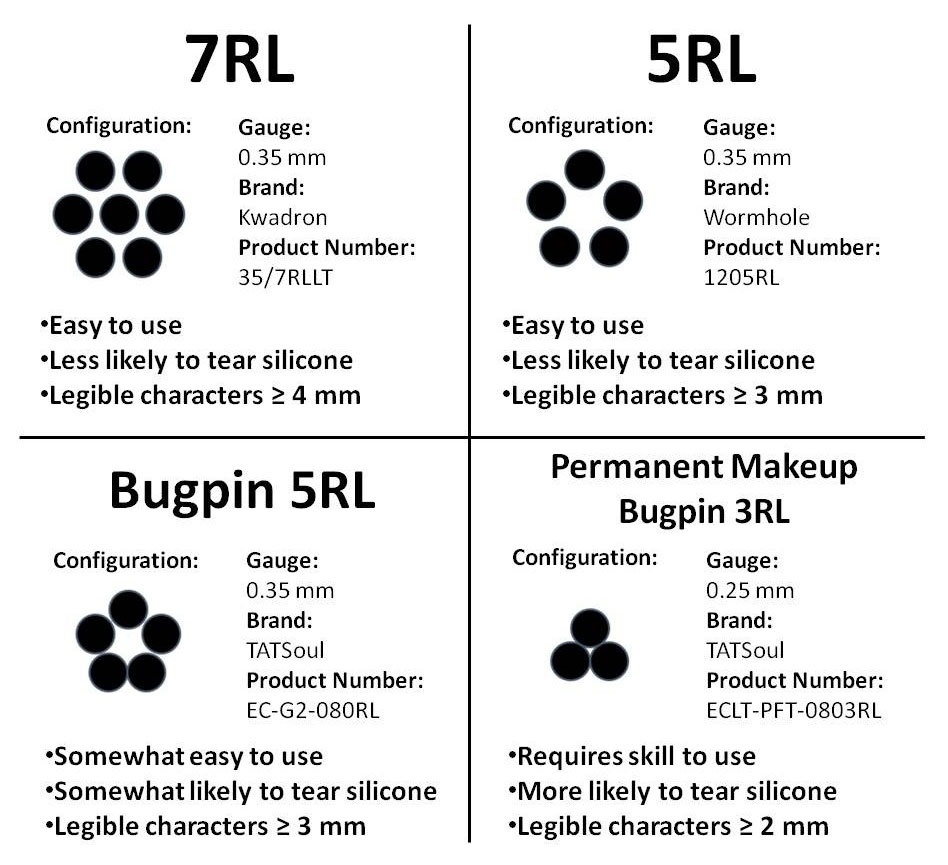
Figure 2
Needle cartridge configurations, product information, and results.
Additional tattoo station materials
In addition to the tattoo machines and needle cartridges described above, supplementary materials were employed in the final tattoo setup for the silicone molds. Plastic wrap was used to create an easy-to-clean surface. Self-adhesive bandage wrap was applied to the tattoo machine handle to improve grip comfort. Paper towels and alcohol (isopropyl alcohol or ethanol) were used to wipe away excess ink. Petroleum jelly was used to prevent ink from smearing on the mold. Tattoo ink cups (included in the kit) were used to hold the ink. Sandbags were used to support wrists. Gloves and lab coats were worn to protect skin and clothing from ink. Several additional materials proved useful for increased comfort but were not essential to the final process used at DMNS. These included craft sticks for applying the petroleum jelly, a headlamp or flexible desk lamp for increased visibility, and stencils for letters and numbers.
Methods
The evaluation of this method was divided into four phases: initial testing, expanded experimentation, refinement of the tattoo procedure, and implementation.
Initial testing
Prior to tattooing on molds, labeling practice was conducted on the faux skin provided in the tattoo kit. This skin is similar to the mold materials but is much thinner, more flexible, and less oily. Practice was then conducted on a discarded piece of Silicones, Inc. GI-1000 RTV silicone. Voltage was tested by tattooing at settings ranging from 3 to 7 volts. Depth was tested by adjusting needle penetration within the silicone between 0.5 mm and 3 mm. Speed was tested by applying test labels at different rates. After each test, the quality of the tattooed text and the condition of the silicone were assessed to determine the appropriate range of voltage, depth, and speed. This process also helped determine how well the ink adhered to the mold material, and whether the archival ink could serve as a substitute for tattoo ink. Best practices determined by this process are described below. Once this process was refined, tattooing began on the mold collection itself.
During and following initial experimentation, the tattoo labels were qualitatively compared with one another and with existing labeling techniques across five distinct criteria: theoretical longevity, modification, legibility/size, cost, and damage. Longevity on a scale of years or decades was impossible to assess at this time, but labels were considered more theoretically long-lasting if they were created using archival ink or another permanent technique, and if they withstood multiple attempts to manually flex the mold or wipe the label away. Modification referred to the label’s potential to be altered, replaced, or supplemented after the construction of the mold. Legibility/size was evaluated based on how consistently readable labels were, as well as how small they could physically be while maintaining legibility. Cost was evaluated using quantitative estimates based on material and supply expenses. Finally, damage was assessed based on whether the mold was physically harmed during the labeling process, and whether such harm could affect future use. Extensive flexing of the mold after label application served as a proxy for future use in casting, since flexing the mold is necessary to remove the cast.
Expanded experimentation
With the assistance of professional tattoo artists, the methods resulting from the initial testing were further evaluated on the three different types of RTV silicone described in the Materials section. All three tests were performed at 5.5 volts with the Wormhole C3-C pen and a 5RL needle cartridge. Tests were also conducted with three additional needle types: a 7RL, a bugpin 5RL, and a permanent makeup 3RL (Figure 2). Owing to the limited availability of molds composed of Silicones, Inc. GI-1100 with GI-2020A catalyst, these cartridge tests were conducted only on Dow Silicone HS III and Silicones, Inc. GI-1000. All six needle cartridge tests were performed at 5.5 volts with the FK Irons Spektra Flux 2 tattoo pen. Each test label was evaluated using the five criteria described above.
Final tattoo procedure
To prepare each tattooing session, the tattooer donned nitrile gloves and a lab coat, secured a sheet of plastic wrap to the table surface where the tattooing would take place, filled an ink cap with archival ink, and tore several sheets of paper towel into two or more pieces for ease of access (Figure 3). Additional materials were arranged in the working area, including petroleum jelly, the bottle of archival ink, the bottle of isopropyl alcohol or ethanol, and the tattoo machine and needle cartridges (Figure 3). The machine was connected and set to 5–6 volts, with the foot pedal positioned nearby, underneath the table.5 Self-adhesive bandage tape was applied to the tattoo machine for grip and replaced every 10–15 hours of use as it deteriorated.
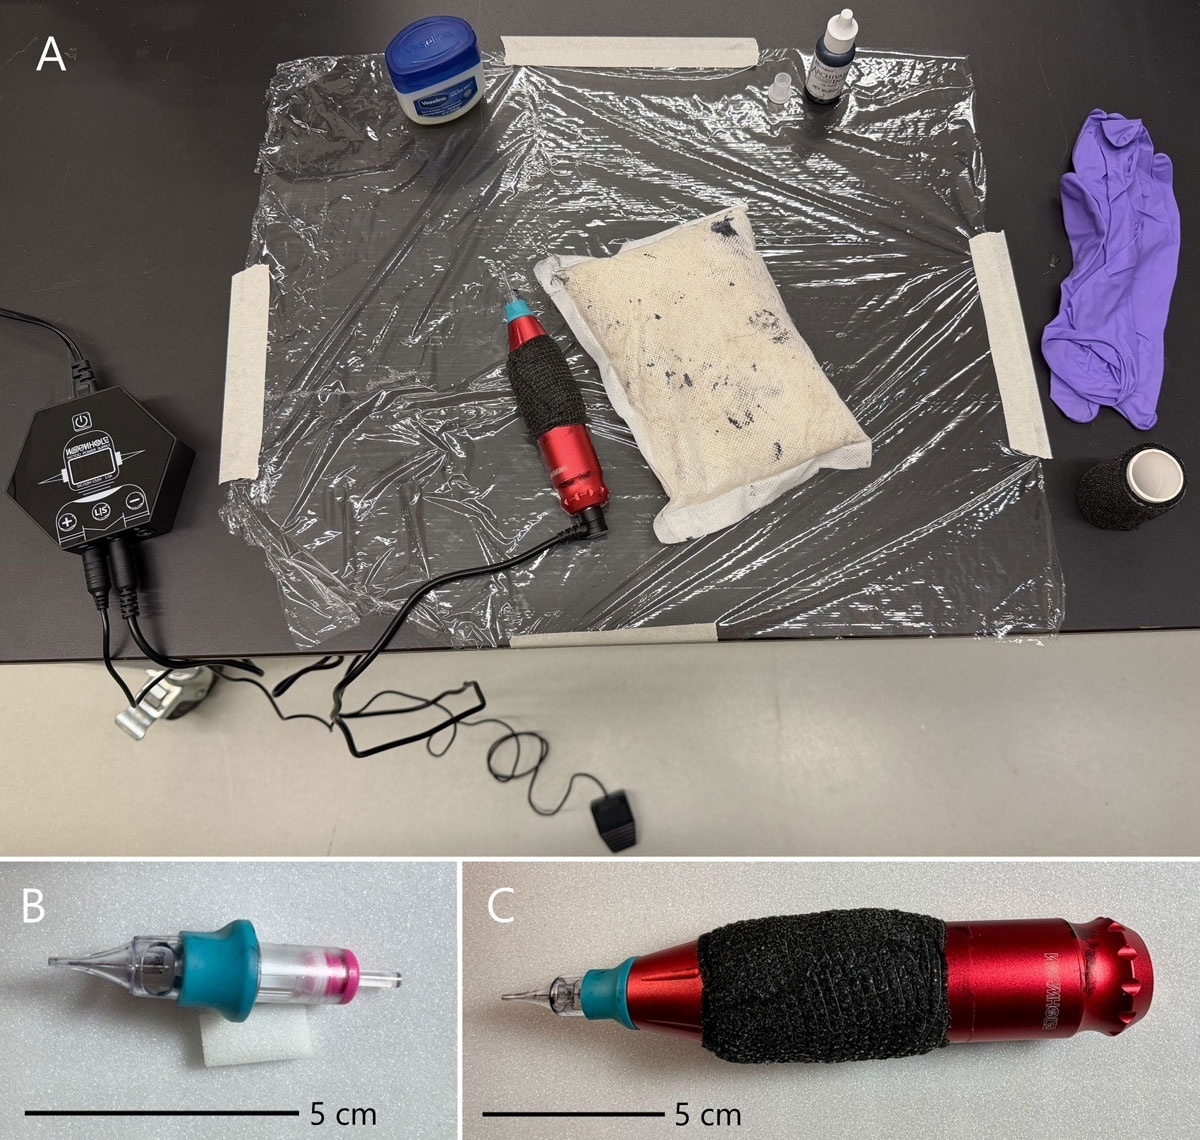
Figure 3
Setup and equipment for tattoo labeling RTV silicone molds. (A) setup includes plastic wrap to prevent ink staining, easily accessible paper towel, archival ink, and petroleum jelly, an ink cap filled three quarters with ink, a sandbag or similar object for wrist support during labeling, nitrile gloves, and a pen-style tattoo machine with a round liner (RL) cartridge. Tattoo machines vary; the one pictured is operated by a foot pedal on the floor. Voltage and other adjustments are made with buttons on the small hexagonal piece set to the left of the main work station. (B) close-up of round liner needle cartridge. The left end is inserted into the tattoo pen and twisted until locked in place. See Figure 2 for more detail on types of RL cartridges. (C) Wormhole C3-C pen machine with round liner needle cartridge inserted. Machine is wrapped with elastic bandage to reduce vibration and increase comfort and grip for the user.
Prior to tattooing, the mold was examined to identify the thickest portion of silicone suitable for labeling. Based on the size of the mold, an appropriate needle configuration was selected, and the cartridge was inserted into the tattoo machine and twisted until locked in place. The selected surface was cleaned with isopropyl alcohol or ethanol and covered with a thin layer of petroleum jelly to guide the ink into the perforations and reduce splatter. The tip of the needle was then dipped into the ink while the tattoo pen was running, without striking the bottom of the cup. To ensure that each number and letter was adequately saturated with ink, the needle was re-dipped into the ink every two to three characters. During tattooing, the pen was held at a 60°–90° angle from the mold, with wrist stability maintained using sandbags to establish three points of contact with the arm. To avoid damaging the silicone, a penetration depth of 1.5–2 mm was used, and the machine was operated at 5–6 volts. Labels were tattooed by pulling the machine in the same manner as one would pull a pencil (Figure 4).
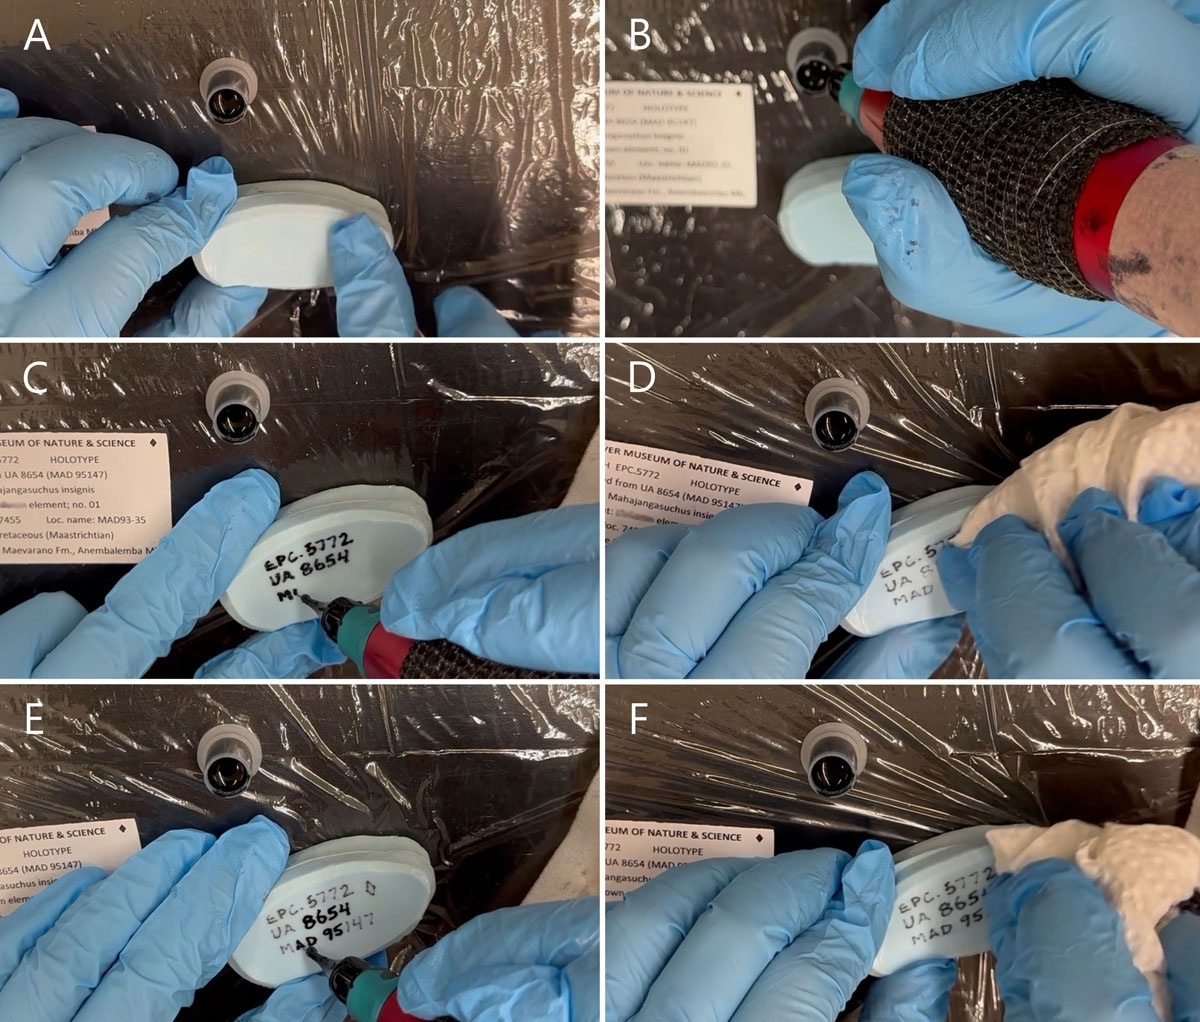
Figure 4
Process of applying tattoo label to RTV silicone mold. (A) If dirty, silicone surface is cleaned with a paper towel and alcohol. A thin layer of petroleum jelly is applied across the label surface with a finger to guide the ink into the surface and reduce splatter. (B) The machine is started at 5–6 volts (some machines are operated by foot pedal, others by button). The needle tip is dipped into the ink cap while running. It is best not to strike the bottom of the ink cap, as this can lead to a dulled, barbed, or separated needle grouping, which produces frayed or unstable lines. (C) Characters are written by pulling the machine as one would pull a pencil, but held more vertically than a pencil. Movement speed should be slow enough to form a solid line, but not so slow as to shred the silicone. The needle tip should penetrate 1.5 to 2 mm into the silicone. The needle is redipped in the ink cap every few characters to ensure sufficient ink coverage. (D) Petroleum jelly and excess ink are removed with a firm but gentle wipe with a paper towel. The label is assessed for quality. (E) If any lines are deemed too light, additional petroleum jelly is applied and the characters are written over a second time. (F) A final paper towel wipe is used to clean the surface of the silicone.
Each label consisted of three rows of information: the newly assigned catalog number of the mold, the catalog number of the original fossil, and the field number of the original fossil. Additional information was included as necessary, such as a small diamond symbol on the margin of the label to denote holotype status. Both the practice of writing temporary guide labels with markers before tracing them with the tattoo pen and freehand application were tested. Freehand application was determined to be preferable, as it was less time-consuming and produced equally legible labels.
After tattooing each label, the excess ink and petroleum jelly were wiped away with a paper towel to assess the result. If any characters appeared too light to read, petroleum jelly was reapplied and the characters were tattooed over. This process was repeated until the label was deemed legible, at which point the area received a final wipe with isopropyl alcohol or ethanol to remove residual ink and petroleum jelly.
Upon conclusion of the tattoo session, the needle cartridge and ink cap were rinsed with isopropyl alcohol or ethanol over paper towel in the tattooing area for reuse.6 The plastic wrap, nitrile gloves, and paper towel were disposed of.
Implementation
At the outset of the project, molds were labeled with the Wormhole C3-C by one or two staff members at a time in one- to two-hour sessions, with new staff members occasionally receiving training in the process. After working with tattoo artists to finalize the above procedure, it was recognized that their expertise could be leveraged to expedite completion of the labeling project. Volunteers provided their own tattoo machines and needle cartridges, so this approach also provided access to higher-quality, more expensive equipment and materials, which normally require a tattoo license to purchase. To label large numbers of molds at a time, three- to four-hour labeling sessions were hosted at the museum with two to five tattoo artists and one to three staff members at a time. Each participant received instruction from museum staff before beginning to label and was provided with a paper reference guide for formatting. Early label attempts by artists and staff alike often resulted in tearing of the silicone, so quality checks were performed until each participant had adapted to the material.
The final labeling session at DMNS also served as a public science event. Five tattoo artists labeled molds on the museum floor, providing visitors with the opportunity to interact with them and ask questions. Original specimens were displayed, and attendees were educated about the use of silicone molding. Approximately 300 molds were labeled, and 402 visitors interacted with the event over the course of three hours. The collaboration with local tattoo artists contributed substantially to the success of both this method and this project.
Safety considerations
The inherent risks associated with the use of rotary tattoo pens are described below, along with appropriate measures to prevent and mitigate injury. Institutions purchasing their own machine from Amazon or another vendor should be aware that these types of cost-effective machines are not formally rated for use on humans, because the motor housing does not permit proper disassembly and cleaning sufficient to ensure an environment free from bloodborne pathogens (Fangerow 2025). Museum professionals are strongly advised against tattooing themselves or their colleagues with such equipment. Tattooing in a non-sanitized environment with a machine that cannot be adequately cleaned, using an ink not rated for human use, may result in severe infection (Mayo Clinic 2024).
Needle puncture represents a risk inherent to working with tattoo equipment, though it should be noted that throughout the entirety of this project, no staff member, intern, or volunteer punctured their skin with a needle. Had a puncture occurred, the following procedure would have been used to reduce infection risk. The site would have been washed with soap and water or a benzalkonium chloride (BZK) antiseptic wipe if available (CDC 2025). If the injured individual was not up to date on their tetanus or hepatitis vaccines, they would have been taken to the nearest emergency room or urgent care facility to receive a booster (CDC 2025). Otherwise, the wound would have been monitored and kept clean, and an appointment would have been made with a doctor for further treatment and testing (CDC 2025). The needle would have been disposed of in a designated sharps container immediately to reduce the risk of spreading bloodborne pathogens (CDC 2025). If a puncture had occurred with a needle cartridge inserted into a tattoo pen, the entire pen would have been disassembled and sanitized by a tattoo artist if it were a higher-end model (e.g., FK Irons Spektra Flux 2) or discarded in a biohazard bag if it were a cost-effective model that could not be fully disassembled for cleaning (e.g., Wormhole C3-C; see above). Any individual whose skin is punctured by a needle in the workplace should comply with all applicable institutional reporting and care policies for injuries.
Although the risk is lower when tattooing molds rather than human beings, it is important to remain aware of the risks posed by bloodborne pathogens. Most bloodborne pathogens, including but not limited to Staphylococcus, hepatitis, tuberculosis (TB), impetigo, syphilis, and HIV, typically have relatively long incubation periods (CDC 2025). As a result, a doctor might prescribe post-exposure prophylaxis and request follow-up appointments for testing at regular intervals, as certain viruses may not appear on a blood test until weeks or months later (CDC 2025).
Rotary tattoo pens are vibrational tools that require significant muscular dexterity. Research on the long-term risks of tattooing as a career remains limited, but the available literature suggests increased rates of carpal tunnel syndrome (Kluger 2017), increased rates of Raynaud phenomenon (reduced blood flow and ‘blanching’ of the fingers) in artists who tattoo four or more days per week (Kluger 2017), and increased rates of finger, neck, and back pain during tattooing itself (Keester and Sommerich 2017; Kluger 2017). Poor ergonomic working conditions are cited as the leading cause of these issues, particularly as tattooing humans frequently requires spending long periods in uncomfortable positions to reach the desired location on the recipient’s body (Keester and Sommerich 2017; Kluger 2017). To mitigate these risks during tattoo labeling, sandbags should be used to support the wrist, labeling should take place on a solid, flat surface with adequate lighting to prevent eye strain (many tattoo artists use headlamps to improve lighting conditions), and breaks should be taken.
The material safety data sheet (MSDS) for the Ranger archival ink used in this study indicates no health risks associated with normal use or skin exposure (Ranger 2024). Nonetheless, nitrile gloves should be considered personal protective equipment to prevent extensive ink staining on the hands. Additional personal protective equipment for working with the ink and tattoo pen is considered optional by the authors. The risk of splatter on the face is reduced by the small amount of ink in the ink cap at any given time, as well as by the stability of the ink cap itself, although eye protection may be worn to eliminate the risk of ink contact with the eye. Museum professionals in this study frequently wore lab coats to reduce the risk of staining clothing, although tattoo artist volunteers generally elected not to wear them. Both tattoo pens used in this study were sufficiently quiet that none of the participants felt the need for ear protection, though individuals with sensitive hearing may wish to employ it.
Results and Discussion
Based on all phases of testing, tattoos present an effective way to label RTV silicone molds made from Dow HS III and Silicones, Inc. GI-1000 and GI-1100 with GI-2020A catalyst (Figure 5). Since tattoo labels were functional on all three types of silicone tested, the authors are optimistic that they will be similarly functional on other types of RTV silicone molds. Labels were relatively quick to apply, taking three to eight minutes per label depending on the experience level of the tattooer. A comparison of the performance of tattoo labels with existing labeling techniques according to the five criteria tested herein is as follows (with results from all phases presented together):
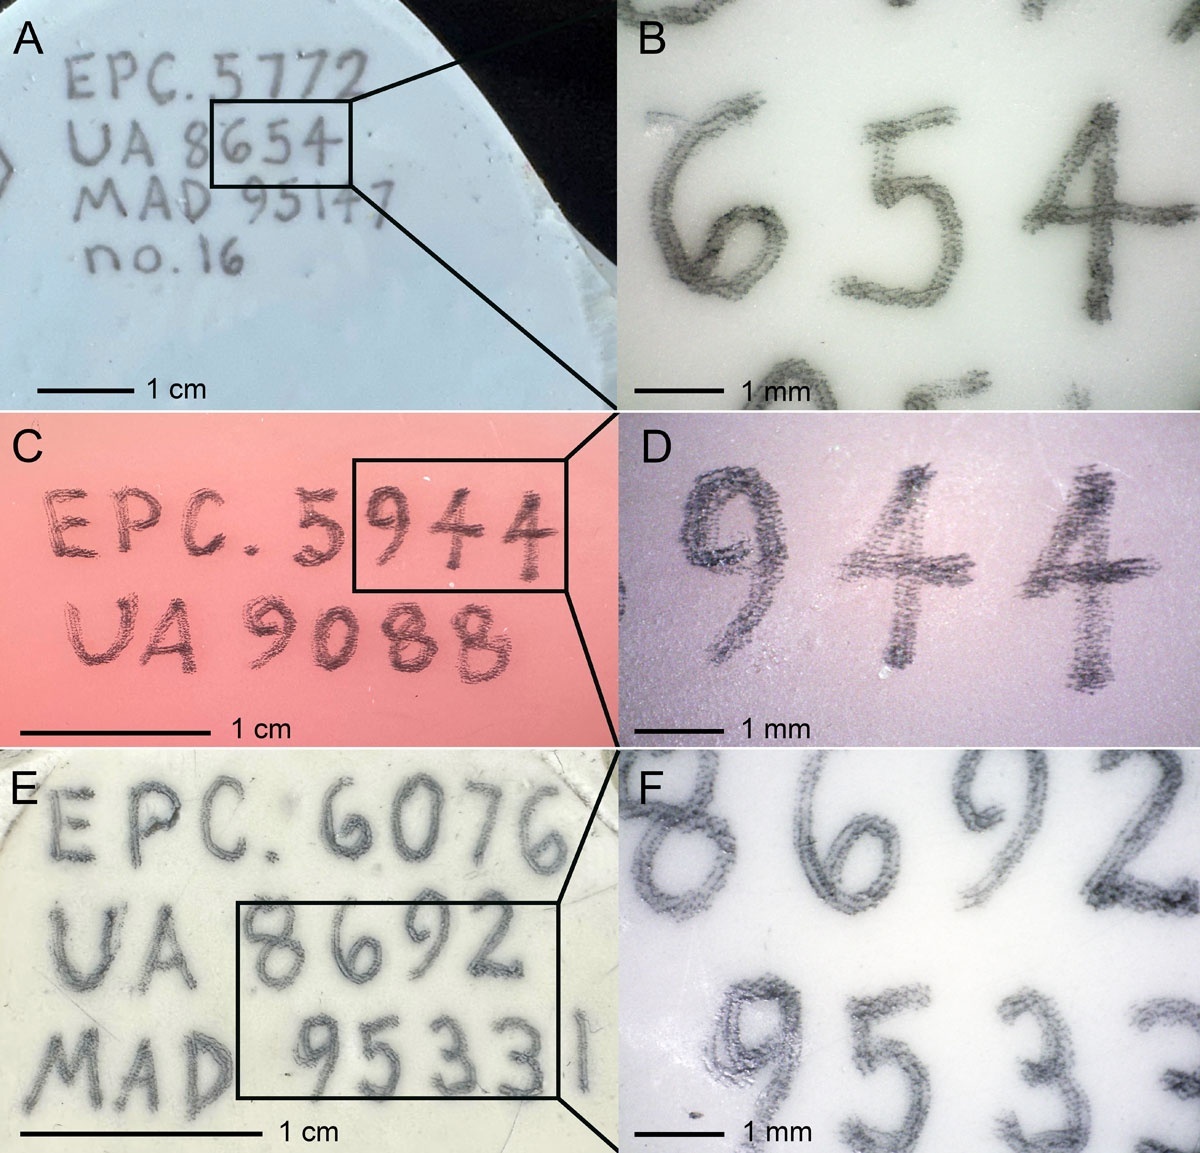
Figure 5
Tattoo labels on three types of RTV silicone. (A, B) Silicones Inc. GI-1000. (C, D) Silicones Inc. GI-1100 with GI-2020A catalyst. (E, F) Dow HS III. Labels were written with a 5RL needle cartridge at 5.5 volts with the Wormhole tattoo pen.
Permanence: Tattooed labels are theoretically more archival/permanent than marker and sticker labels since they are capable of withstanding manual flexing and smearing, and are likely just as archival/permanent as stamped and VPS labels since the surface of the silicone is permanently altered by the tattooing process (Waters 1983; Person and Baker 2007).
Modification: It is not possible to modify tattooed labels after they have been written, but they can be crossed out and replaced with additions or corrections at any time as long as there is enough surface area on the mold for the additional information. This is an improvement on stamped labels, which can only be administered before the silicone cures and therefore cannot be corrected or added to after the mold is produced (Waters 1983). It is also a slight improvement on VPS labels, which take up significantly more space than the small, compact tattoo labels (Person and Baker 2007) and thus reduce the amount of information, corrections or otherwise, that will fit on a given mold.
Legibility/size: Tattoo labels can reach character heights as small as just two millimeters while maintaining good legibility (Figure 6). Stamped labels have highly variable legibility depending on the stamps used in their construction (needles vs. leatherworking stamps, for example), and can be difficult to read on low-contrast mold colors (Figure 1B–C). VPS labels can be legible at larger scales, but are illegible at such small scales as millimeters (Person and Baker 2007).
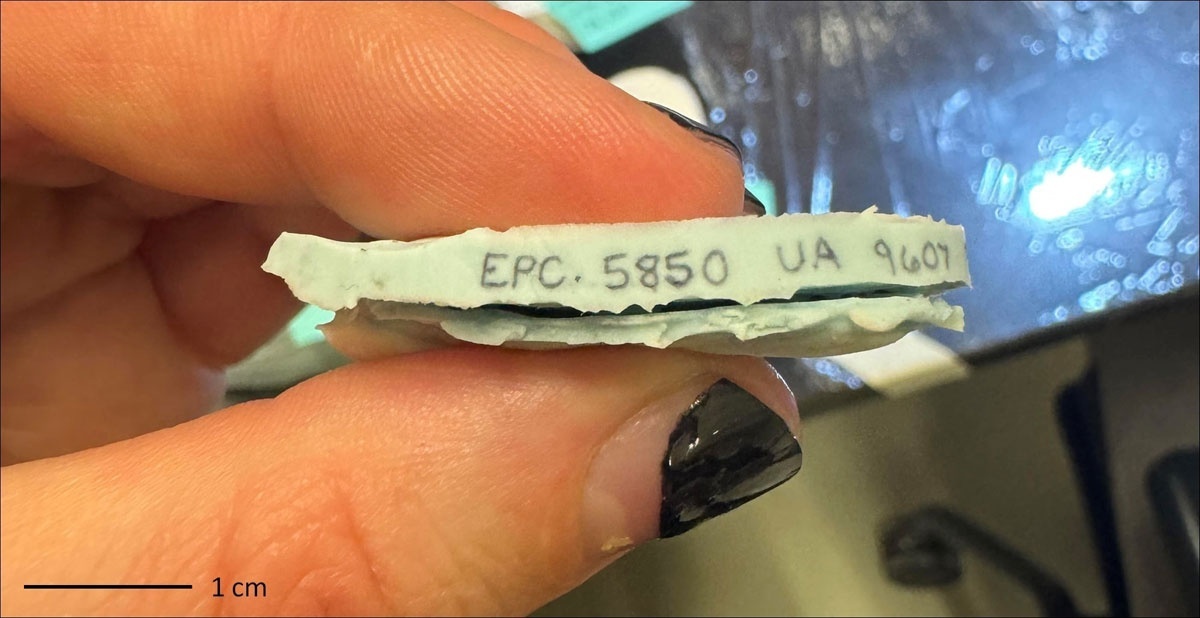
Figure 6
Labels written by professional tattoo artists with the permanent makeup bugpin 3RL cartridge and FK Irons Spektra Flux 2 tattoo pen were incredibly small and precise.
Cost: By the estimates of the authors, molds labeled by sticker or VPS would likely cost over US$1.00 per mold, which could easily become prohibitively expensive for large mold collections. During this study, a total startup cost of US$41.97 was sufficient to label hundreds of molds without even using the second of two bottles of ink purchased for the project. Tattoo labels are thus considerably less expensive than sticker or VPS labels. A set of letter stamps for stamped labels could be less expensive than tattooed labels, however (as low as US$19.99).
Damage: Tattooing labels onto molds inherently damages the surface of the mold more than stamp or VPS labeling. Damage itself was variable; at best, it was limited to such small perforations that the silicone could be flexed extensively without ripping or tearing. At worst, especially when the tattoo was too deep or the voltage on the machine too high, tearing of the silicone was possible (Figure 7). Dow HS III proved the softest and most likely to tear of the three silicone products, but with practice and caution, it could still be labeled with negligible surface damage.
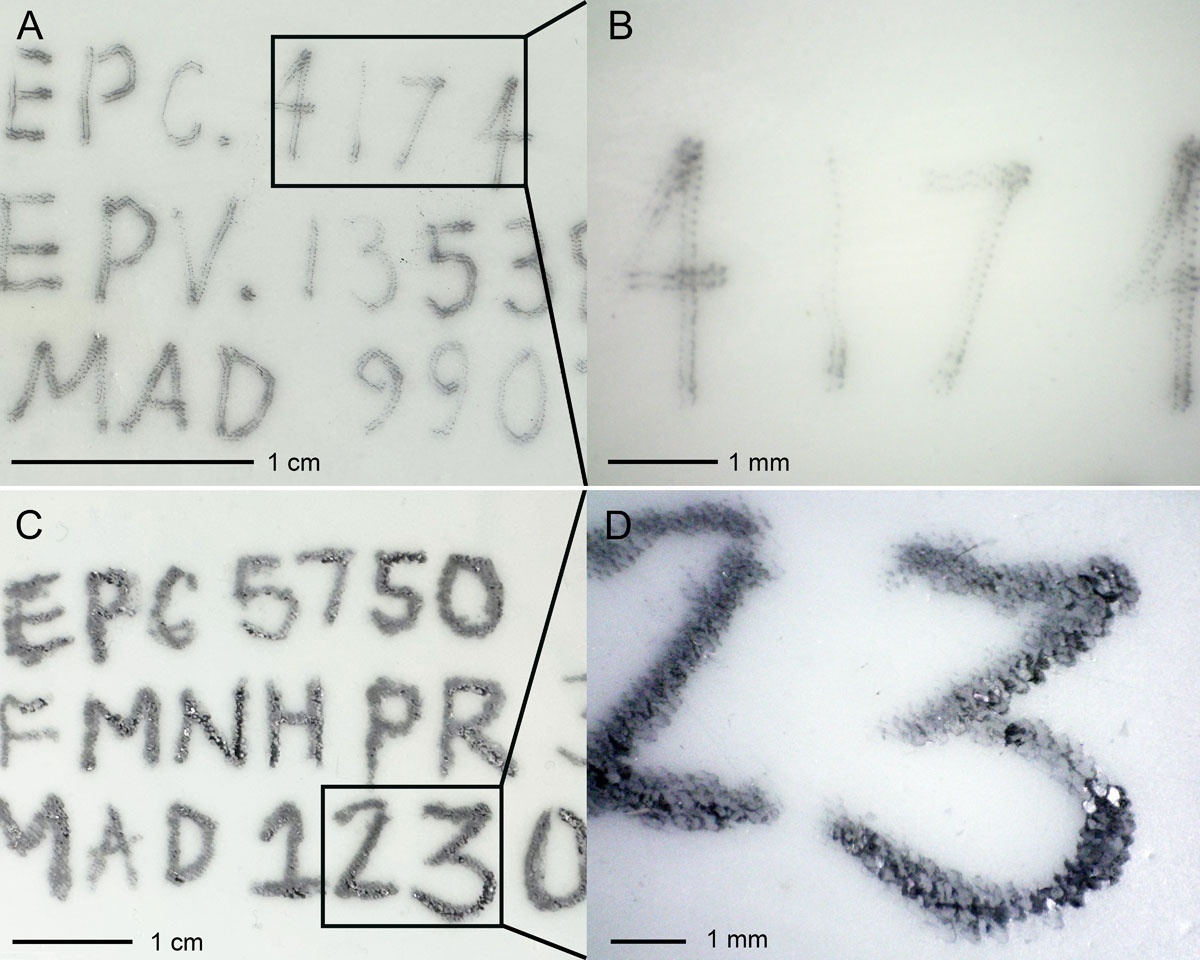
Figure 7
Problems with tattoo labels on RTV silicone. (A, B) Lettering can appear faded and difficult to read when too little depth, voltage, or ink is used. (C, D) Silicone can split, tear, or shred when too much depth or voltage is used. Labels were written with a 5RL needle cartridge with the Wormhole tattoo pen on Silicones Inc. GI-1000 at varying voltages.
Based on these criteria, tattoo labels present a novel and effective solution to decades of difficulty in labeling RTV silicone molds. Tearing the silicone is a possible outcome, but is entirely avoidable with practice and care.
A setting of 5–6 volts on the machine and a needle depth of 1.5–2 mm were most effective for labeling. Using a higher voltage or deeper depth resulted in tearing of the silicone (especially with molds made of Dow HS III), while using a lower depth or voltage frequently resulted in light, illegible characters (Figure 7). Within these constraints, both factors ultimately had to be adjusted and balanced with hand speed on an individual basis to account for personal variation in technique. It was best to begin lighter, with lower voltage and slower hand movements, since one could always go back over a light or inconsistent line, but one could not repair or erase a line that was too deep or heavy. The FK Irons Spektra Flux 2 pen produced smoother, more reliable lines and was more comfortable to use than the less expensive Wormhole C3-C pen, but both pens produced legible labels. Freehanding the labels with the tattoo pen was more efficient than writing guide labels in marker and tracing them with the tattoo pen, since the oils in the silicone rapidly ruined the markers.
Of the four needle arrangements tested, all produced legible, flexible, smear-resistant labels with minimal damage to the silicone (Figures 8, 9). Bugpin needles produced the most precise lines and felt most similar to writing with a standard pen. The 7RL and both 5RL cartridges were easiest for beginners to use, and suitable for the majority of the molds. It was very difficult to label smaller molds with the 7RL, while 5RL cartridges (especially the bugpin 5RL) were capable of greater precision and smaller text. The permanent makeup bugpin 3RL could produce incredibly small, precise labels (characters as small as 2 mm tall) but required a steadier, more experienced hand to prevent tearing.
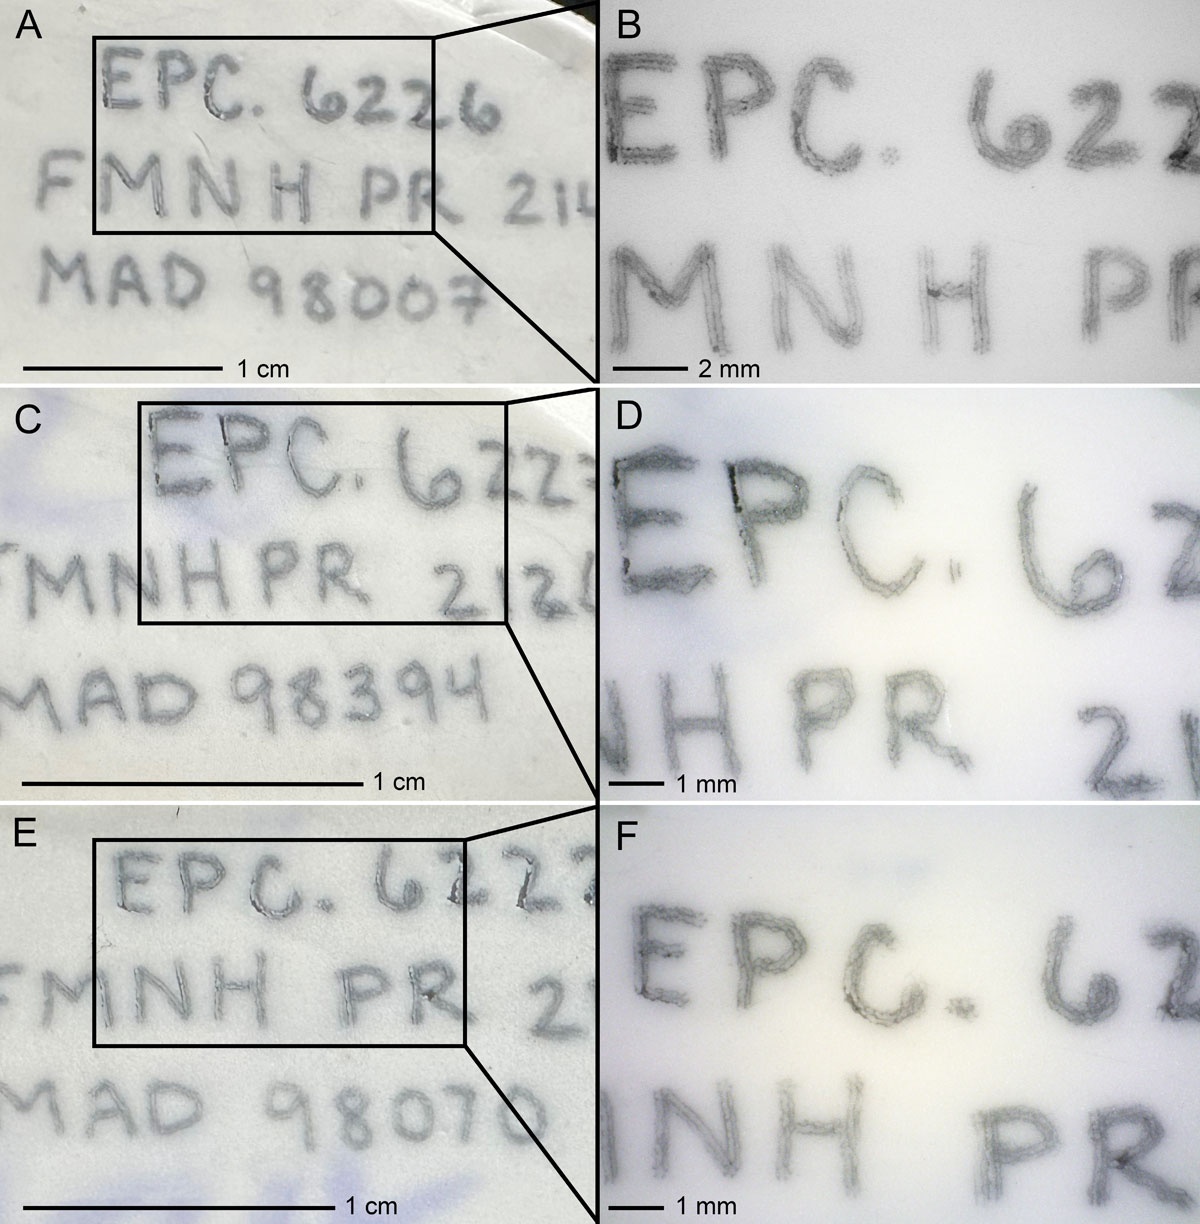
Figure 8
Tattoo labels made with three different needle cartridges on Dow Silicone HS III. (A, B) 7RL cartridge. (C, D) Bugpin 5RL cartridge (E, F) Permanent Makeup Bugpin 3RL cartridge. Labels were written at 5.5 volts with the FK Irons Spektra Flux 2 tattoo pen. Note that Dow Silicone HS III is less resistant to tearing than Silicones Inc. GI-1000 (shown in Figure 9).
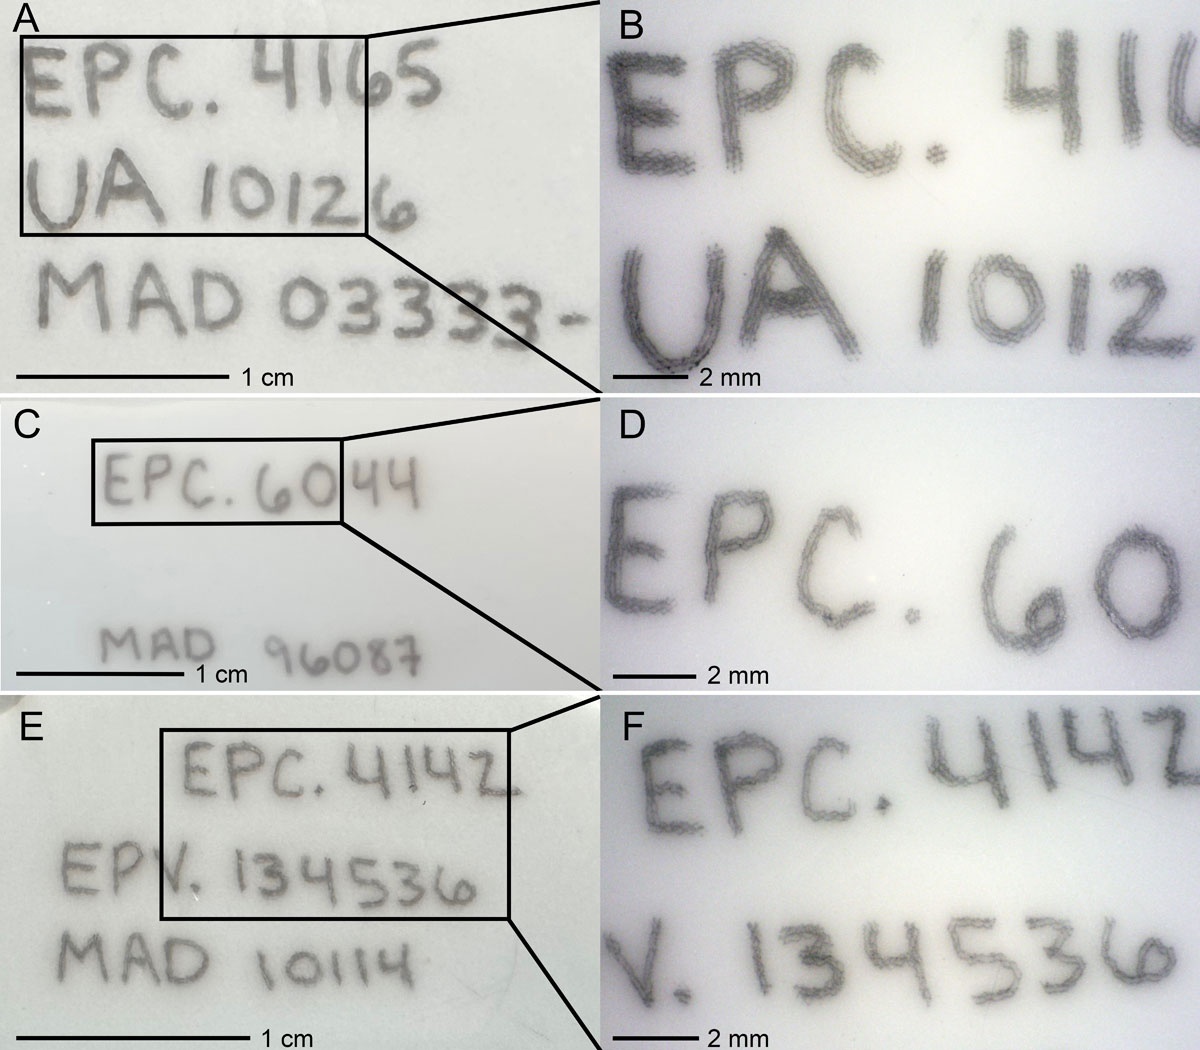
Figure 9
Tattoo labels made with three different needle cartridges on Silicones Inc. GI-1000. (A, B) 7RL cartridge. (C, D) Bugpin 5RL cartridge. (E, F) Permanent Makeup Bugpin 3RL cartridge. Labels were written at 5.5 volts with the FK Irons Spektra Flux 2 tattoo pen. Note that Silicones Inc. GI-1000 is more resistant to tearing than Dow Silicone HS III (shown in Figure 8).
A key part of any archival labeling method is its longevity. While labels tattooed with archival ink should be near-permanent in theory, this study cannot comment on the realized longevity of tattooed labels. If they do fade because of light exposure, additional ink could be rubbed into the characters to revitalize the label. Further testing over the next several decades will be necessary to assess the aging of tattoo labels more definitively. Further testing will also be necessary to identify the effectiveness of tattoo labels on ‘Smooth-On’-type silicone products used in certain molding projects, as these products are stretchier than those tested herein.
This project entailed the organization and labeling of existing molds, but the methodology could also apply to the creation of new molds. The authors recommend labeling the mold immediately upon the curing of the first piece of silicone to minimize information loss. An institution may still wish to use ‘stamp’ labels during the molding process itself, and then return to add tattooed labels later, as described here. Alternatively, an institution might wish to use both labeling methods during the mold’s creation as insurance against information loss resulting from label damage. Collections and preparation professionals should take care to clearly communicate which party is responsible for labeling. Whether used on new molds or collections of existing ones, this methodology should help reduce information loss and increase the accessibility and organizational capacity of mold collections.
This project utilized two logistical approaches to the process of labeling the Madagascar mold collection at DMNS: purchasing museum equipment for use by current staff and volunteers, and collaborating with local tattoo artists who contributed their own equipment, expertise, and time to the labeling of the collection. The first approach was logistically simpler and faster to initiate, but the second approach produced higher-quality labels at a faster rate once the process began. Both approaches have merit, and each might be more or less suitable to a project depending on the size of the mold collection, the budget of the institution, and other factors. If pursuing the second approach, it is recommended that a) all collaborators and tattoo artists read this paper and practice on scrap silicone, and b) institutions find ways to reciprocate the time and expertise of the tattoo artists if possible.7
Given the success of these methods and the fact that ‘stick and poke’ tattoos have been recommended in the literature for decades (Kelly and McLachlan 1980; Davidson et al. 2006), it is curious that the use of commercial tattoo equipment was not tested and reported on sooner. This delay may be explained by the availability of the equipment. The first popular rotary pen product, the Cheyenne HAWK, was not released until 2007 (Cheyenne Tattoo 2017), and as with most commercial tattoo equipment, the product was only available for purchase by licensed tattoo artists. Dragonhawk and Wormhole Tattoo, both prominent producers of low-end rotary tattoo pens available to non-licensed buyers, only trademarked their brands in 2015 and 2016, respectively (Dragonhawk 2015; Wormhole Tattoo 2016). The professional experience of licensed tattoo artist and coauthor L. D. Bird also suggests that these cheaper kits only became available after 2015. Thus, the authors believe these methods have not been reported previously because the technology required was not available to museum professionals until relatively recently.
Conclusion
Tattoos are an effective method for labeling RTV silicone molds in museum collections. Tattooed labels are resistant to smearing and flexing, easy to modify/update after the mold sets, legible even at small sizes, relatively inexpensive, and cause negligible damage to the silicone when applied correctly. This combination of features represents an overall improvement on previous labeling techniques. Total label longevity cannot be assessed until more time passes, but with the use of archival ink, labels are expected to last at least several decades. Rubbing additional ink into the characters should revitalize the labels in the event they do fade to illegibility. Nonetheless, this methodology should be revisited in a few decades to assess longevity more definitively.
Tattoo labels are recommended for any institution wishing to archivally label silicone molds in order to increase information retention associated with mold collections. The methodology is equally applicable to collections of existing molds and to the creation of new molds. Institutions may contact the corresponding author for additional guidance on applying tattoo labels. Familiarity with bloodborne pathogen safety is recommended before use of this methodology in case of accidental injury with the tattoo needle.
This project forged a positive professional relationship between scientists at DMNS and artists at Nest Art Collective, which was critical for developing the best possible methodology. The experiences and problem-solving approaches shared by the tattoo artists led to innovations that may not have occurred to museum staff. The arts are commonly left out of science, technology, engineering, and mathematics (STEM)-based institutions, and the innovations presented here show that STEM professionals are well served by inviting collaboration with artists. The resulting fusion, called STEAM (science, technology, engineering, arts, and mathematics), can increase the creativity and problem-solving capacity of scientific endeavors in addition to providing opportunities for science-minded artists to engage in research.
Notes
[1] See Krause et al. (2022) for more information on the Madagascar Project.
[2] While this kit met the needs of this project, the manufacturer warns that it is not safe to use on human skin.
[3] Higher-quality tattoo machines like the Spektra Flux 2 often require a tattoo license to purchase, and may only be available for labeling molds through collaboration with tattoo artists.
[4] Notably, this product is inexpensive but not lightfast. No issues with this choice were identified, as the molds in this project are stored in dark conditions; however, for lighter storage conditions, other products may be preferable.
[6] When the needle cartridge was deemed too dull for further use, particularly after repeatedly striking the bottom of the ink cup, it was disposed of in a designated sharps receptacle; needle dullness manifested as thicker, less precise lettering.
[7] An institution could compensate them financially, provide food during/after label sessions, host table events (for example, set up an educational table at an event for their studio), or donate casts of fossil specimens to their studio. Of course, this relationship might differ from institution to institution, especially for government-affiliated organizations with regulations regarding the exchange of favors. All gestures of reciprocity should be verified for compliance with relevant legal and ethical standards.
Acknowledgements
We acknowledge National Science Foundation grant DBI-2242716 to David W. Krause for funding the purchase of supplies for this project. We thank Electronic Imaging Materials, Inc., for providing us with a free sample of SiliCode stickers. We extend our deepest gratitude to the staff of Nest Art Collective and other tattoo artists, including Russell R. Apell, Isabel Bump, Hailey Crossley, Addison Farrier, Carl Farrier, Kylie Patterson, Mikayla Riley, and Sadie Trigg, for contributing to the labeling of hundreds of molds at DMNS, and to Zackary Garvin and Kiera Drapela for connecting DMNS staff with coauthor L. D. Bird. We also thank the University of Antananarivo and the Field Museum of Natural History for their ongoing collaboration on the Madagascar Project. Finally, we thank Dave Krause and Kristen MacKenzie for their enthusiastic support of this project, Natalie Toth for providing lab space and practice silicone, Annaka Clement for her guidance and frequent edits as we prepared for publication, and Joe Groenke for information on silicone products and for his encouragement.
Author Contributions
R. R. Hummel organized and directed the project with help from S. K. Swenson. R. R. Hummel and S. K. Swenson conducted testing, evaluated results, and wrote the bulk of the manuscript (R. R. Hummel drafted the introduction, results, conclusion, and some figures; S. K. Swenson drafted the materials and methods). L. D. Bird advised on and helped draft the methods, conducted testing, and evaluated results. N. A. McGee contributed to testing, conducted microscope photography, created figures, and drafted captions. All authors contributed to editing the manuscript.