
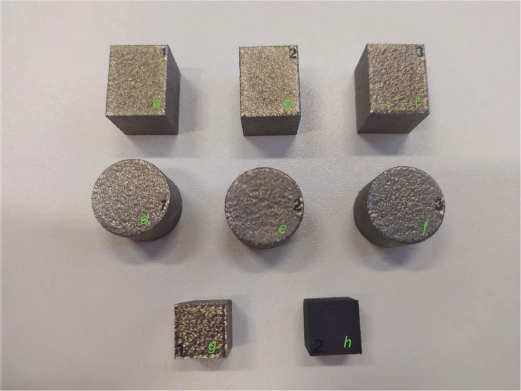
Figure 1.
Specimens used in the X-ray diffraction phase analyses.
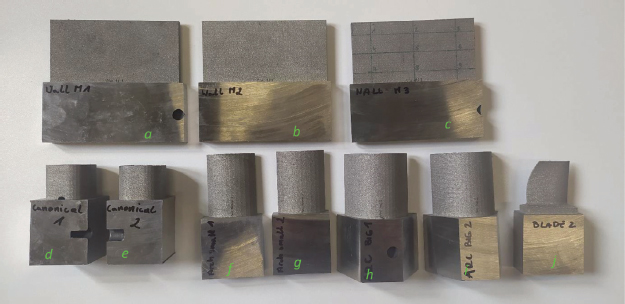
Figure 2.
Specimens used in the X-ray stress measurements.
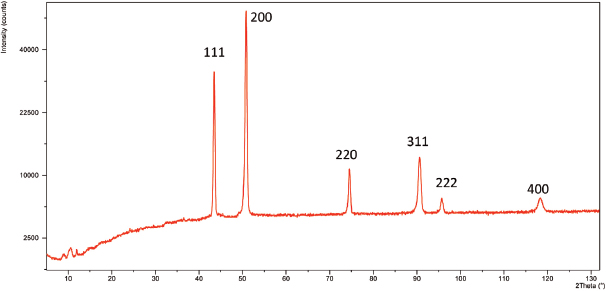
Figure 3.
Diffractogram obtained for the cubic specimen (g in the Figure 1). The individual reflections of the dominant phase were described by the Miller coefficients hkl.
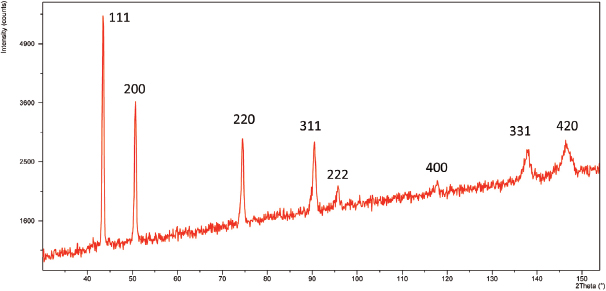
Figure 4.
Diffractogram obtained for wall type specimen (geometry like a–c in Figure 2) cut off from the platform. The individual reflections of the dominant phase were described by the Miller coefficients hkl.
Table 1.
Rietveld phase analysis results.
| phase percentage [%] | ICDD card number | crystallographic structure | lattice parameter [Å] |
|---|---|---|---|
| Fe0.5Ni0.5 | 04-021-6318 | cubic, Fm-3m, 225 | a0 = 3.59458 |
| 89.1% | |||
| Nb0.1Ni0.9 | 04-004-4494 | cubic, Fm-3m, 225 | a0 = 3.803844 |
| 3.5% | |||
| NbNi3 | 04-012-8012 | tetragonal, I4/mmm, 139 | a0 = 3.566829, |
| 3.3% | c0 = 7.39813 | ||
| NbNi3 | 03-065-2589 | orthorhombic, Pmmn, 59 | a0 = 4.308615, |
| 2.6% | b0 = 5.165817, | ||
| c0 = 4.573394 | |||
| Ni3Ti | 01-075-0878 | hexagonal, P63/mmc, 194 | a0 = 5.1114773, |
| 0.6% | c0 = 8.313766 | ||
| Ti0.33Ni0.67 | 04-007-1996 | rombohedral, R-3m, 166 | a0 = 2.550052, |
| 0.4% | c0 = 43.62515 | ||
| Cr2Nb | 04-004-6470 | cubic, Fd-3m, 227 | a0 = 6.989395 |
| 0.5% |
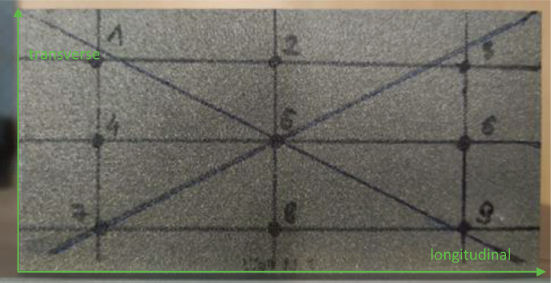
Figure 5.
Wall-shaped specimen with location of measuring points for preliminary measurements before and after being cut off from the printing platform.
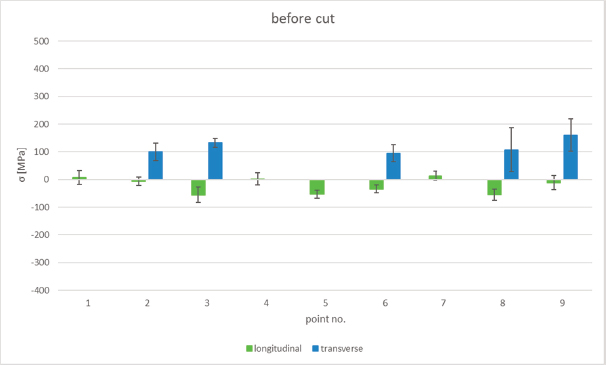
Figure 6.
Results of X-ray diffraction stress measurements for wall-shaped specimen before being cut off the built platform.
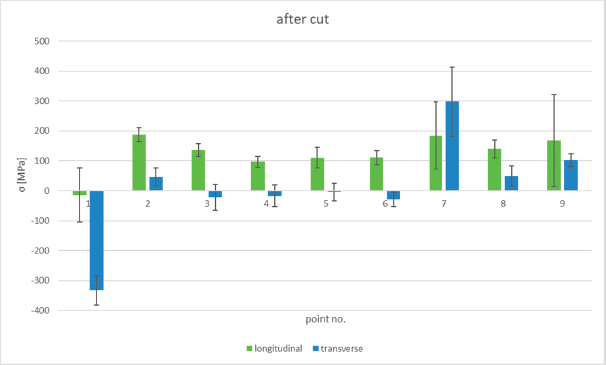
Figure 7.
Results of X-ray diffraction stress measurements for wall-shaped specimen after being cut off the built platform.
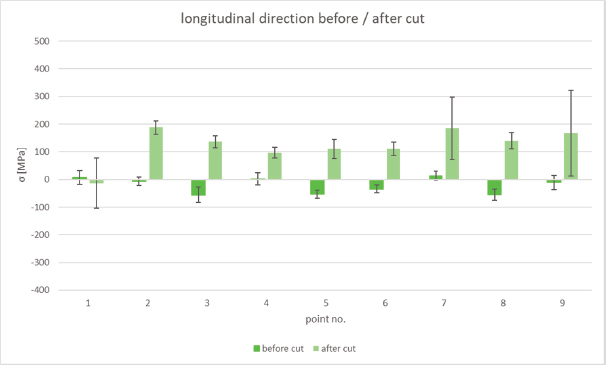
Figure 8.
Comparison of results before and after being cut off from the platform – measurements performed in longitudinal direction.
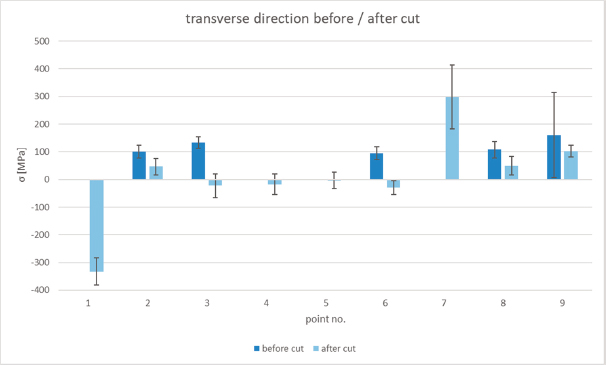
Figure 9.
Comparison of results before and after being cut off from the platform – measurements performed in transverse direction.
Table 2.
Results of X-ray diffraction stress measurements for the wall-shaped specimen.
| before cut | after cut | |||||||
|---|---|---|---|---|---|---|---|---|
| point no. ↓ | longitudinal | transverse | longitudinal | transverse | ||||
| σ [MPa] | Δσ [MPa] | σ [MPa] | Δσ [MPa] | σ [MPa] | Δσ [MPa] | σ [MPa] | Δσ [MPa] | |
| 1 | 7.1 | 25.1 | - | - | -13.6 | 90.4 | -332.7 | 48.7 |
| 2 | -6.3 | 16 | 100.5 | 31.4 | 187.9 | 23.3 | 46.5 | 30.2 |
| 3 | -55.6 | 27.5 | 132.6 | 16.3 | 136.1 | 21.2 | -22.1 | 42.7 |
| 4 | 1.9 | 22.5 | - | - | 96.5 | 19 | -16.9 | 36.6 |
| 5 | -53.1 | 14.9 | - | - | 110.3 | 35 | -4.2 | 29.7 |
| 6 | -34.6 | 14.2 | 95.1 | 29.8 | 110.8 | 23.5 | -29.2 | 24.4 |
| 7 | 13.6 | 15.5 | - | - | 184.5 | 112.2 | 298.1 | 115.6 |
| 8 | -55 | 20.1 | 107.4 | 79.5 | 139.4 | 29.6 | 49.7 | 33.6 |
| 9 | -11.1 | 26.7 | 160.8 | 58.6 | 168.1 | 154.5 | 102.6 | 21.5 |
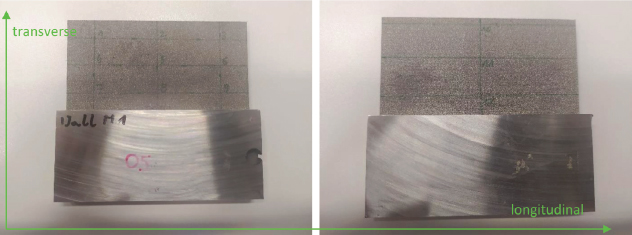
Figure 10.
Specimen WALL M1, showing the location of measuring points on both sides.
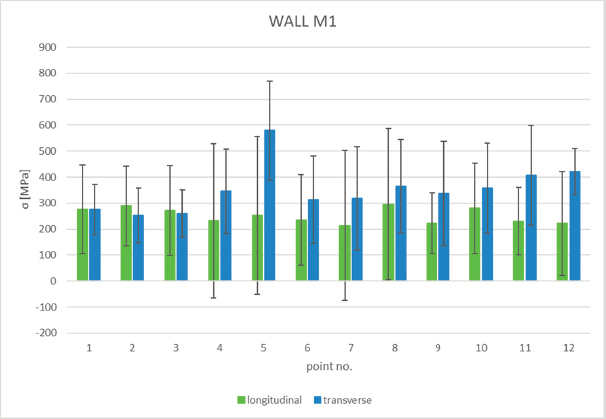
Figure 11.
Results of X-ray diffraction stress measurements for specimen WALL M1.
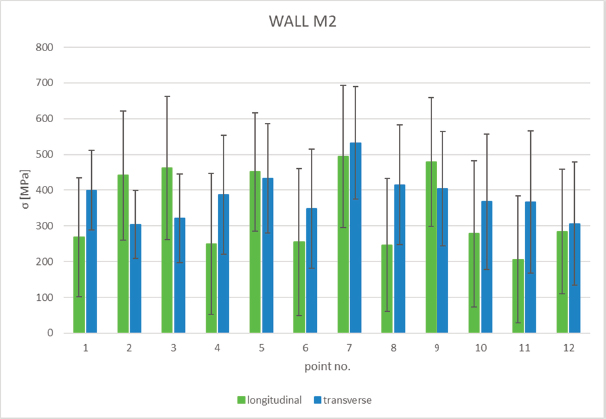
Figure 12.
Results of X-ray diffraction stress measurements for specimen WALL M2.
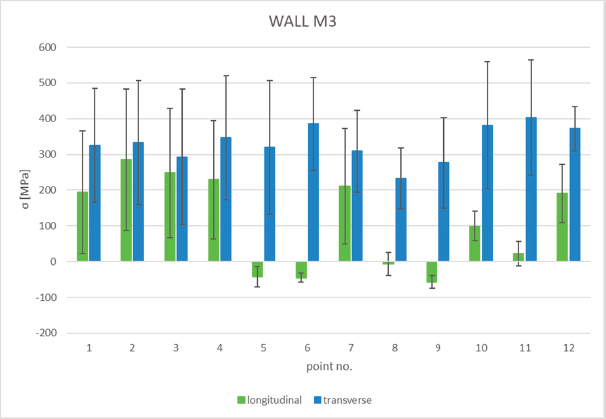
Figure 13.
Results of X-ray diffraction stress measurements for specimen WALL M3.
Table 3.
Results of X-ray diffraction stress measurements for wall-shaped specimens.
| WALL M1 | WALL M2 | WALL M3 | ||||||||||
|---|---|---|---|---|---|---|---|---|---|---|---|---|
| point no. ↓ | longitudinal | transverse | longitudinal | transverse | longitudinal | transverse | ||||||
| σ [MPa] | Δσ [MPa] | σ [MPa] | Δσ [MPa] | σ [MPa] | Δσ [MPa] | σ [MPa] | Δσ [MPa] | σ [MPa] | Δσ [MPa] | σ [MPa] | Δσ [MPa] | |
| 1 | 277.2 | 170.3 | 275.2 | 97.9 | 267.7 | 166.4 | 399.9 | 110.8 | 194.2 | 171.1 | 325.3 | 158.6 |
| 2 | 289.4 | 153.2 | 253.1 | 104.8 | 440.9 | 180.3 | 304.3 | 94.9 | 285 | 198 | 333.7 | 173.7 |
| 3 | 271.6 | 172 | 259.4 | 90.6 | 461.4 | 200.7 | 320.7 | 123.5 | 247.6 | 180.8 | 293.1 | 189 |
| 4 | 231.7 | 296.5 | 345.5 | 163.1 | 249 | 196.9 | 387.8 | 166.3 | 229.2 | 165.3 | 346.6 | 172.9 |
| 5 | 252.5 | 303.3 | 579 | 190 | 451.1 | 165.2 | 432.9 | 152.6 | -42.7 | 28.8 | 319 | 186.9 |
| 6 | 235.4 | 174.6 | 314.6 | 168.3 | 254.4 | 205.4 | 347.4 | 166.6 | -45.4 | 12.8 | 385.7 | 129.7 |
| 7 | 213.8 | 288 | 318.6 | 198.4 | 493.5 | 198.8 | 532.3 | 157 | 210.9 | 161.9 | 309.4 | 114.8 |
| 8 | 295.6 | 290.8 | 364.5 | 180.3 | 246.4 | 186 | 415.2 | 167.5 | -6.8 | 32.1 | 232.6 | 84.7 |
| 9 | 221.9 | 116.8 | 337 | 201.7 | 479.2 | 180 | 403.5 | 159.7 | -56.8 | 18.4 | 276.8 | 127 |
| 10 | 279.9 | 173.9 | 358.4 | 172.2 | 277.8 | 204.6 | 367.7 | 190 | 99.6 | 40.9 | 381.1 | 177.6 |
| 11 | 230.3 | 130.3 | 406.6 | 192 | 206 | 177.1 | 367.3 | 198.9 | 22.6 | 34.6 | 403.2 | 161 |
| 12 | 221.9 | 199.3 | 420.7 | 89.2 | 284.4 | 174.4 | 306.3 | 172.7 | 190.7 | 81.1 | 371.9 | 62 |
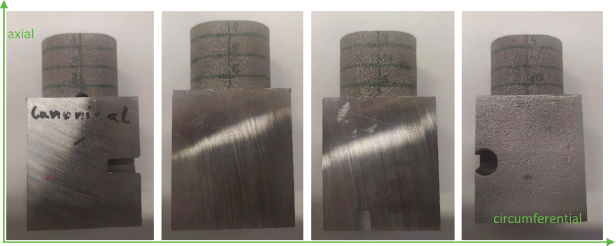
Figure 14.
Specimen CANONICAL 1, showing the location of measuring points on all sides.
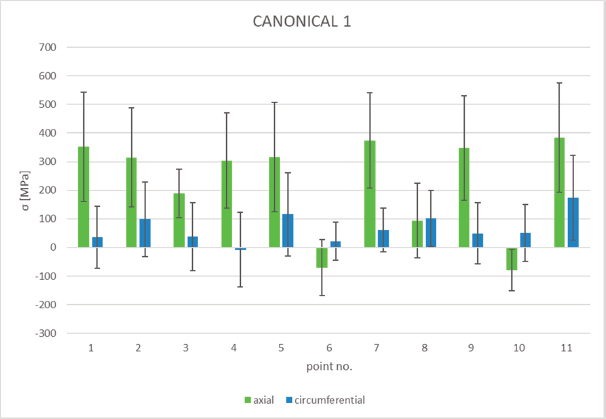
Figure 15.
Results of X-ray diffraction stress measurements for specimen CANONICAL 1.
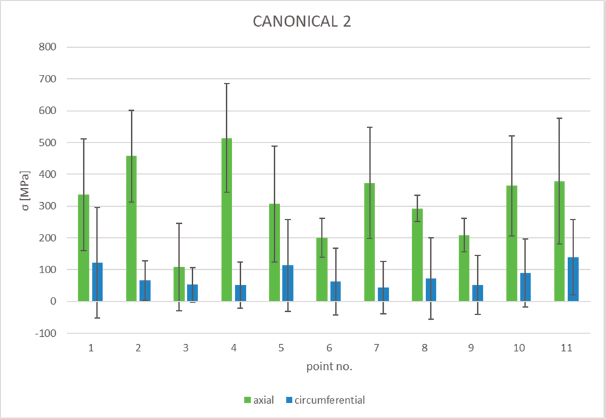
Figure 16.
Results of X-ray diffraction stress measurements for specimen CANONICAL 2.
Table 4.
Results of X-ray diffraction stress measurements for canonical shaped specimens.
| point no. ↓ | CANONICAL 1 | CANONICAL 2 | ||||||
|---|---|---|---|---|---|---|---|---|
| axial | circumferential | Axial | circumferential | |||||
| σ [MPa] | Δσ [MPa] | σ [MPa] | Δσ [MPa] | σ [MPa] | Δσ [MPa] | σ [MPa] | Δσ [MPa] | |
| 1 | 351.6 | 190.6 | 36.6 | 108.3 | 335.7 | 175.7 | 121.1 | 173.8 |
| 2 | 314.8 | 173.4 | 98.9 | 130.8 | 457.6 | 143.9 | 65.4 | 62.8 |
| 3 | 188.4 | 85.5 | 38 | 118.5 | 108.5 | 138.2 | 52.1 | 55.1 |
| 4 | 304.2 | 166.4 | -7.7 | 130 | 513.9 | 171.1 | 51.1 | 72.1 |
| 5 | 316.1 | 191.4 | 115.9 | 145.8 | 306.5 | 182.6 | 113.2 | 144.2 |
| 6 | -70.2 | 97.6 | 21.2 | 66.7 | 199.7 | 61.3 | 62.6 | 105.5 |
| 7 | 373.8 | 166.2 | 61.7 | 76.2 | 372.9 | 174.1 | 43.8 | 82 |
| 8 | 93.6 | 130.4 | 102.1 | 97.3 | 292.1 | 41.2 | 72.2 | 127.8 |
| 9 | 347.8 | 182 | 49.3 | 106.8 | 208.5 | 52.5 | 51.7 | 92.6 |
| 10 | -78.8 | 71.6 | 50.8 | 99.5 | 363.4 | 157.1 | 89.4 | 106.4 |
| 11 | 383.9 | 191.4 | 174.1 | 148.1 | 378.5 | 197.9 | 138.7 | 118.7 |
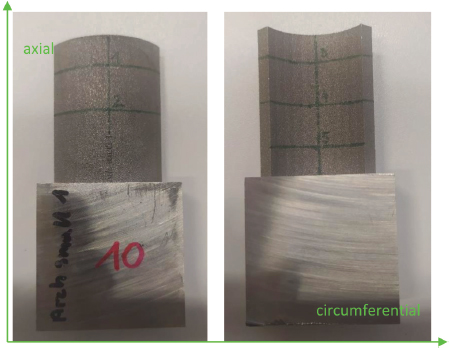
Figure 17.
Speciment ARC SMALL 1, showing the location of measuring points on both sides.
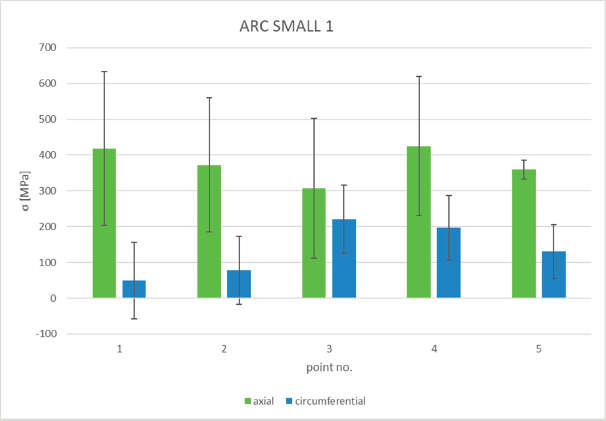
Figure 18.
Results of X-ray diffraction stress measurements for specimen ARC SMALL 1.
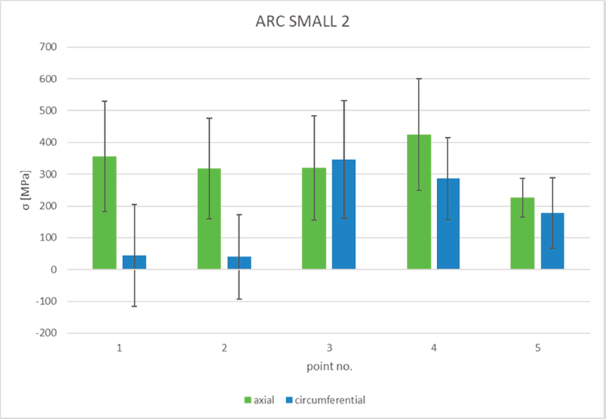
Figure 19.
Results of X-ray diffraction stress measurements for specimen ARC SMALL 2.
Table 5.
Results of X-ray diffraction stress measurements for ARC SMALL specimens.
| point no. ↓ | ARC SMALL 1 | ARC SMALL 2 | ||||||
|---|---|---|---|---|---|---|---|---|
| axial | circumferential | axial | circumferential | |||||
| σ [MPa] | Δσ [Mpa] | σ [Mpa] | Δσ [Mpa] | σ [Mpa] | Δσ [Mpa] | σ [Mpa] | Δσ [Mpa] | |
| 1 | 417.9 | 214.7 | 49.3 | 107.2 | 355.6 | 173.9 | 44.9 | 160.6 |
| 2 | 372.3 | 187.4 | 78.1 | 94.8 | 317.3 | 158.3 | 39.7 | 132 |
| 3 | 307.7 | 194.9 | 220.9 | 94.6 | 319.8 | 164.5 | 346.5 | 185.1 |
| 4 | 425.3 | 195.1 | 196.7 | 90 | 424.7 | 175.3 | 286.3 | 129.1 |
| 5 | 359.6 | 26.5 | 130 | 74.9 | 225.7 | 60.6 | 178 | 110.9 |
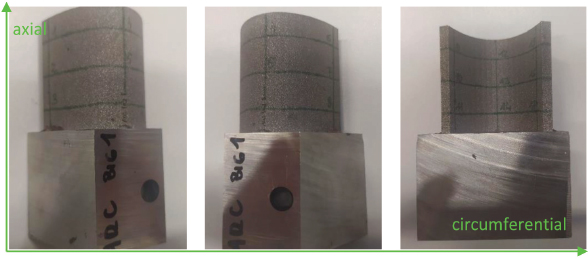
Figure 20.
Specimen ARC BIG 1, showing the location of measuring points on both sides.
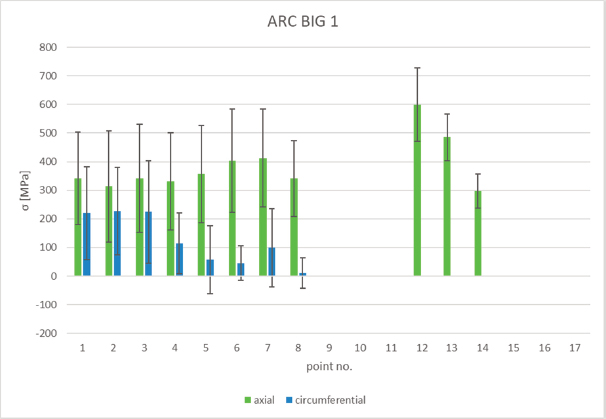
Figure 21.
Results of X-ray diffraction stress measurements for specimen ARC BIG 1.
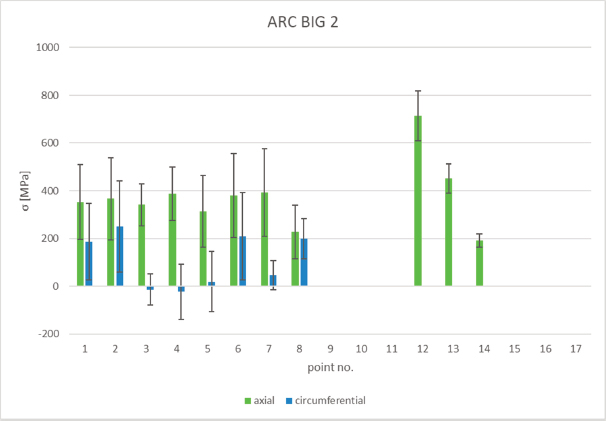
Figure 22.
Results of X-ray diffraction stress measurements for specimen ARC BIG 2.
Table 6.
Results of X-ray diffraction stress measurements for the two ARC BIG specimens. The measurements for points 9–11 and 15–17 for both directions, and for points 12–14 in the circumferential direction, could not be performed due to geometrical issues.
| ARC BIG 1 | ARC BIG 2 | |||||||
|---|---|---|---|---|---|---|---|---|
| point no. ↓ | axial | circumferential | axial | circumferential | ||||
| σ [MPa] | Δσ [MPa] | σ [MPa] | Δσ [MPa] | σ [MPa] | Δσ [MPa] | σ [MPa] | Δσ [MPa] | |
| 1 | 341.8 | 161.7 | 220.1 | 162.2 | 352.7 | 156.8 | 186.2 | 160.4 |
| 2 | 313.1 | 194.9 | 227.7 | 152.6 | 366.5 | 171.9 | 249.6 | 192 |
| 3 | 342.2 | 189.4 | 224.4 | 179.5 | 340.3 | 87.2 | -13.9 | 65.1 |
| 4 | 331.9 | 170 | 113.9 | 106 | 386.8 | 111.9 | -24 | 116.9 |
| 5 | 355.8 | 169.5 | 56.9 | 118.3 | 313.7 | 151.1 | 18.5 | 126 |
| 6 | 403.3 | 180.3 | 45.3 | 60.4 | 379.9 | 175.6 | 209 | 183.2 |
| 7 | 412.1 | 171.2 | 98.7 | 137.1 | 392.7 | 183.7 | 46.5 | 60.5 |
| 8 | 341.3 | 132.8 | 10.7 | 52.4 | 226 | 112.4 | 198.9 | 84.6 |
| 12 | 599.2 | 128.1 | - | - | 712.9 | 104.4 | - | - |
| 13 | 485.1 | 81.4 | - | - | 450.1 | 61.3 | - | - |
| 14 | 297.7 | 59.6 | - | - | 191.6 | 28 | - | - |
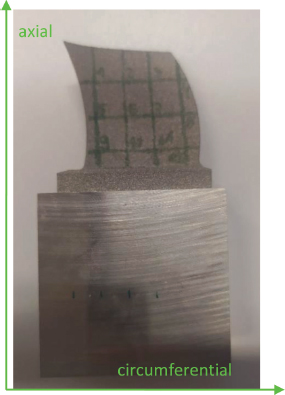
Figure 23.
Specimen BLADE 2, showing the location of measuring points.
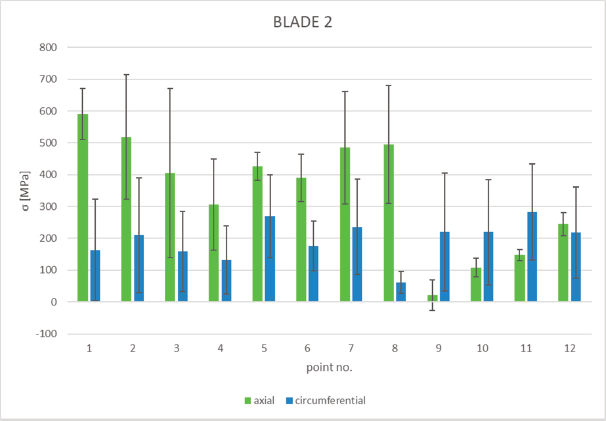
Figure 24.
Results of X-ray diffraction stress measurements for specimen BLADE 2.
Table 7.
Results of X-ray diffraction stress measurements for specimen BLADE 2.
| point no. ↓ | axial | circumferential | ||
|---|---|---|---|---|
| σ [MPa] | Δσ [MPa] | σ [MPa] | Δσ [MPa] | |
| 1 | 591 | 80.1 | 163.6 | 160 |
| 2 | 518.7 | 196.3 | 209.6 | 180.2 |
| 3 | 405.4 | 266.3 | 158.6 | 126.2 |
| 4 | 305.5 | 143.7 | 132.1 | 106.8 |
| 5 | 426.4 | 43.7 | 270.1 | 129.9 |
| 6 | 389.8 | 74.8 | 176.5 | 78.7 |
| 7 | 485.4 | 176.7 | 236 | 150.5 |
| 8 | 495 | 185.7 | 61.5 | 34.9 |
| 9 | 21 | 47.5 | 219.7 | 184.7 |
| 10 | 107.8 | 29.1 | 219.9 | 165.2 |
| 11 | 147.4 | 17.2 | 282.6 | 150.7 |
| 12 | 244.3 | 36.6 | 218.4 | 142.8 |