
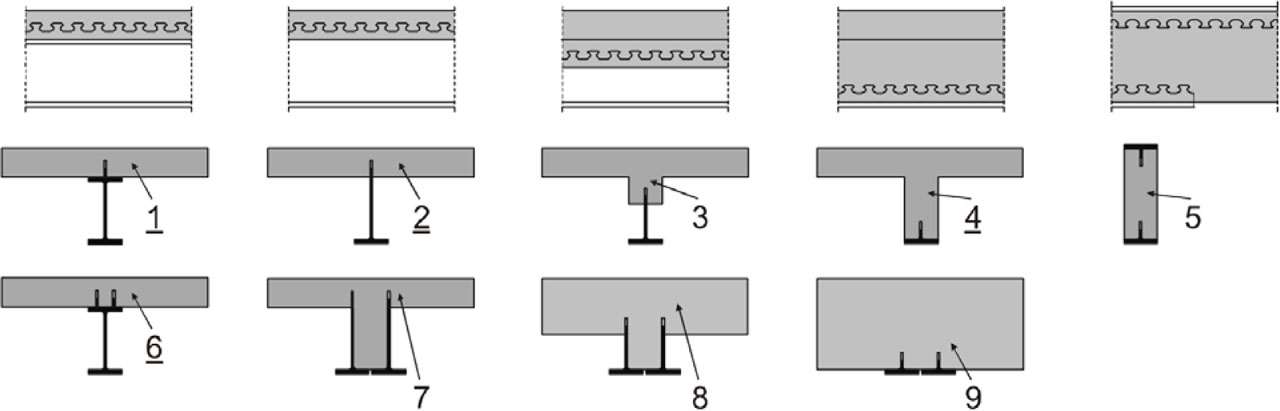
Figure 1
Different side views (upper row) and cross sections (middle and bottom rows) of girders with composite dowels. 1–5: With single dowel strip, 6–9: sections using two dowel strips [4].
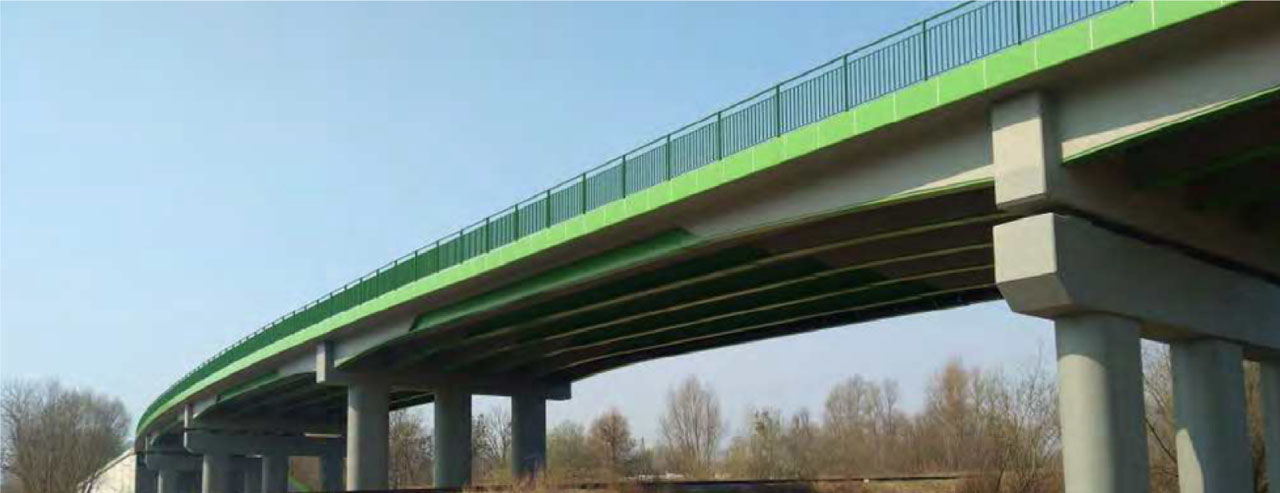
Figure 2
Bridge in Elbląg using both steel and concrete webs in the girder [4, 5].
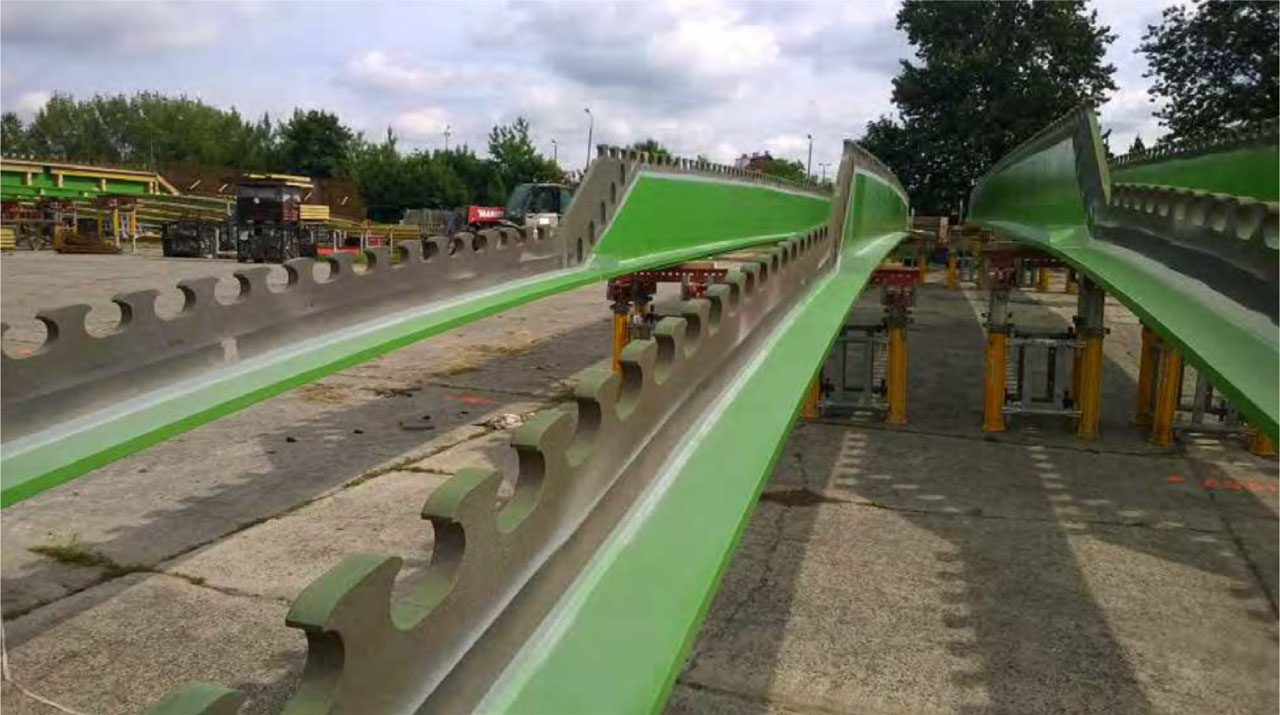
Figure 3
Steel T-sections of Elbląg bridge. High T-sections for mid-span regions, low T-sections for internal support regions [4].
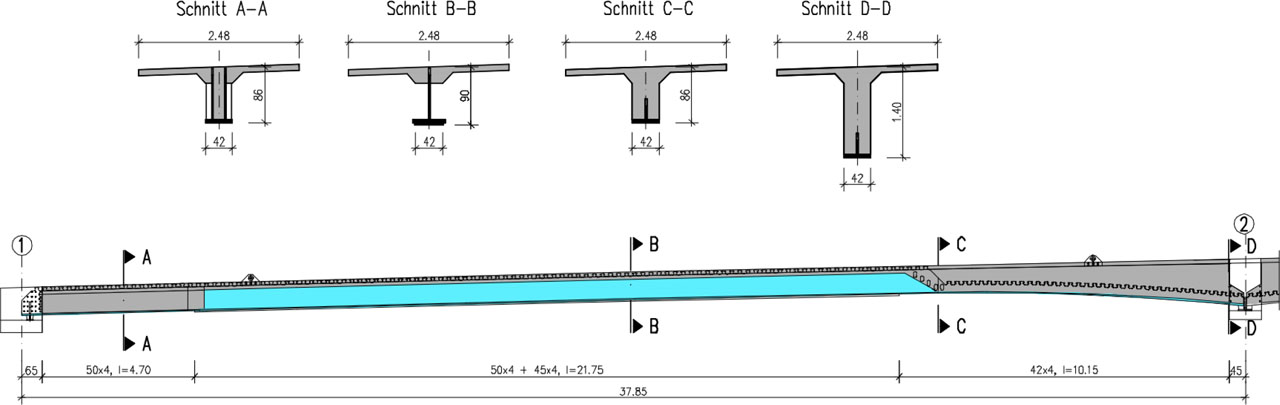
Figure 4
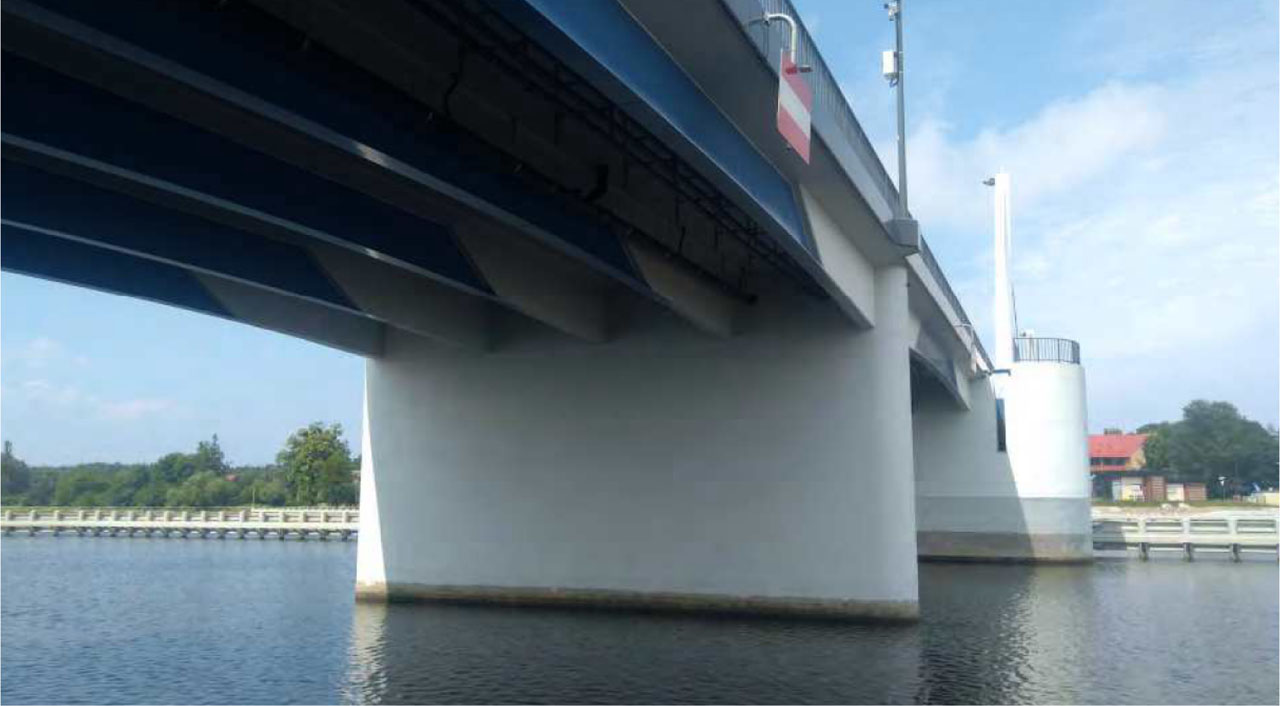
Figure 5
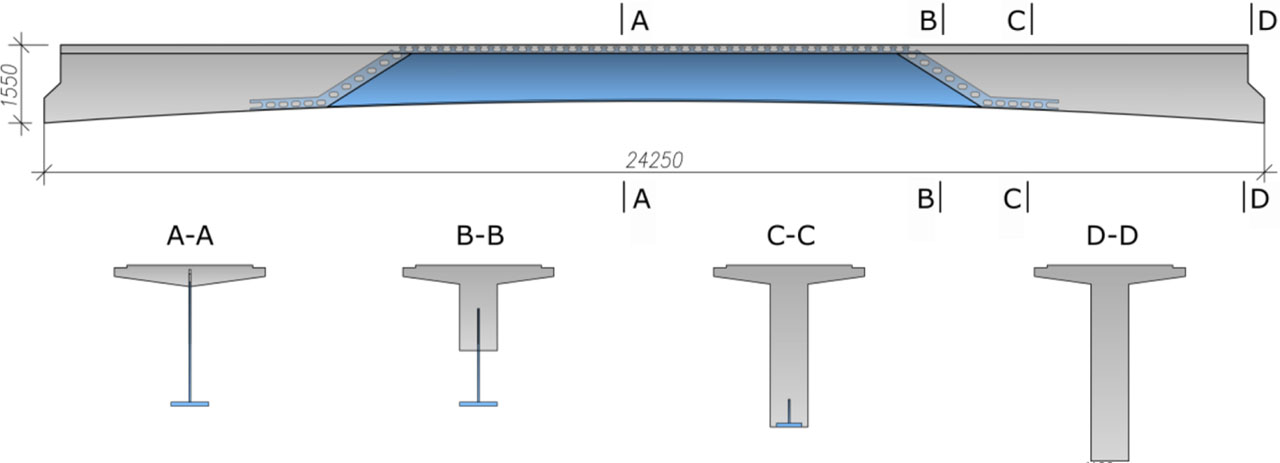
Figure 6
Hybrid girder of Sobieszewo bridge [7].

Figure 7
Cross section of one of the bridges along the S3 road being designed currently by Europrojekt Gdańsk.
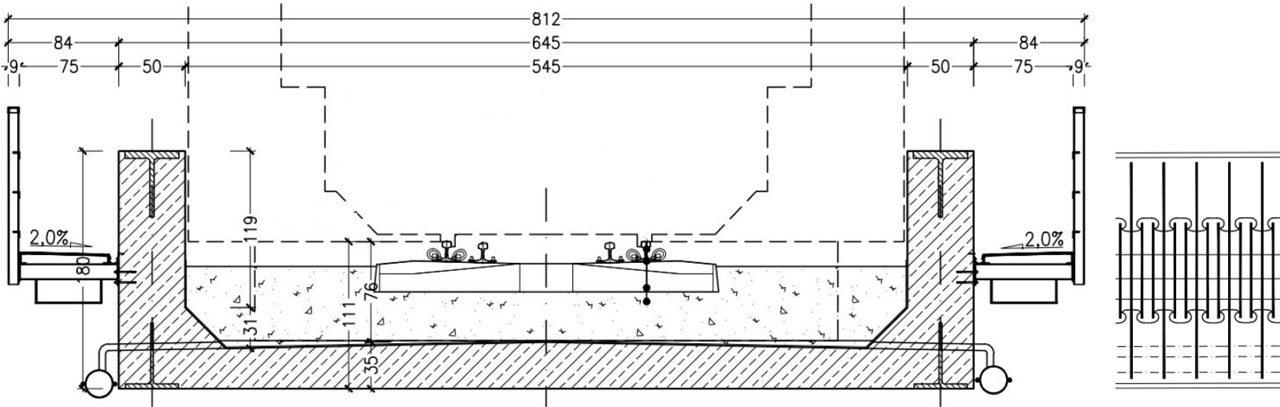
Figure 8
Cross section of the Dąbrowa Górnicza bridge and, on the right, longitudinal section showing the T-sections and rebar arrangement in the girder's web.
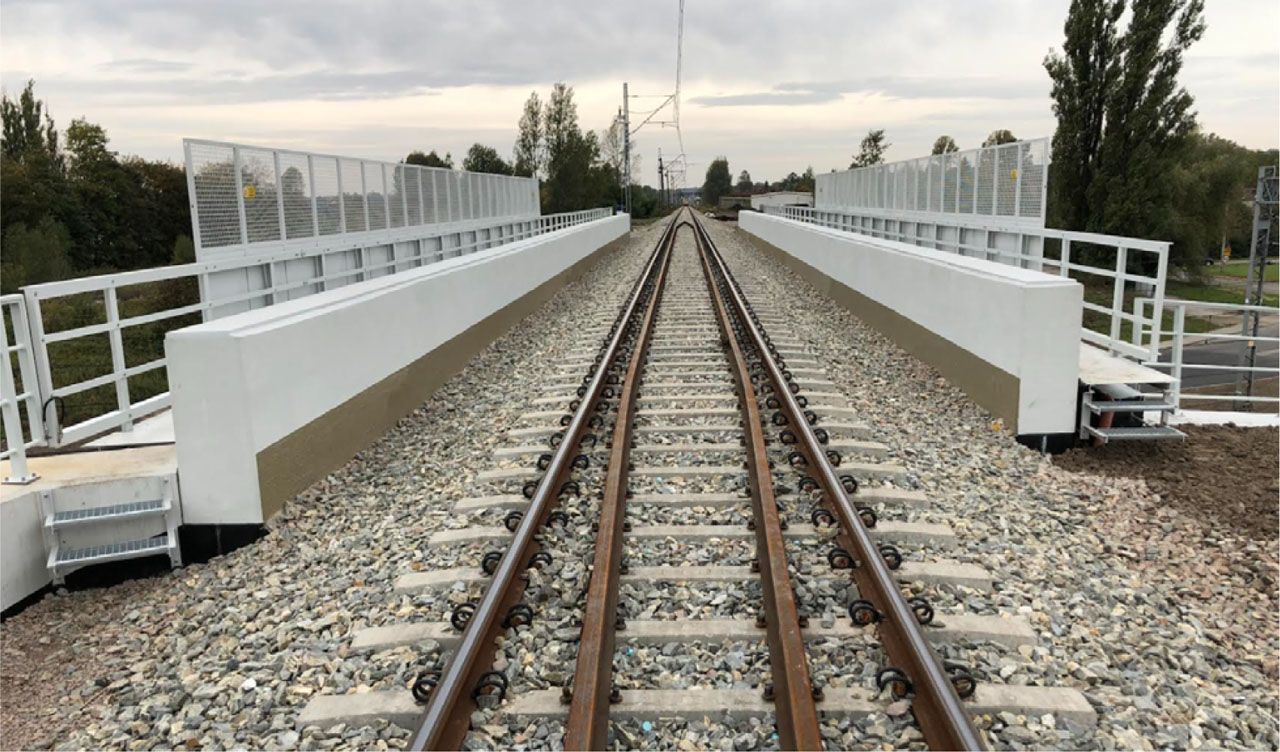
Figure 9
Bridge in Dąbrowa Górnicza after erection. Source: Nowak Mosty.
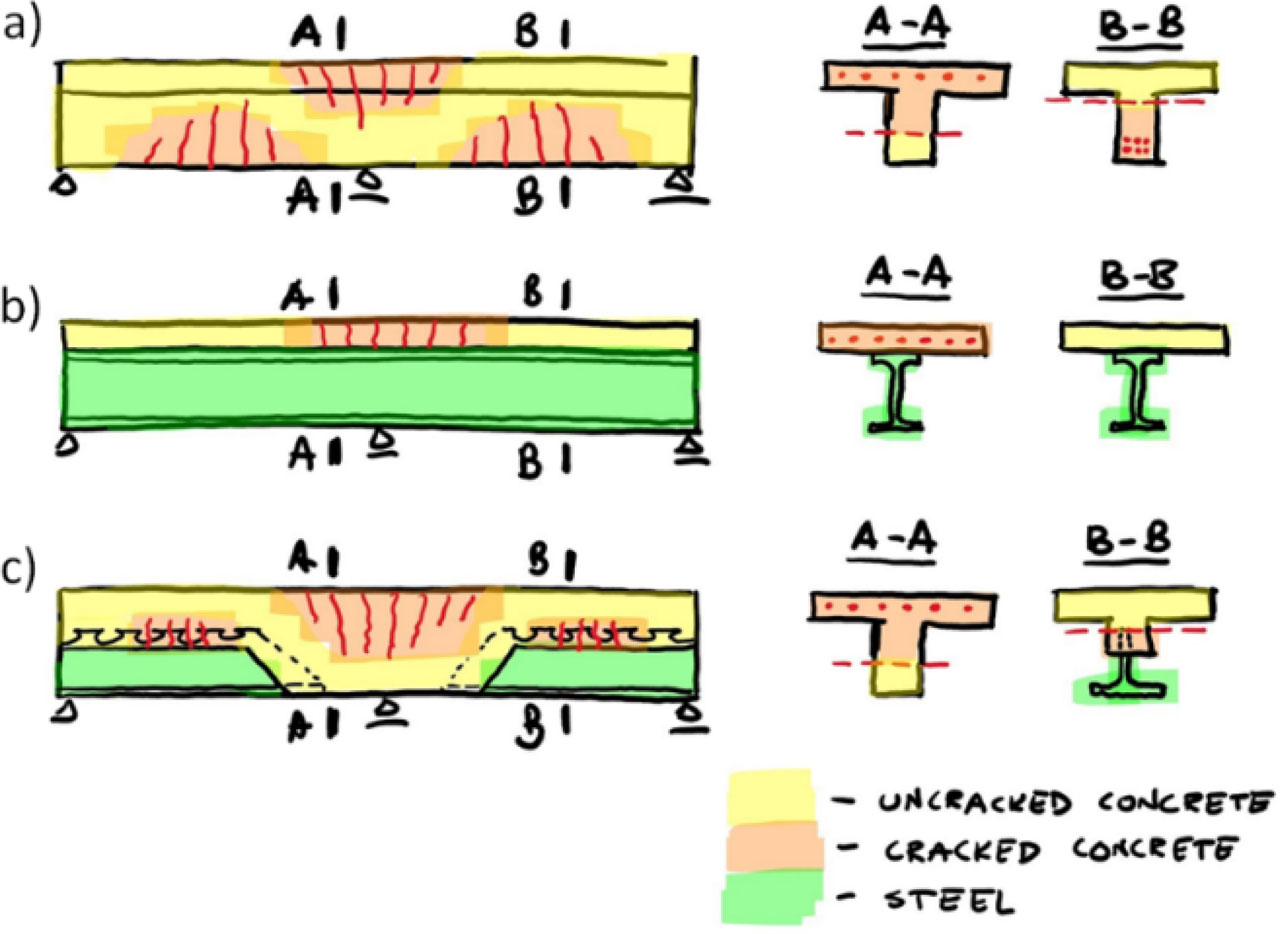
Figure 10
Concrete cracking ranges in (a) reinforced concrete beam, (b) composite beam, (c) hybrid beam.
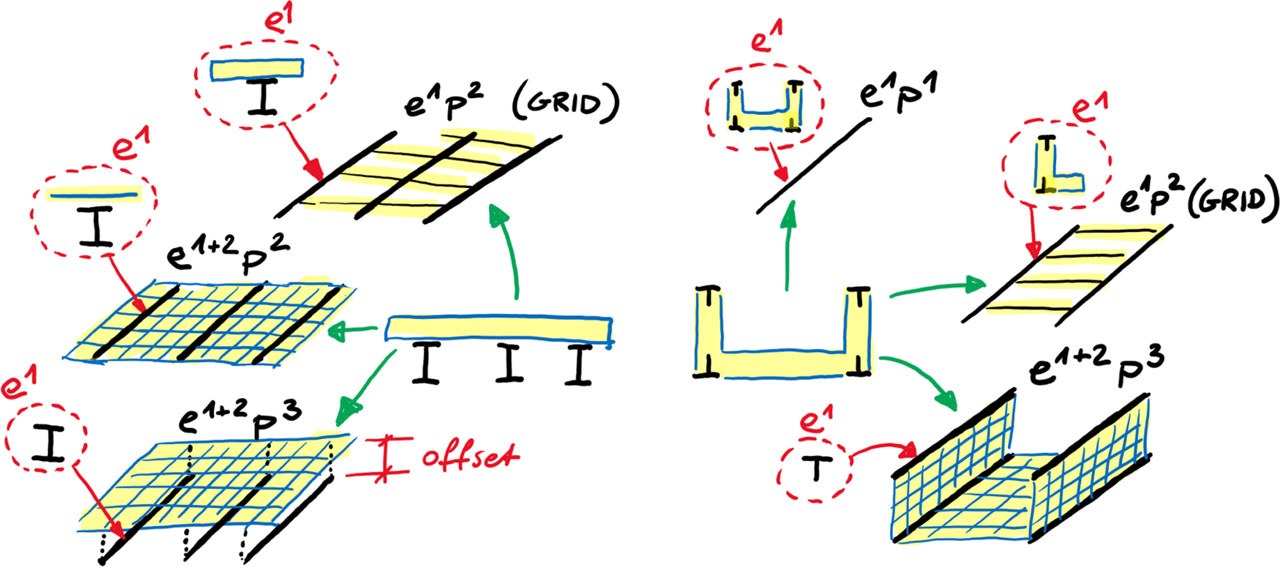
Figure 11
Different numerical models for composite bridges’ analysis (on basis of [9]).
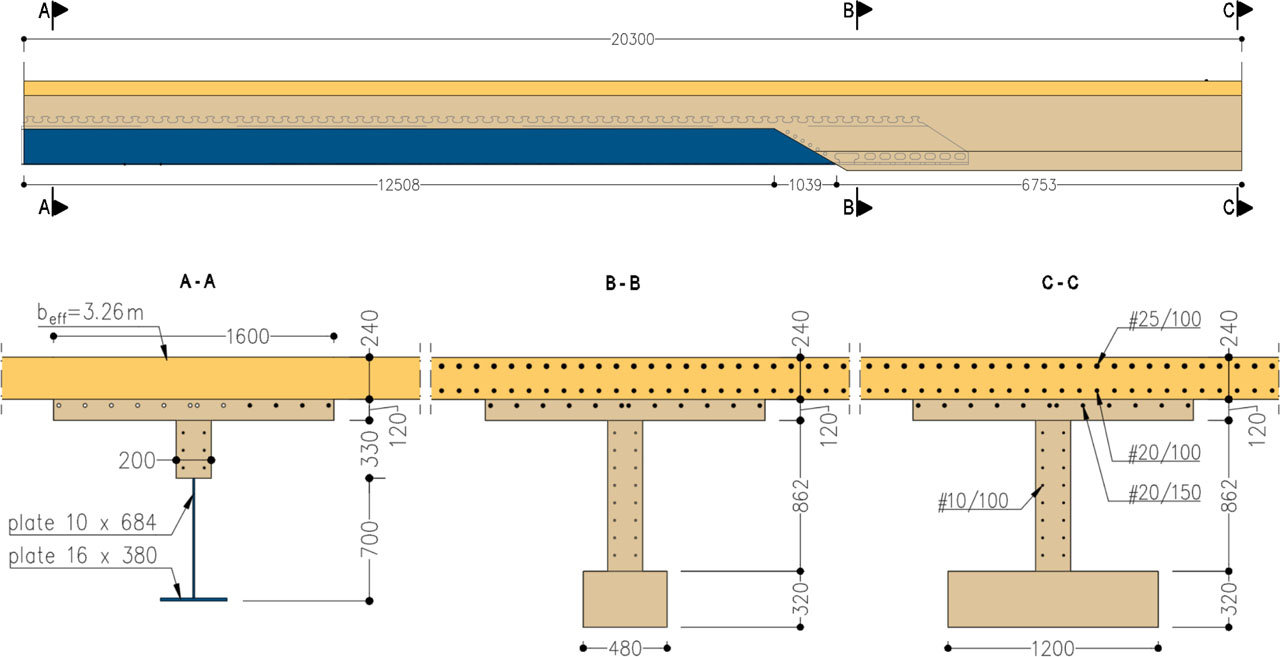
Figure 12
Hybrid beam assumed for FE analysis (rebars only in the tensile regions are displayed).
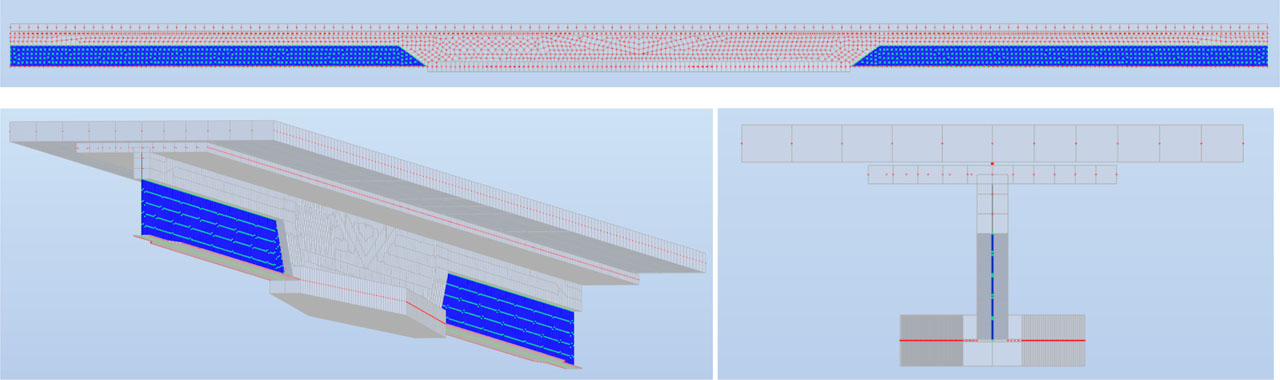
Figure 13
Side view, 3d view and cross section of a finite element model of the considered beam (steel web highlighted in blue).
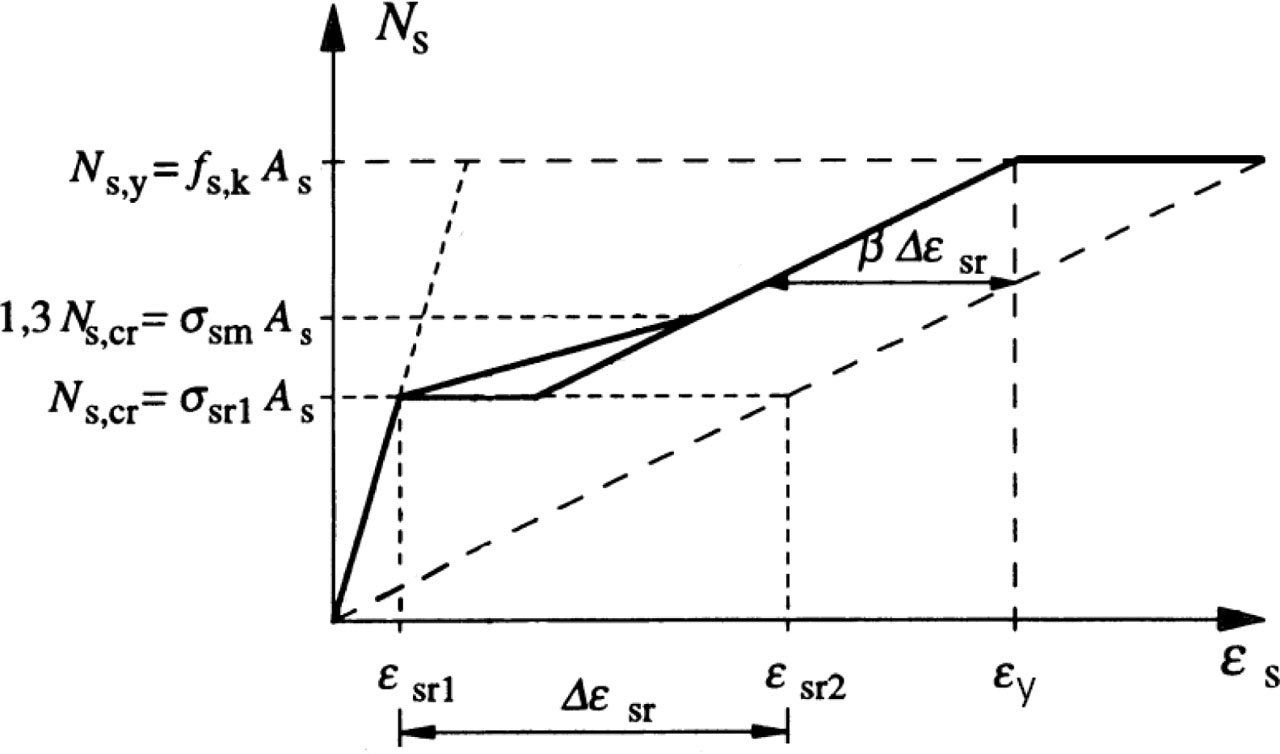
Figure 14
Tension stiffening model adopted in approach C according to annex L1 [27].
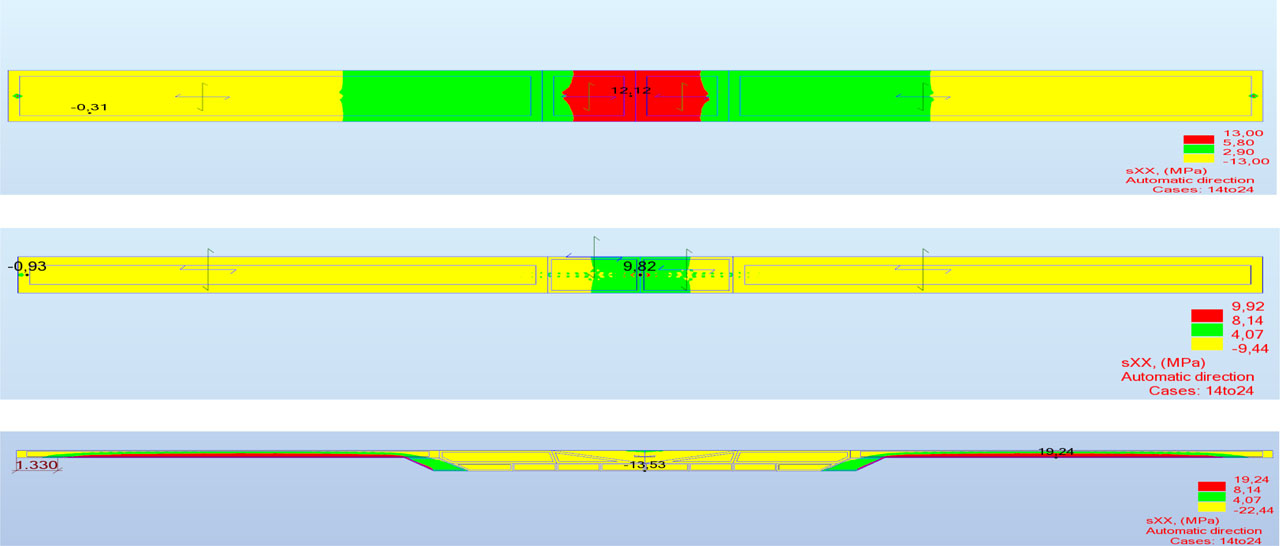
Figure 15
Tensile stress layout in in situ slab (top view), upper slab (top view) and concrete web of the prefab (side view) – uncracked analysis (step 1).
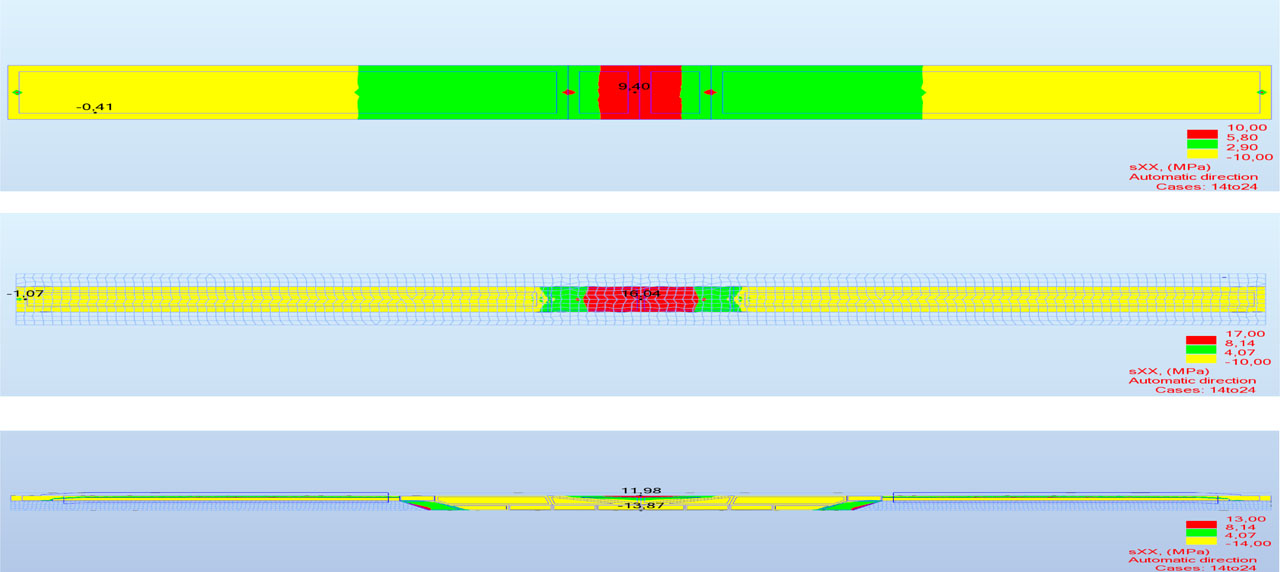
Figure 16
Tensile stress layout in in situ slab (top view), upper slab (top view) and concrete web of the prefab (side view) – cracked analysis (step 2).
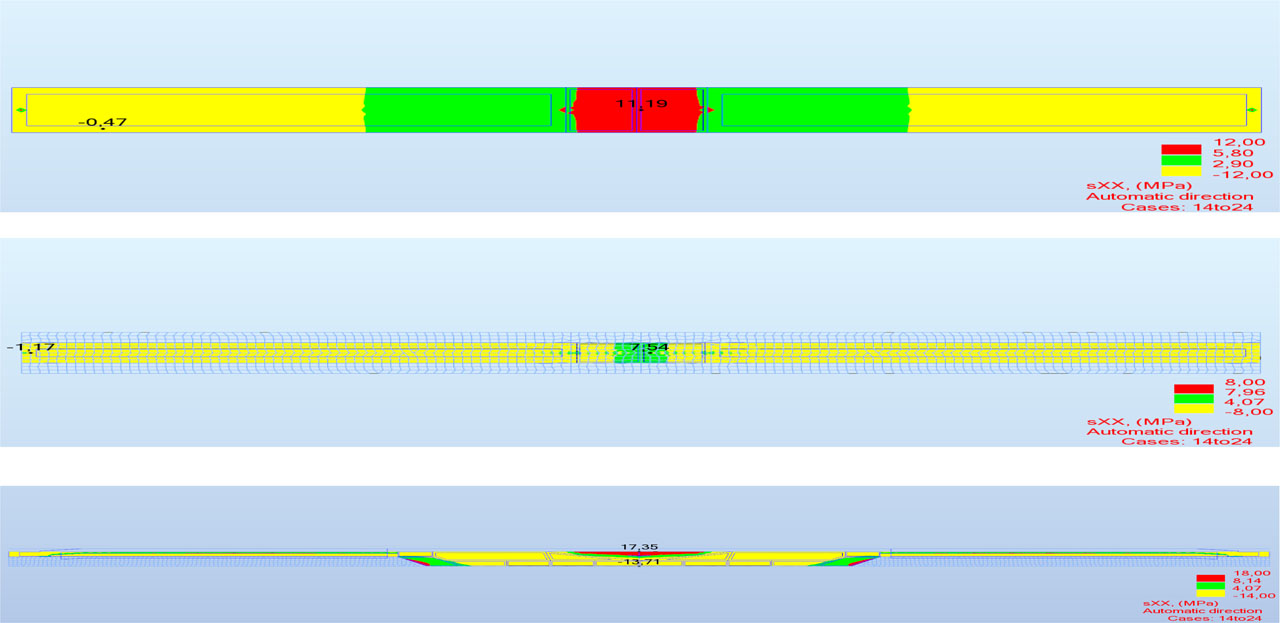
Figure 17
Tensile stress layout in in situ slab (top view), upper slab (top view) and concrete web of the prefab (side view) – cracked analysis (step 3).

Figure 18
Comparison of cracked zones in the web in approaches A, B and C. Cracked zones in slabs are equal to the length of cracked zones in the top part of a web at the internal support.
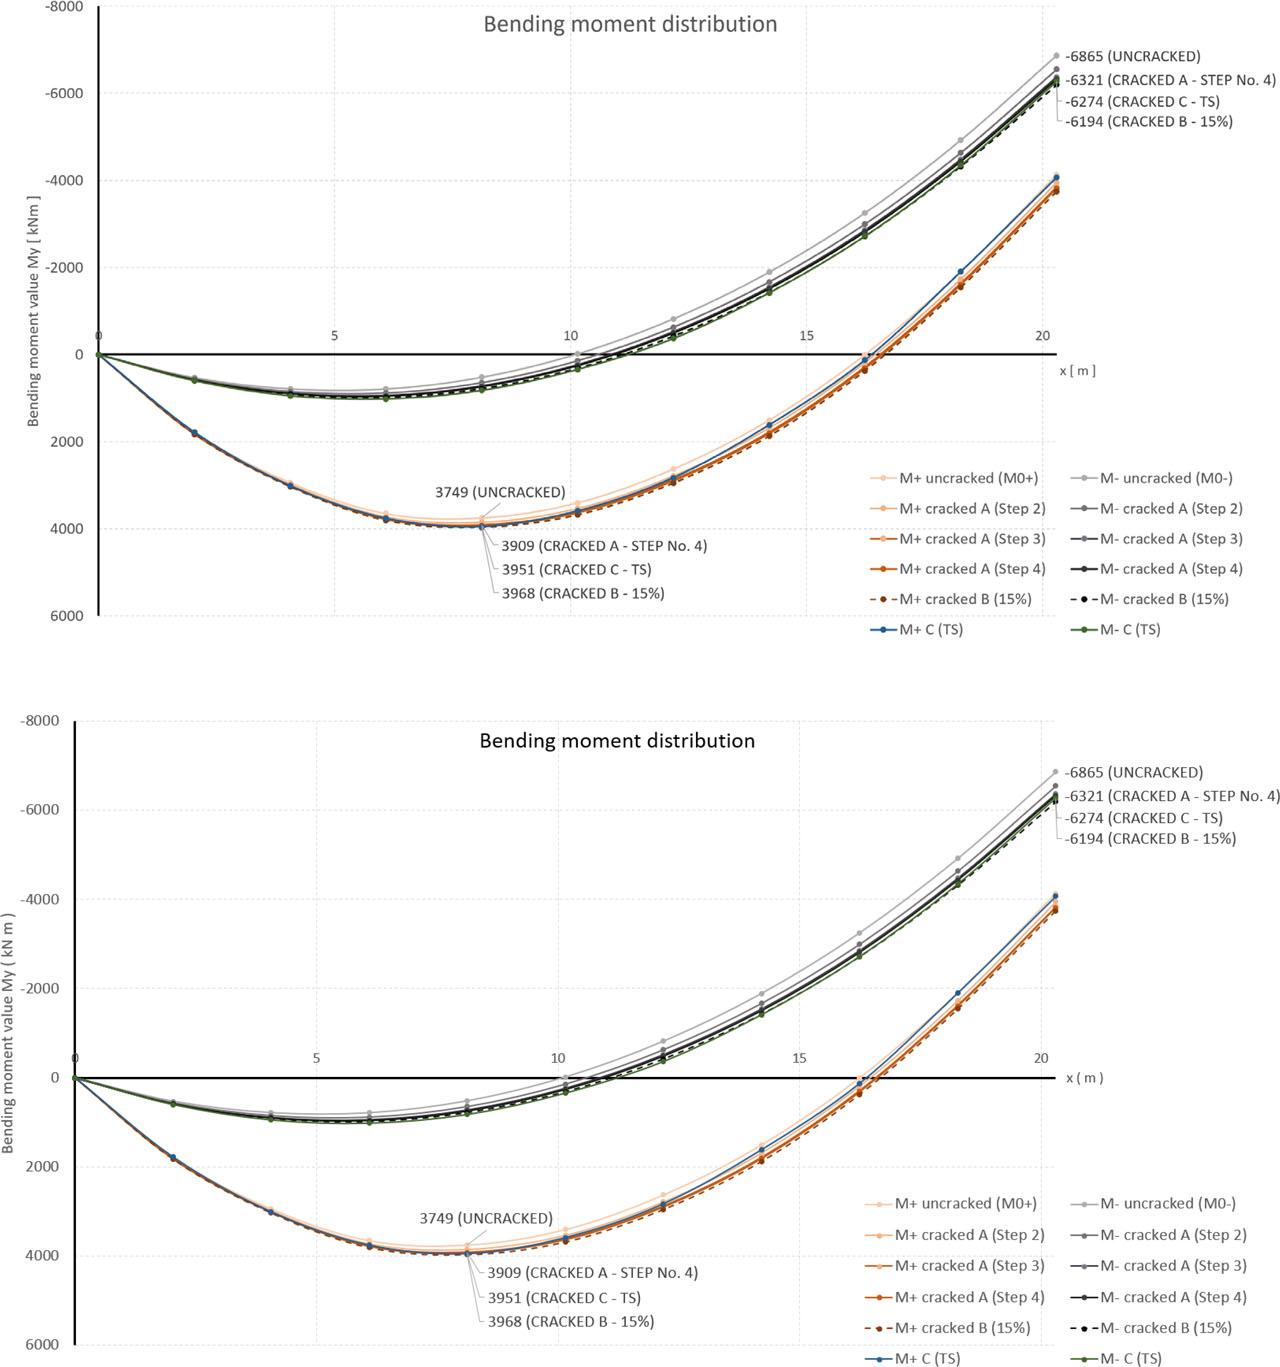
Figure 19
Bending moment envelope depending on the assumed approach (A, B, C).
Table 1
Bending moment values (kN m) along the girder's length (m), depending on the assumed approach (A, B, C). Numerical interpretation of Fig. 19.
| No. | 0 | 1 | 2 | 3 | 4 | 5 | 6 | 7 | 8 | 9 | 10 | M+ / M0+ | M− / M0− | |
|---|---|---|---|---|---|---|---|---|---|---|---|---|---|---|
| Approach | x [m] | 0 | 2,03 | 4,06 | 6,09 | 8,12 | 10,15 | 12,18 | 14,21 | 16,24 | 18,27 | 20,3 | ||
| Base state | M+ uncracked (M0+) | 0 | 1782 | 2940 | 3652 | 3749 | 3401 | 2626 | 1505 | 1 | −1902 | −4129 | 100,0% | |
| M− uncracked (M0−) | 0 | 529 | 787 | 789 | 520 | −16 | −820 | −1892 | −3252 | −4922 | −6865 | 100,0% | ||
| A | M+ cracked A (Step 2) | 0 | 1804 | 2984 | 3727 | 3853 | 3535 | 2786 | 1684 | 183 | −1730 | −3947 | 102,8% | |
| M− cracked A (Step 2) | 0 | 561 | 850 | 885 | 648 | 143 | −628 | −1668 | −2996 | −4634 | −6547 | 95,4% | ||
| M+ cracked A (Step 3) | 0 | 1816 | 3009 | 3768 | 3909 | 3607 | 2870 | 1779 | 279 | −1637 | −3845 | 104,3% | ||
| M− cracked A (Step 3) | 0 | 579 | 884 | 936 | 716 | 229 | −526 | −1548 | −2860 | −4481 | −6369 | 92,8% | ||
| M+ cracked A (Step 4) | 0 | 1820 | 3017 | 3782 | 3928 | 3630 | 2898 | 1811 | 312 | −1607 | −3819 | 104,8% | ||
| M− cracked A (Step 4) | 0 | 584 | 896 | 953 | 739 | 257 | −492 | −1508 | −2814 | −4432 | −6321 | 92,1% | ||
| B | M+ cracked B (15%) | 0 | 1829 | 3035 | 3811 | 3968 | 3682 | 2954 | 1873 | 372 | −1544 | −3748 | 105,8% | |
| M− cracked B (15%) | 0 | 597 | 920 | 990 | 787 | 318 | −419 | −1423 | −2717 | −4321 | −6194 | 90,2% | ||
| C | M+ C (TS) | 0 | 1781 | 3012 | 3760 | 3951 | 3590 | 2828 | 1616 | 125 | −1902 | −4068 | 105,4% | |
| M− C (TS) | 0 | 602 | 947 | 1019 | 824 | 343 | −366 | −1415 | −2719 | −4346 | −6274 | 91,4% |
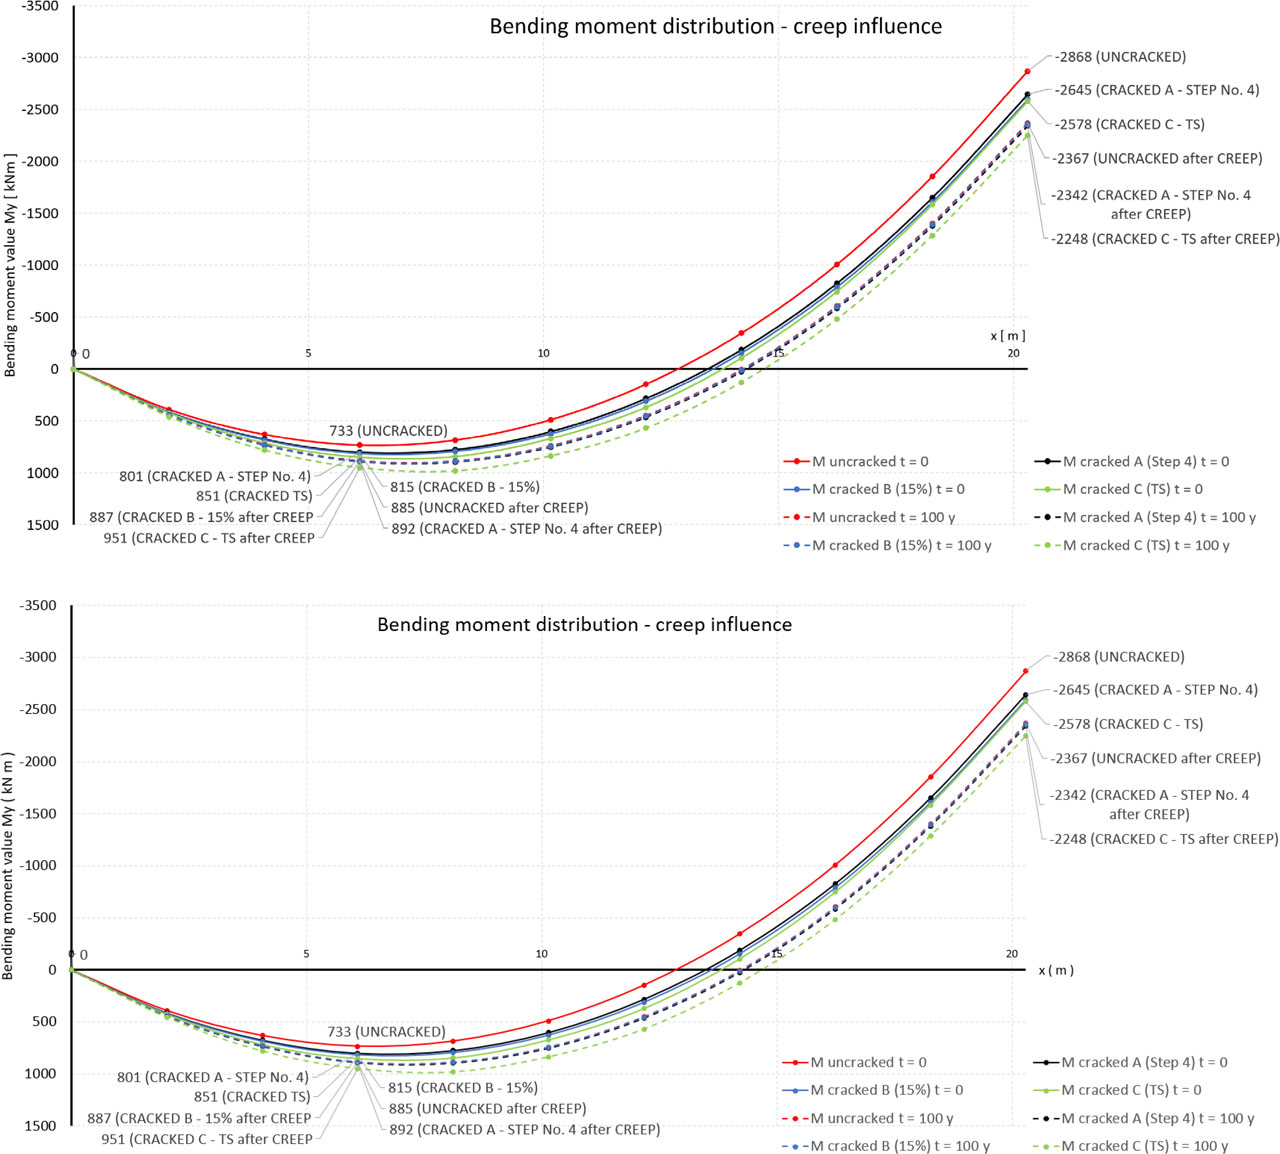
Figure 20
Influence of creep on the bending moment distribution in dependence of the assumed approach (A, B, C). Continuous lines – bending moments without creep, dotted lines – after creeping of concrete.
Table 2
Bending moment values (kN m) along the girder's length (m0 due to creep in dependence of the assumed approach (A, B, C). Numerical interpretation of Fig. 20.
| No. | 0 | 1 | 2 | 3 | 4 | 5 | 6 | 7 | 8 | 9 | 10 | M+ / M0+ | M− / M0− | |
|---|---|---|---|---|---|---|---|---|---|---|---|---|---|---|
| Approach | x [m] | 0 | 2,03 | 4,06 | 6,09 | 8,12 | 10,15 | 12,18 | 14,21 | 16,24 | 18,27 | 20,3 | ||
| Base state | M uncracked t = 0 | 0 | 391 | 631 | 733 | 685 | 489 | 147 | −345 | −1006 | −1853 | −2868 | 100,0% | 100,0% |
| M uncracked t = 100 y | 0 | 442 | 730 | 885 | 887 | 741 | 449 | 8 | −603 | −1401 | −2367 | 120,7% | 82,5% | |
| A | M cracked A (Step 4) t = 100 y | 0 | 442 | 731 | 886 | 888 | 844 | 452 | 12 | −599 | −1397 | −2364 | 109,3% | 92,2% |
| M cracked A (Step 4) t = 100 y | 0 | 444 | 735 | 892 | 896 | 753 | 464 | 25 | −584 | −1379 | −2342 | 121,7% | 81,7% | |
| B | M cracked B (15%) t = 0 | 0 | 419 | 685 | 815 | 794 | 626 | 311 | −154 | −788 | −1607 | −2595 | 111,2% | 90,5% |
| M cracked B (15%) t = 100 y | 0 | 442 | 731 | 887 | 889 | 744 | 453 | 13 | −598 | −1393 | −2360 | 121,0% | 82,3% | |
| C | M cracked C (TS) t = 0 | 0 | 0 | 427 | 715 | 851 | 845 | 672 | 370 | −105 | −746 | −1584 | 116,1% | 89,9% |
| M cracked C (TS) t = 100 y | 0 | 0 | 459 | 782 | 951 | 982 | 838 | 569 | 128 | −480 | −1286 | 129,7% | 78,4% |
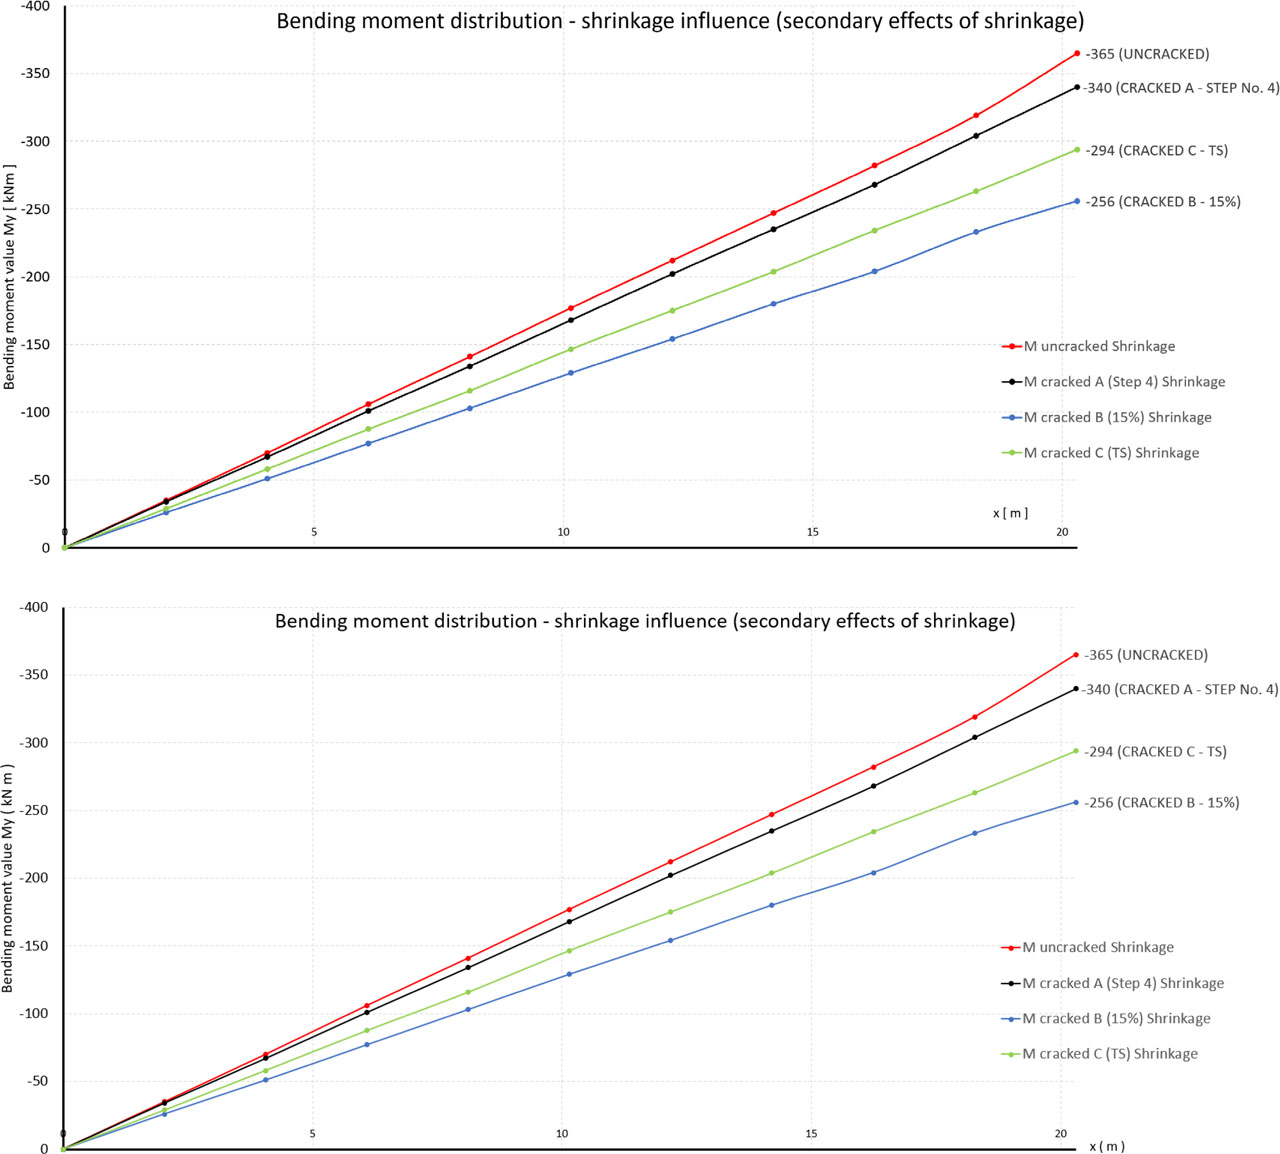
Figure 21
Bending moment distribution due to shrinkage in dependence of the assumed approach (A, B, C).
Table 3
Bending moment values (kN m) along the girder's length (m) due to shrinkage in dependence of the assumed approach (A, B, C). Numerical interpretation of Fig. 21.
| No. | 0 | 1 | 2 | 3 | 4 | 5 | 6 | 7 | 8 | 9 | 10 | M− / M0− | |
|---|---|---|---|---|---|---|---|---|---|---|---|---|---|
| Approach | x [m] | 0 | 2,03 | 4,06 | 6,09 | 8,12 | 10,15 | 12,18 | 14,21 | 16,24 | 18,27 | 20,3 | |
| Base state | M uncracked Shrinkage | 0 | −35 | −70 | −106 | −141 | −177 | −212 | −247 | −282 | −319 | −365 | 100,0% |
| A | M cracked A (Step 4) Shrinkage | 0 | −34 | −67 | −101 | −134 | −168 | −202 | −235 | −268 | −304 | −340 | 93,2% |
| B | M cracked B (15%) Shrinkage | 0 | −26 | −51 | −77 | −103 | −129 | −154 | −180 | −204 | −233 | −256 | 70,1% |
| C | M cracked C (TS) Shrinkage | 0 | −29 | −58 | −88 | −116 | −147 | −175 | −204 | −234 | −263 | −294 | 80,5% |