
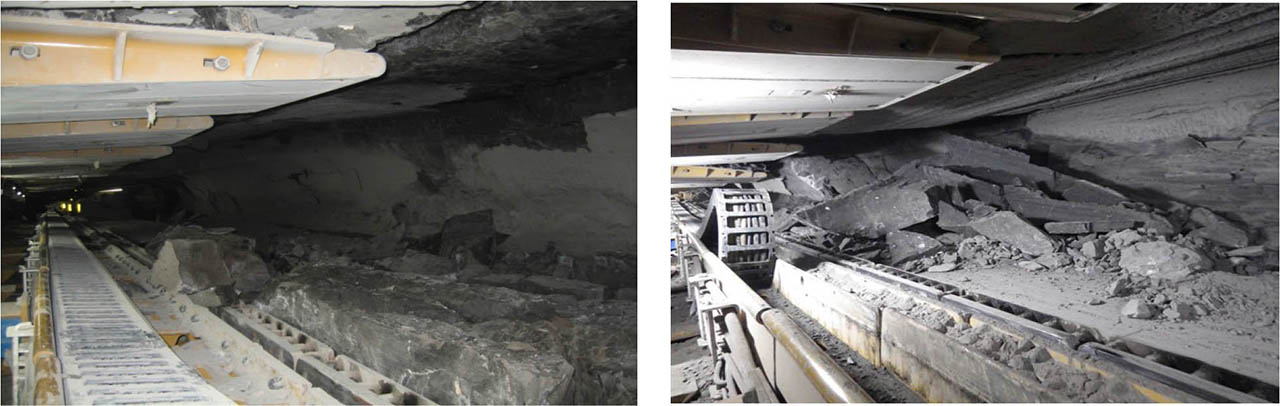
Figure 1
Failures in the 5A/1 longwall a) roof falls, b) wall spalling.
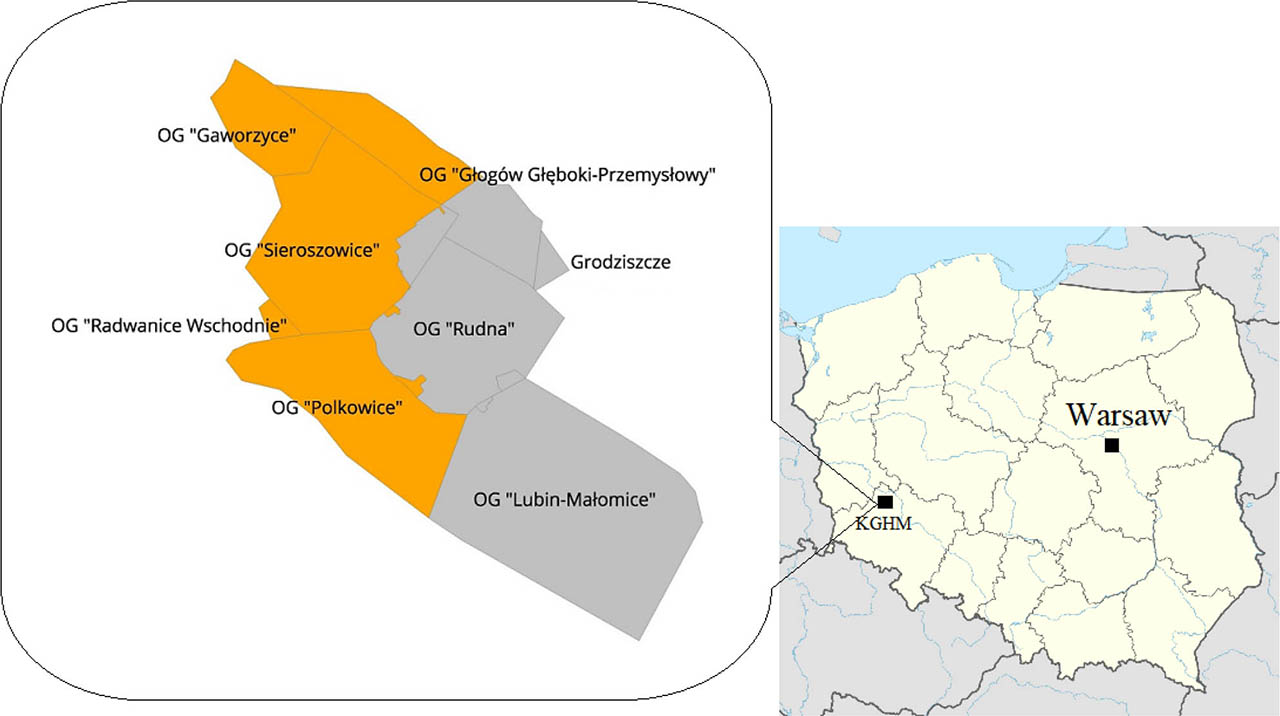
Figure 2
Location of the Polkowice-Sieroszowice copper mine.
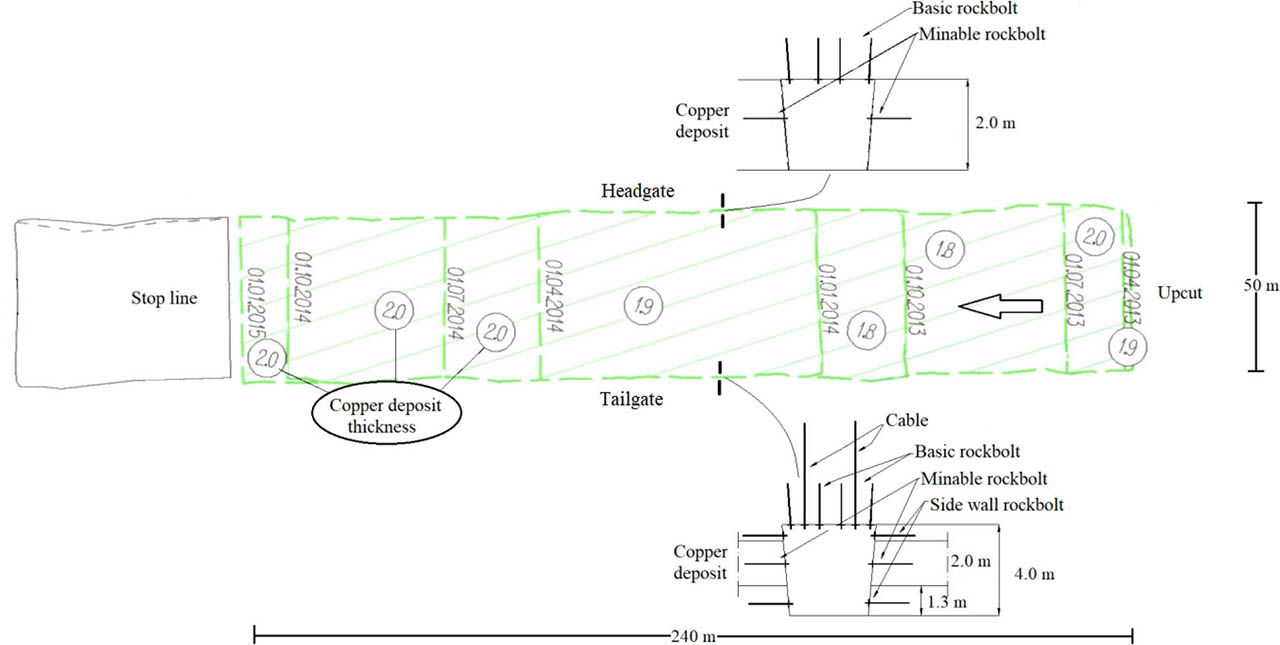
Figure 3
Outline of the A5/1 copper longwall (not to scale).
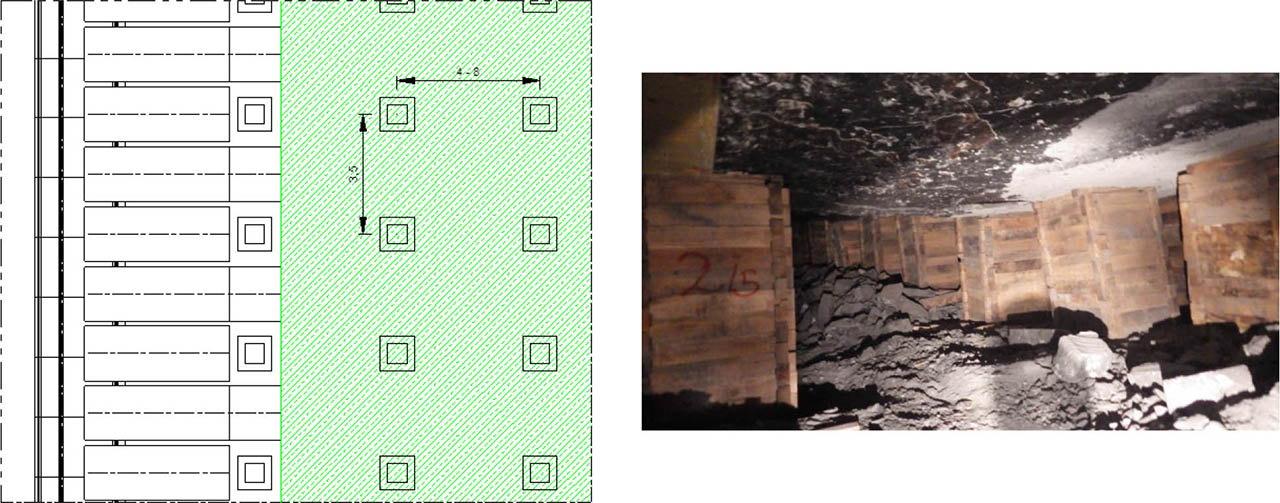
Figure 4
Spacing of box crib behind the powered roof support.
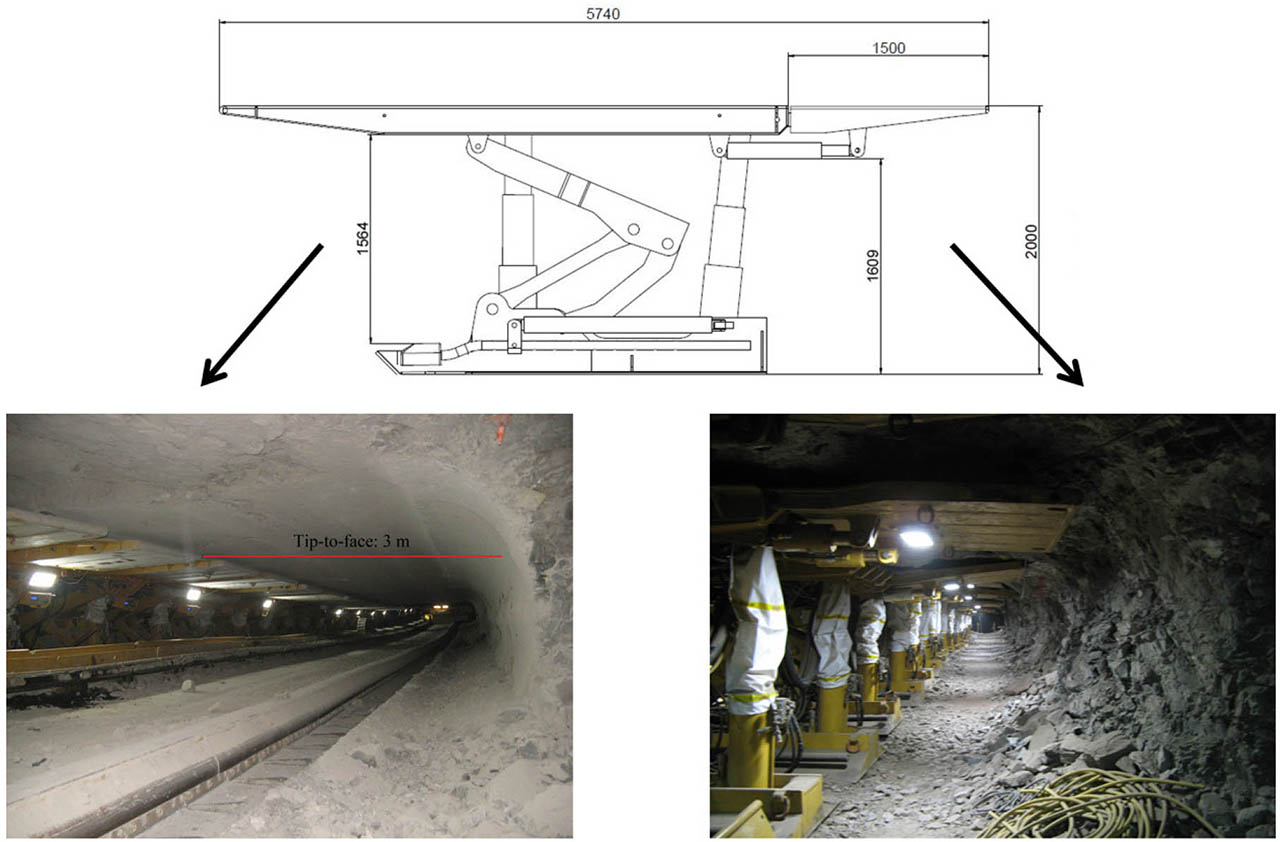
Figure 5
Outline of the powered roof support applied in the 5A/1 longwall panel at the set-up stage.
Table 1
Lithology of rock mass in the A5 region.
| Rock mass | Rock layer thickness (m) | |
|---|---|---|
| Anhydrite | 157 | Roof rocks |
| Limy dolomite (I) | 8 | |
| Limy dolomite (I) | 9 | |
| Compact limy dolomite (II) | 1.0 | |
| Compact limy dolomite (II) | 0.7 | |
| Compact limy dolomite (II) | 0.5 | |
| Dolomite + shale | 2.0 | Copper deposit |
| Grey sandstone | 4.4 | Floor rocks |
| Red sandstone | 200 |
Table 2
Mechanical parameters of intact rocks in the A5 region.
| Bulk modulus, K (GPa) | Shear modulus, G (GPa) | Friction angle, θ (°) | Cohesion, c (MPa) | Tensile strength, Rt (MPa) | Compressive strength, Rc (MPa) | Density, γ (kg/m3) | |
|---|---|---|---|---|---|---|---|
| Anhydrite | 21.6 | 13.5 | 34 | 14.5 | 6.4 | 92.6 | 2950 |
| Dolomite, limestone upper (I) | 16.07 | 11.07 | 45 | 12.8 | 5.5 | 115.5 | 2750 |
| Dolomite, limestone lower (II) | 14.72 | 10.13 | 42 | 10.0 | 4.2 | 60.0 | 2650 |
| Copper deposit | 11.27 | 8.44 | 27 | 8.0 | 3.5 | 68.0 | 2600 |
| Grey sandstone | 5.12 | 4.32 | 32 | 5.6 | 2.0 | 37.0 | 2200 |
| Red sandstone | 3.72 | 3.36 | 30 | 4.8 | 1.1 | 25.6 | 1900 |
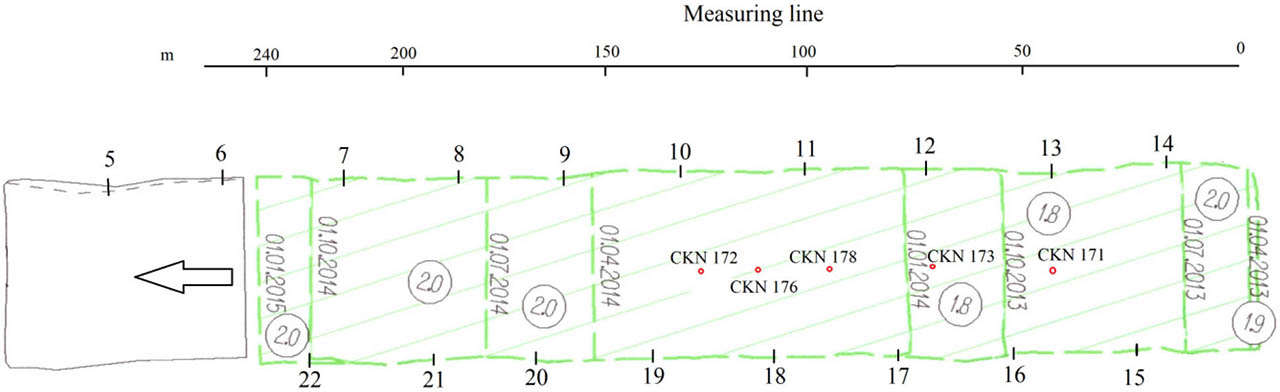
Figure 6
Location of the convergence points (not to scale).
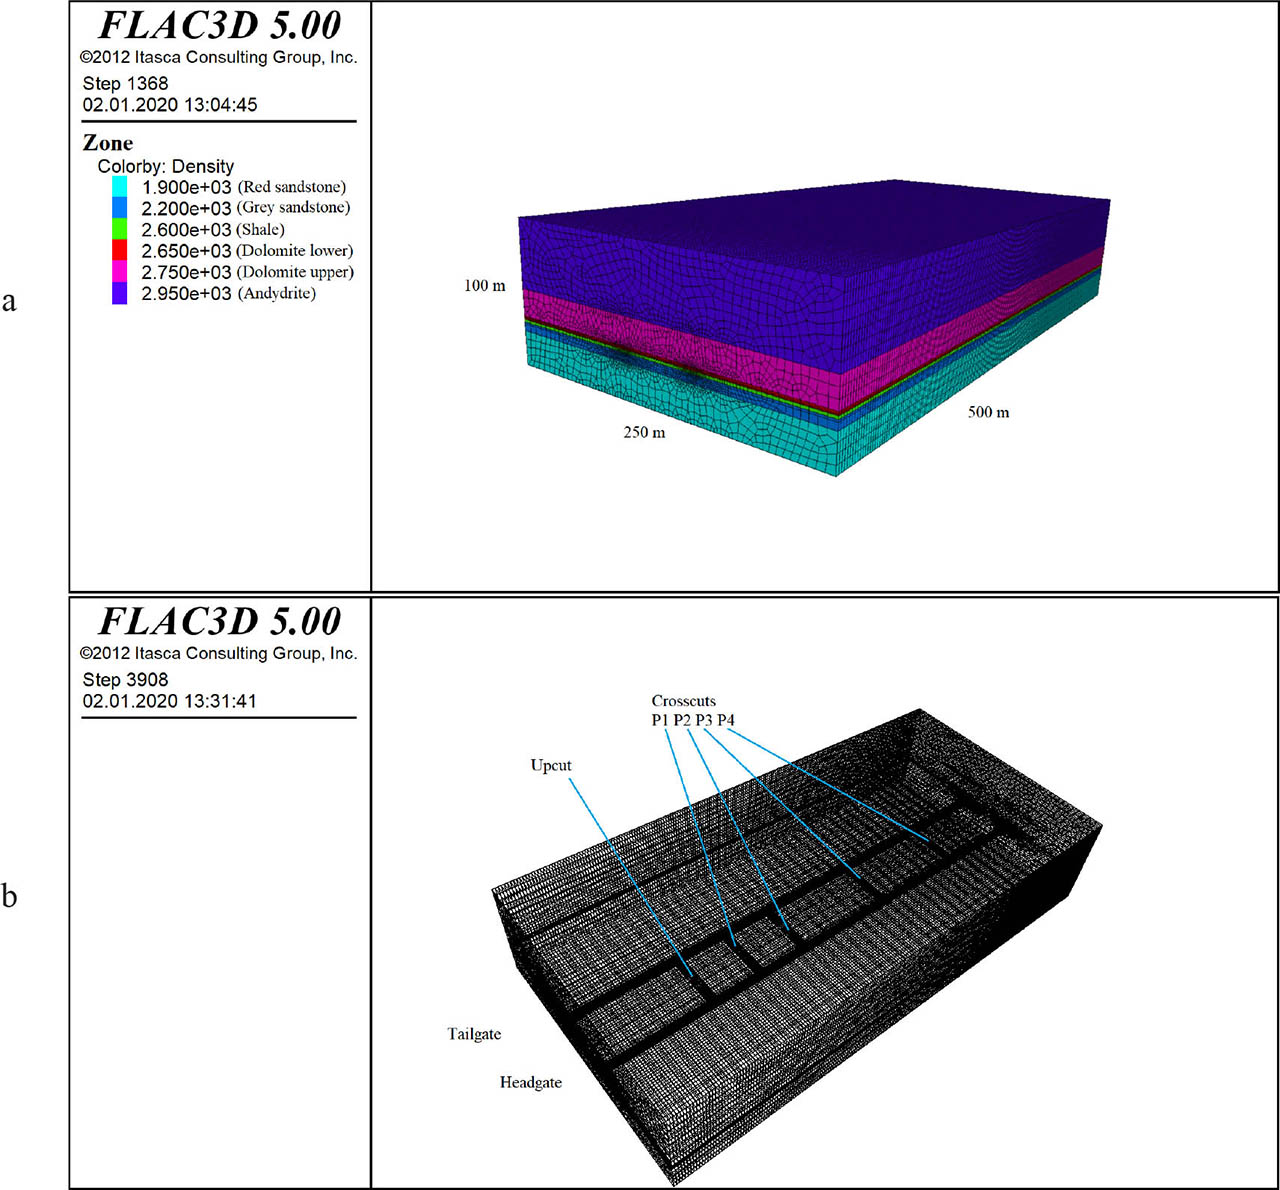
Figure 7
3D model: a) initial model; b) outline of the 5A/1 longwall panel
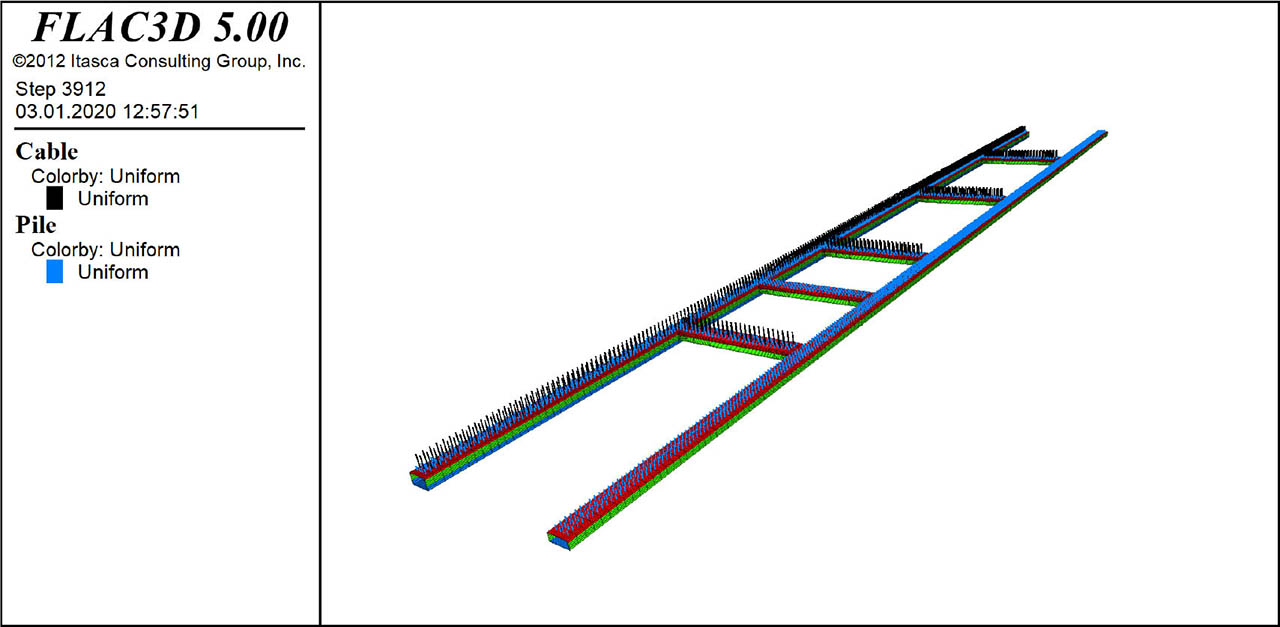
Figure 8
Cable elements (black) and rockbolt elements (blue) in a 3D model.
Table 3
Cable element and rockbolt element properties.
| Rockbolt element | Cable element | ||
|---|---|---|---|
| Rockbolt diameter, m | 0.02 | Cable diameter, m | 0.0155 |
| Young's modulus, GPa | 200 | Young's modulus, GPa | 200 |
| Cross-sectional area, m2 | 3.14e-4 | Cross-sectional area, m2 | 1.89e-4 |
| Exposed perimeter, m | 0.063 | Exposed perimeter, m | 0.049 |
| Axial tensile yield strength, N | 153e3 | Tensile yield strength, N | 250e3 |
| Normal coupling spring cohesion, N/m | 2e6 | Grout cohesive strength (force), N/m | 190e3 |
| Shear coupling spring | 0.5e6 | Grout stiffness, | 0.4e10 |
| cohesion, N/m | N/m/m | ||
| Normal coupling spring stiffness, N/m/m | 1e10 | ||
| Shear coupling spring stiffness, N/m/m | 40e6 | ||
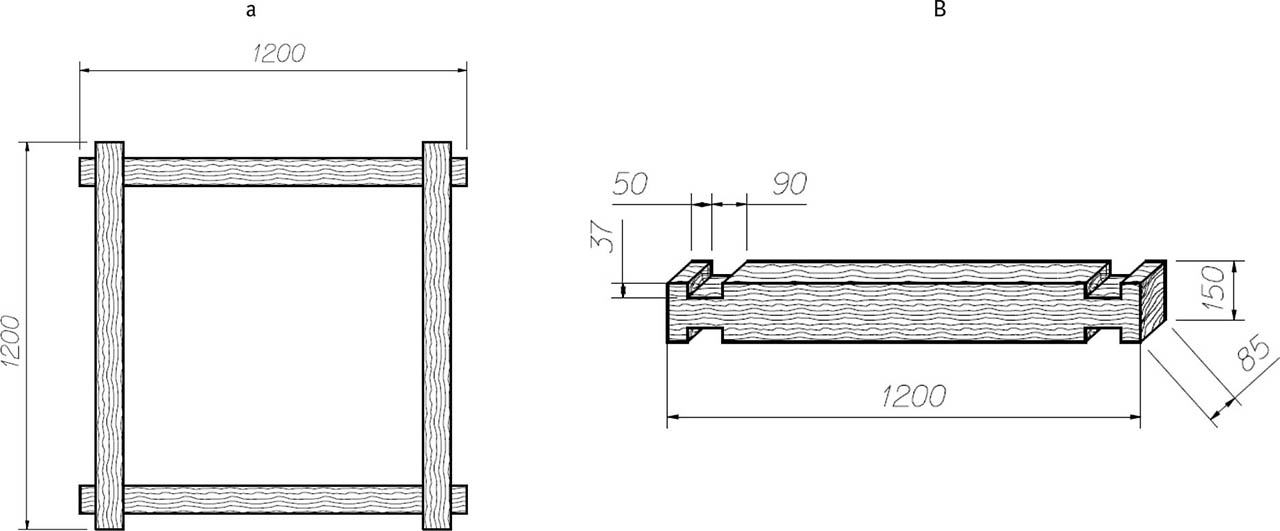
Figure 9
Sketch of the LINK-N-LOCK box crib: a) top view, b) dimensions of a single crib.
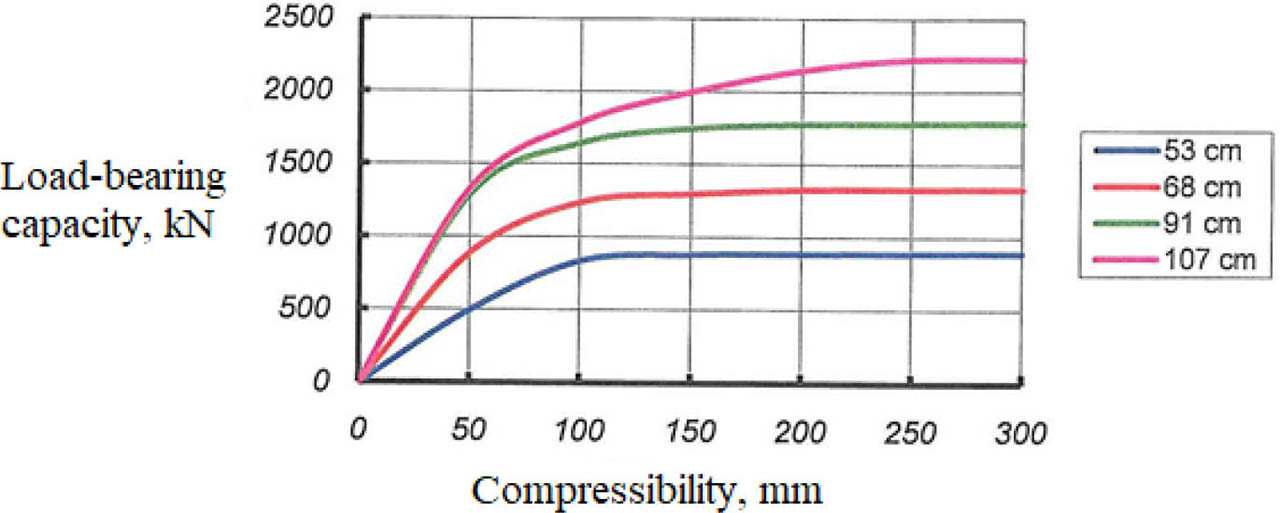
Figure 10
Load-bearing capacity of the LINK-N-LOCK box crib at the height of 2 m with different element lengths.
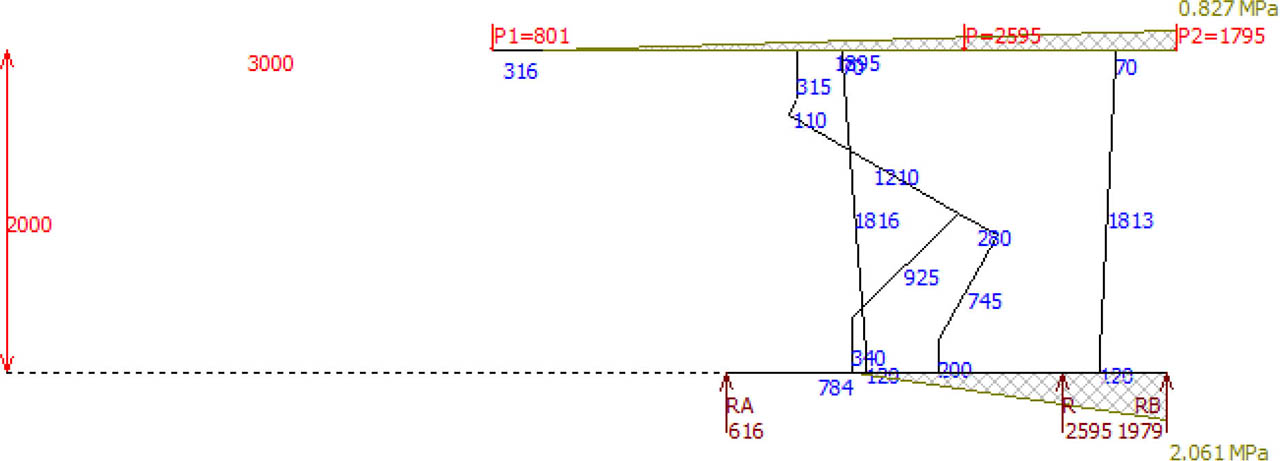
Figure 11
The value and distribution of the load-bearing capacity of the powered roof support with pressure of 32 MPa set in the hydraulic legs for an operating height of 2 m.
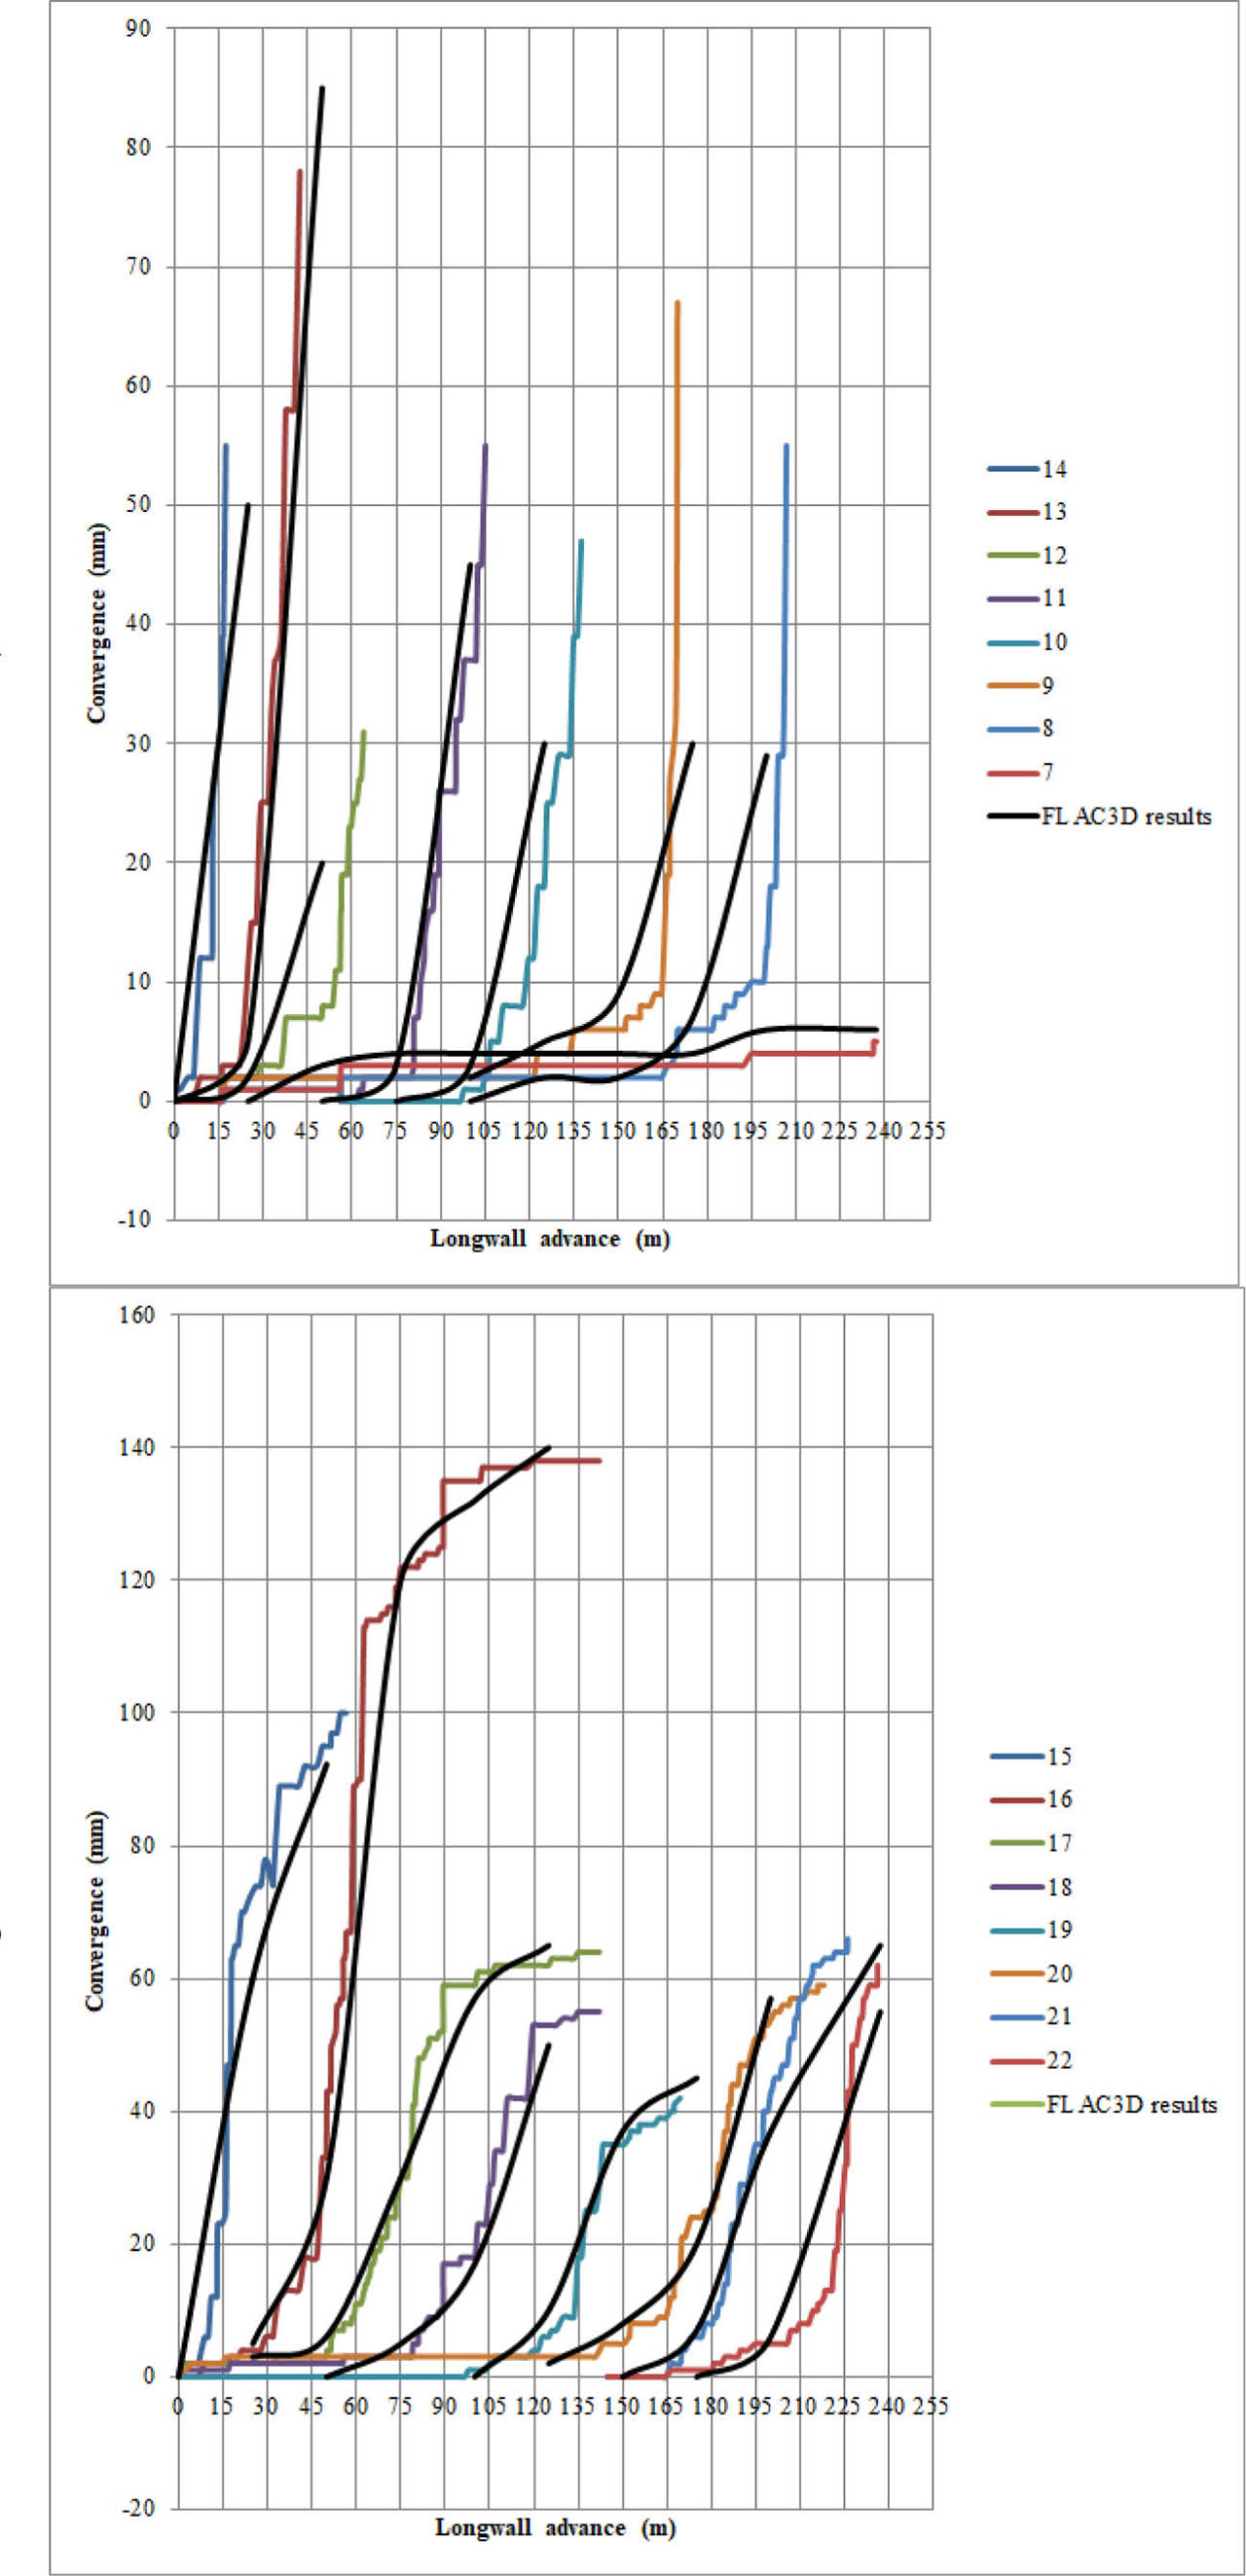
Figure 12
Progress of vertical convergence at: a) headgate, b) tailgate.
Table 4
Mechanical parameters of rock mass adopted for numerical modelling.
| Bulk modulus, K (GPa) | Shear modulus, G (GPa) | Friction angle, θ (°) | Cohesion, c (MPa) | Tensile strength, Rt (MPa) | Density, γ (kg/m3) | |
|---|---|---|---|---|---|---|
| Anhydrite | 3.60 | 2.25 | 34.0 | 2.40 | 1.10 | 2950 |
| Dolomite, limestone upper | 2.70 | 1.84 | 45.0 | 2.20 | 0.93 | 2750 |
| Dolomite, limestone lower | 2.40 | 1.70 | 42.0 | 1.70 | 0.70 | 2650 |
| Copper deposit | 1.80 | 1.40 | 27.0 | 1.35 | 0.60 | 2600 |
| Grey sandstone | 1.30 | 1.10 | 32.0 | 1.25 | 0.50 | 2200 |
| Red sandstone | 0.80 | 0.70 | 30.0 | 1.08 | 0.45 | 1900 |
Table 5
Mechanical parameters of rocks for the strain-softening model.
| Bulk modulus, K (GPa) | Shear modulus, G (GPa) | Friction angle, θ (°) | Cohesion, c (MPa) | Tensile strength, Rt (MPa) | Density, γ (kg/m3) | Residual friction angle, θ (°) | Residual cohesion, cr (MPa) | Residual tensile strength, Rt r (MPa) | |
|---|---|---|---|---|---|---|---|---|---|
| Dolomite, limestone lower | 2.40 | 1.70 | 42.0 | 1.70 | 0.70 | 2650 | 32 | 0.7 | 0.15 |
| Copper deposit | 1.80 | 1.40 | 27.0 | 1.35 | 0.60 | 2600 | 22 | 0.35 | 0.10 |
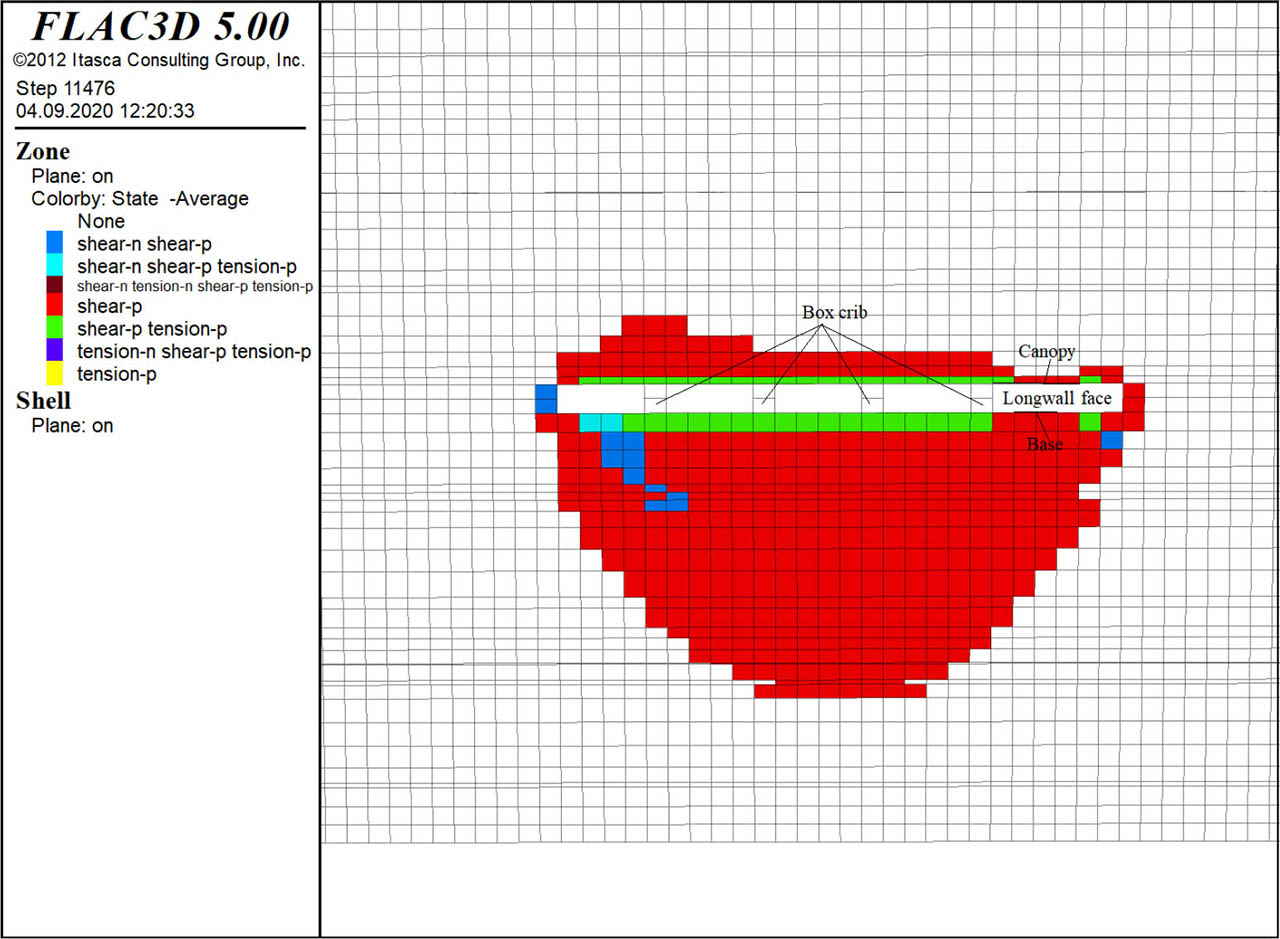
Figure 13
Failure around the longwall face using the Mohr–Coulomb model.
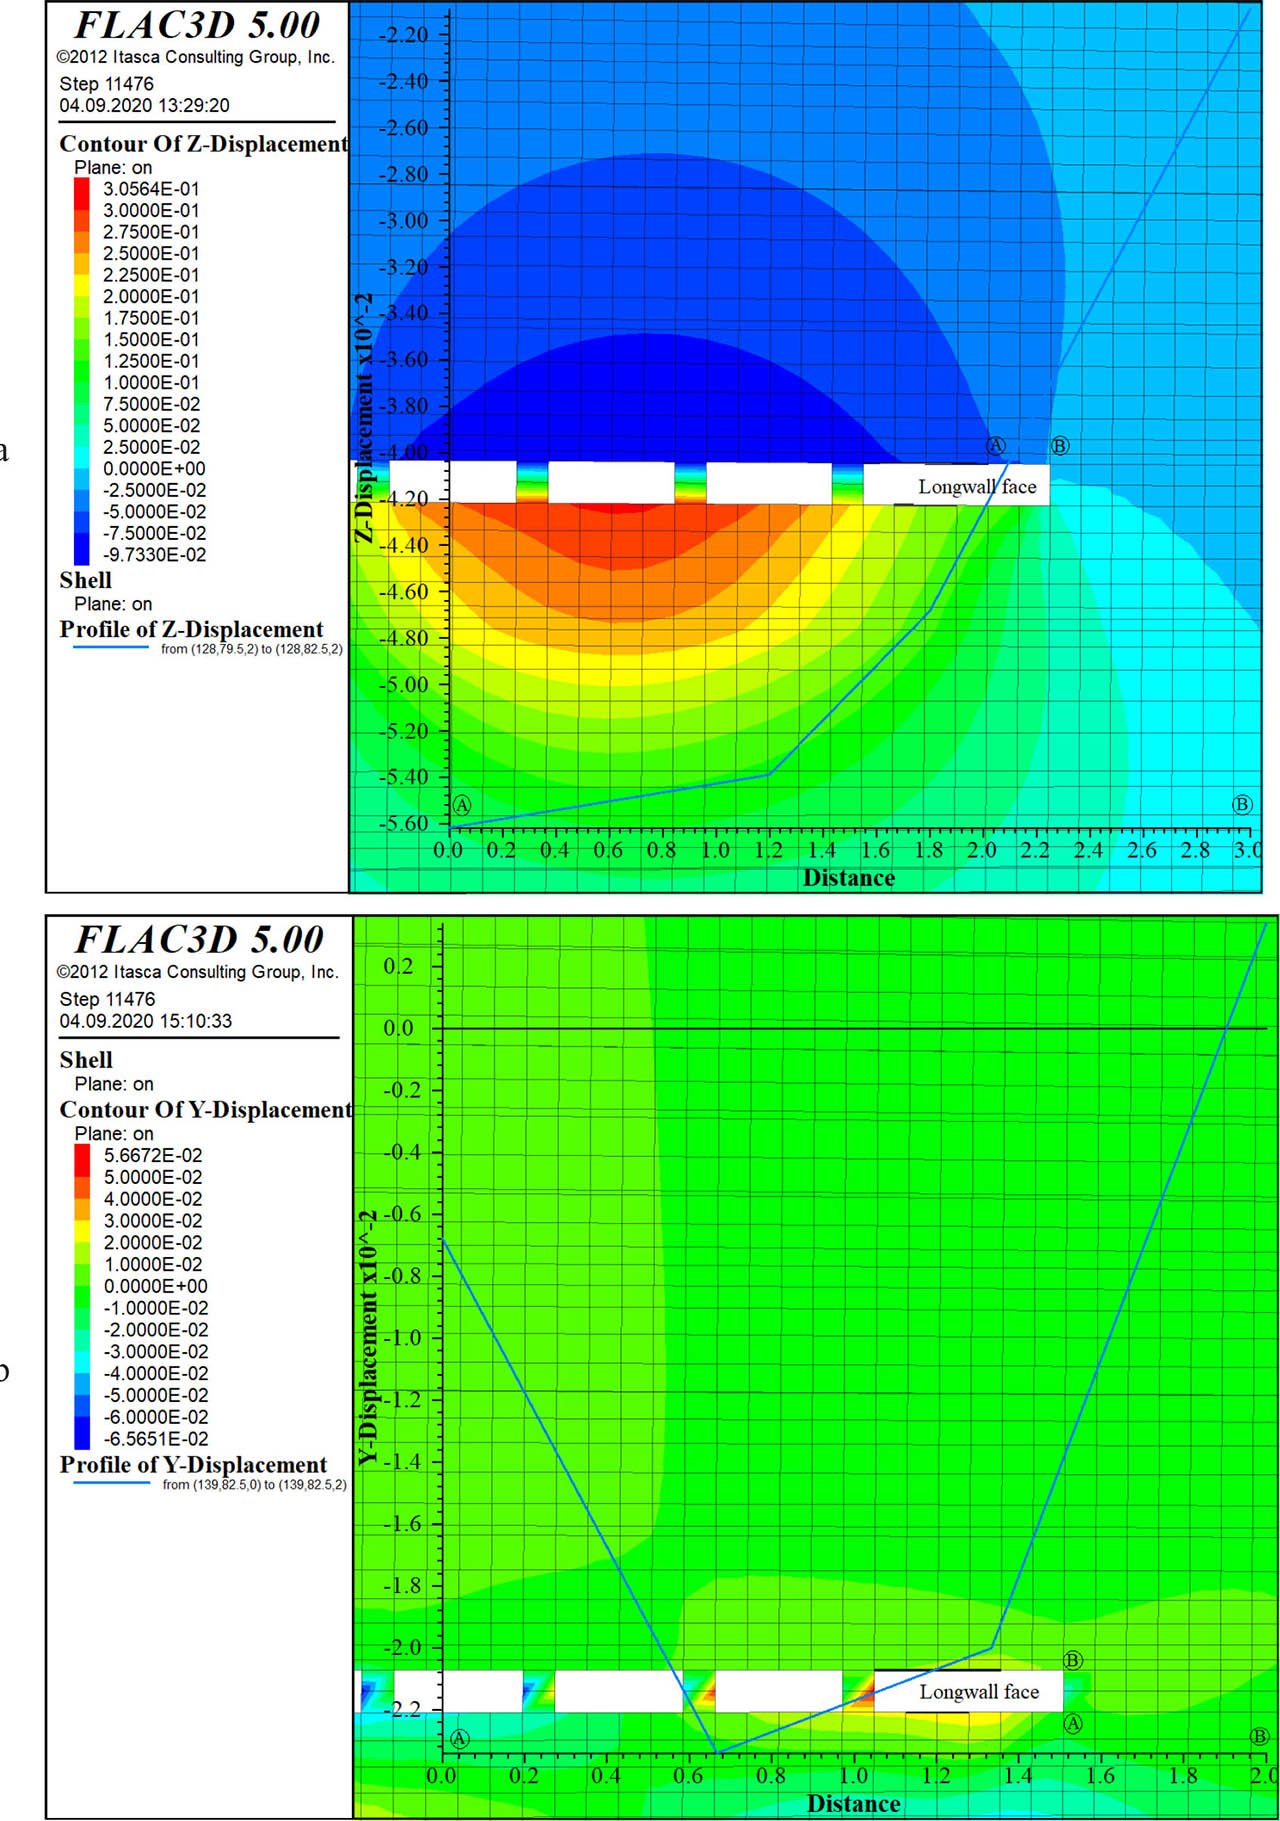
Figure 14
Displacement around the longwall face using the Mohr–Coulomb model: a) vertical displacement along the tip-to-face distance, b) horizontal displacement along the longwall face.
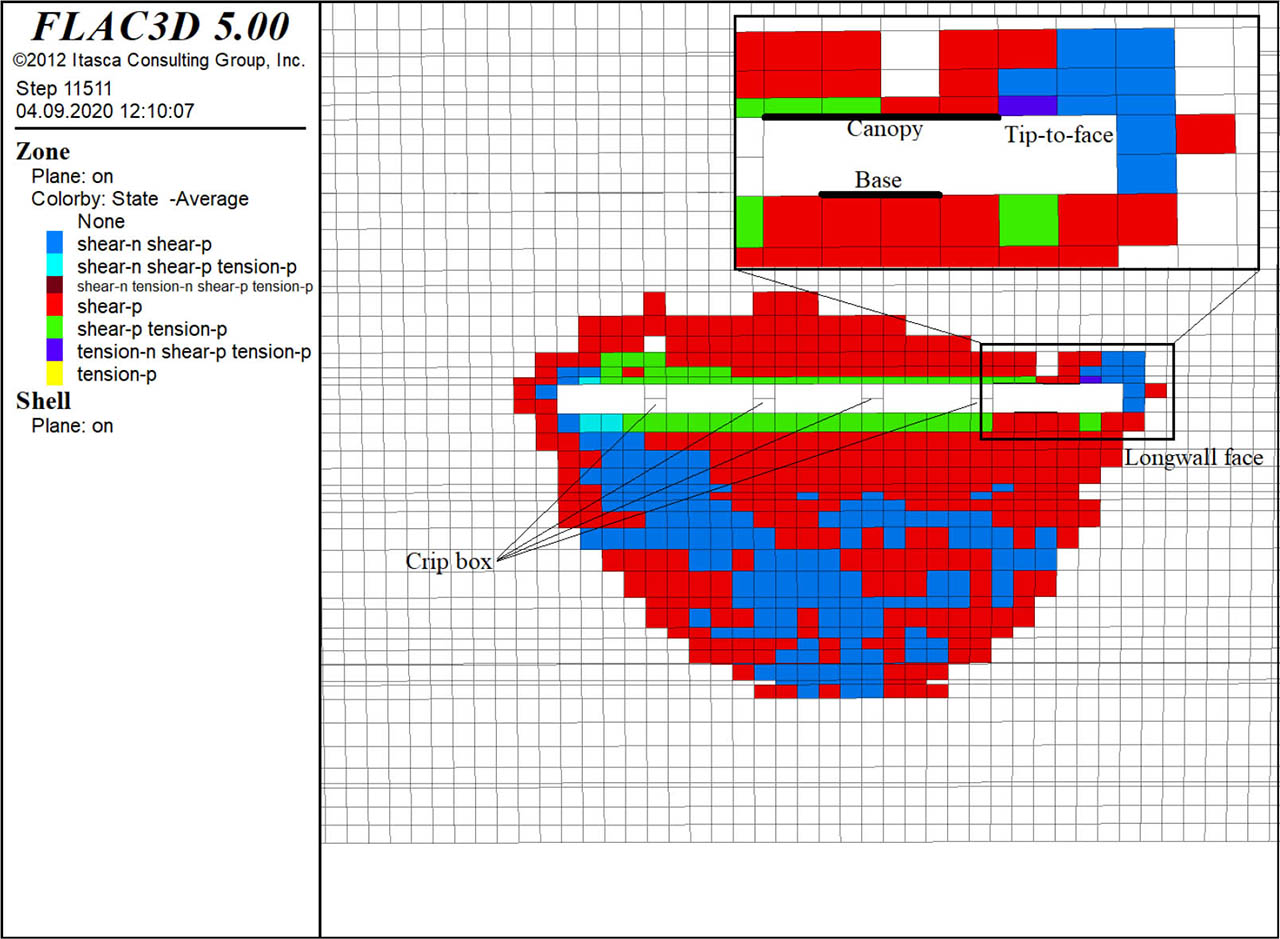
Figure 15
Failures around the longwall face using the strain-softening model.
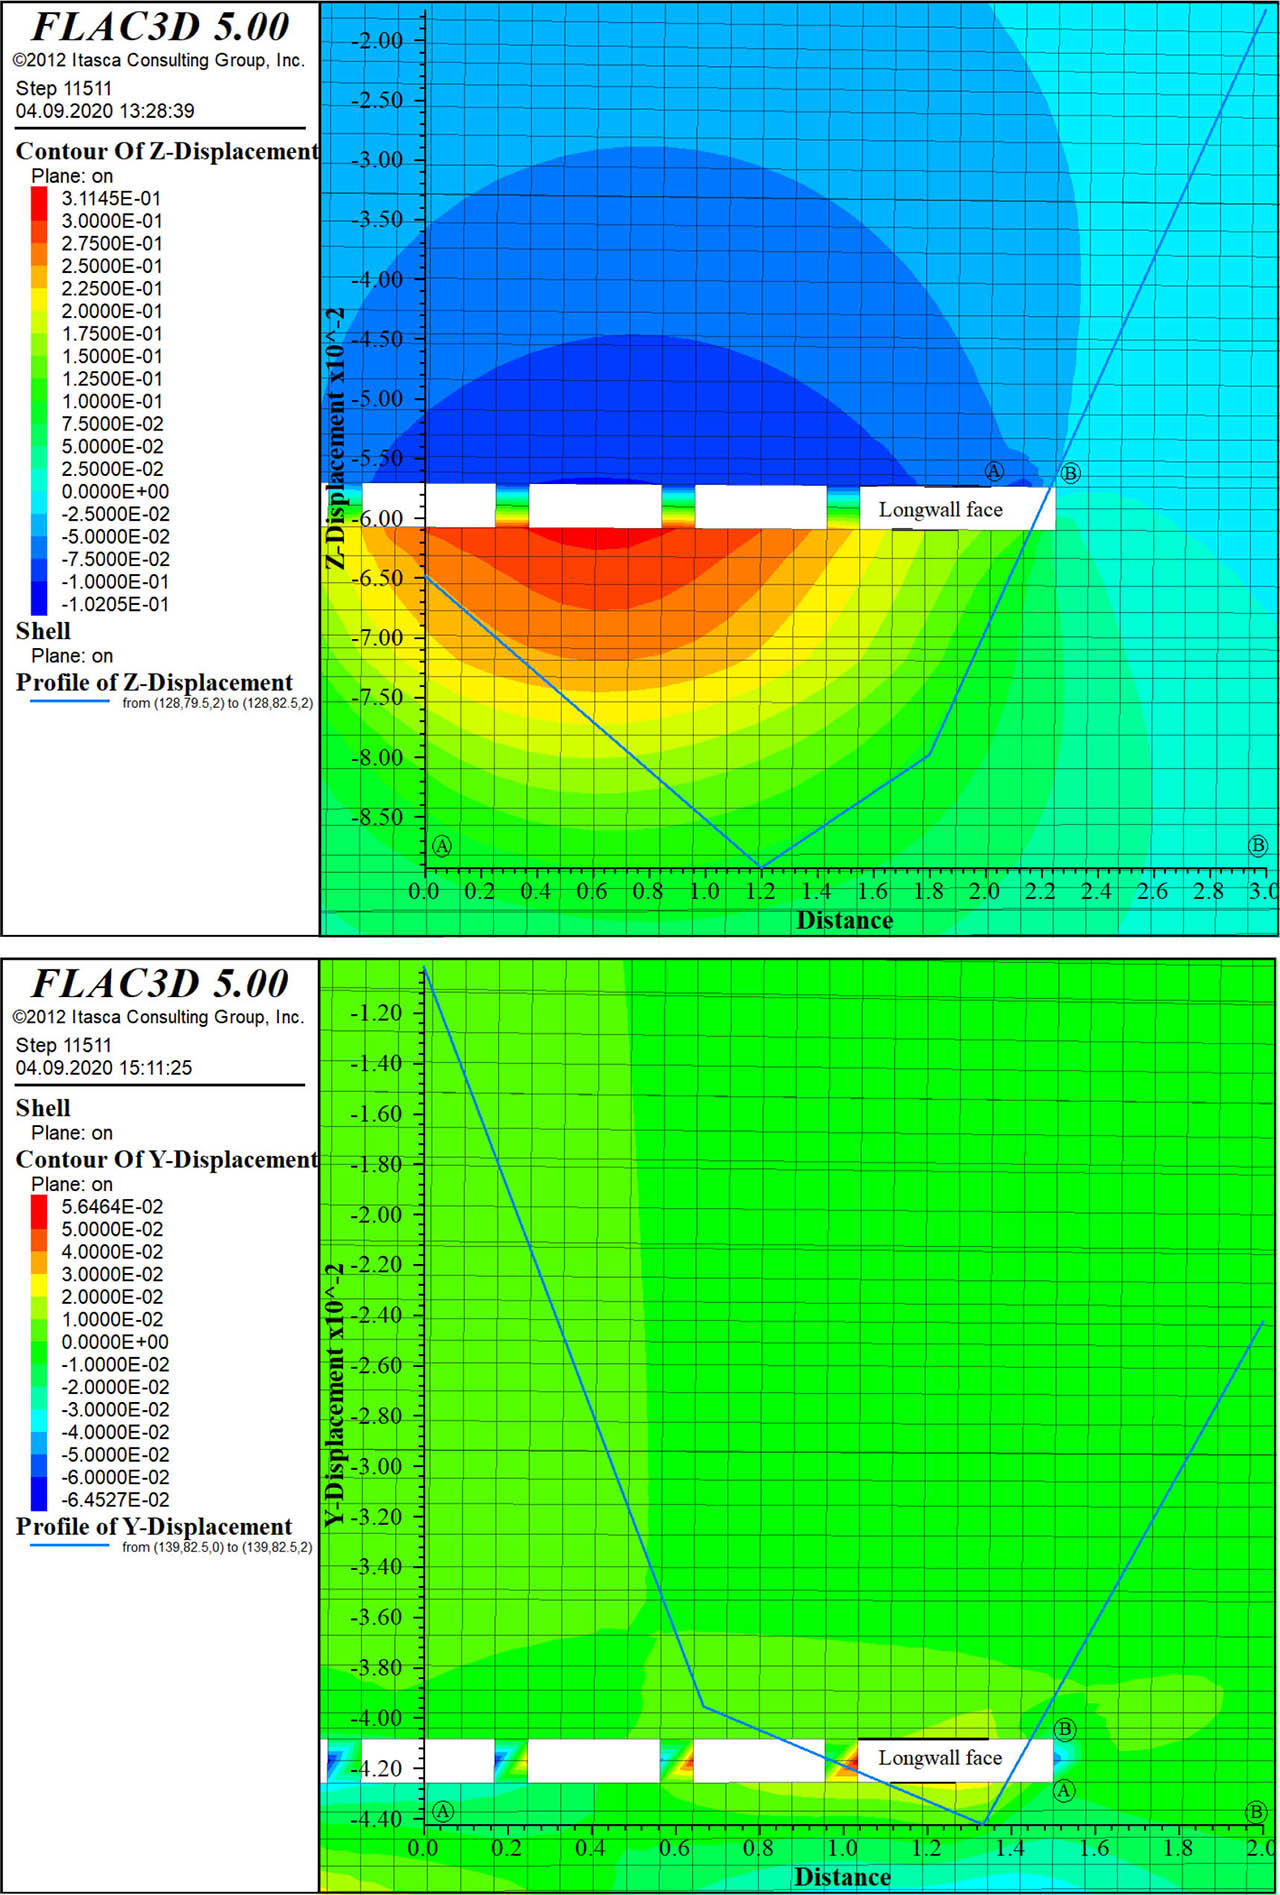
Figure 16
Displacement around the longwall face using the strain-softening model: a) vertical displacement along the tip-to-face distance, b) horizontal displacement along the longwall face.
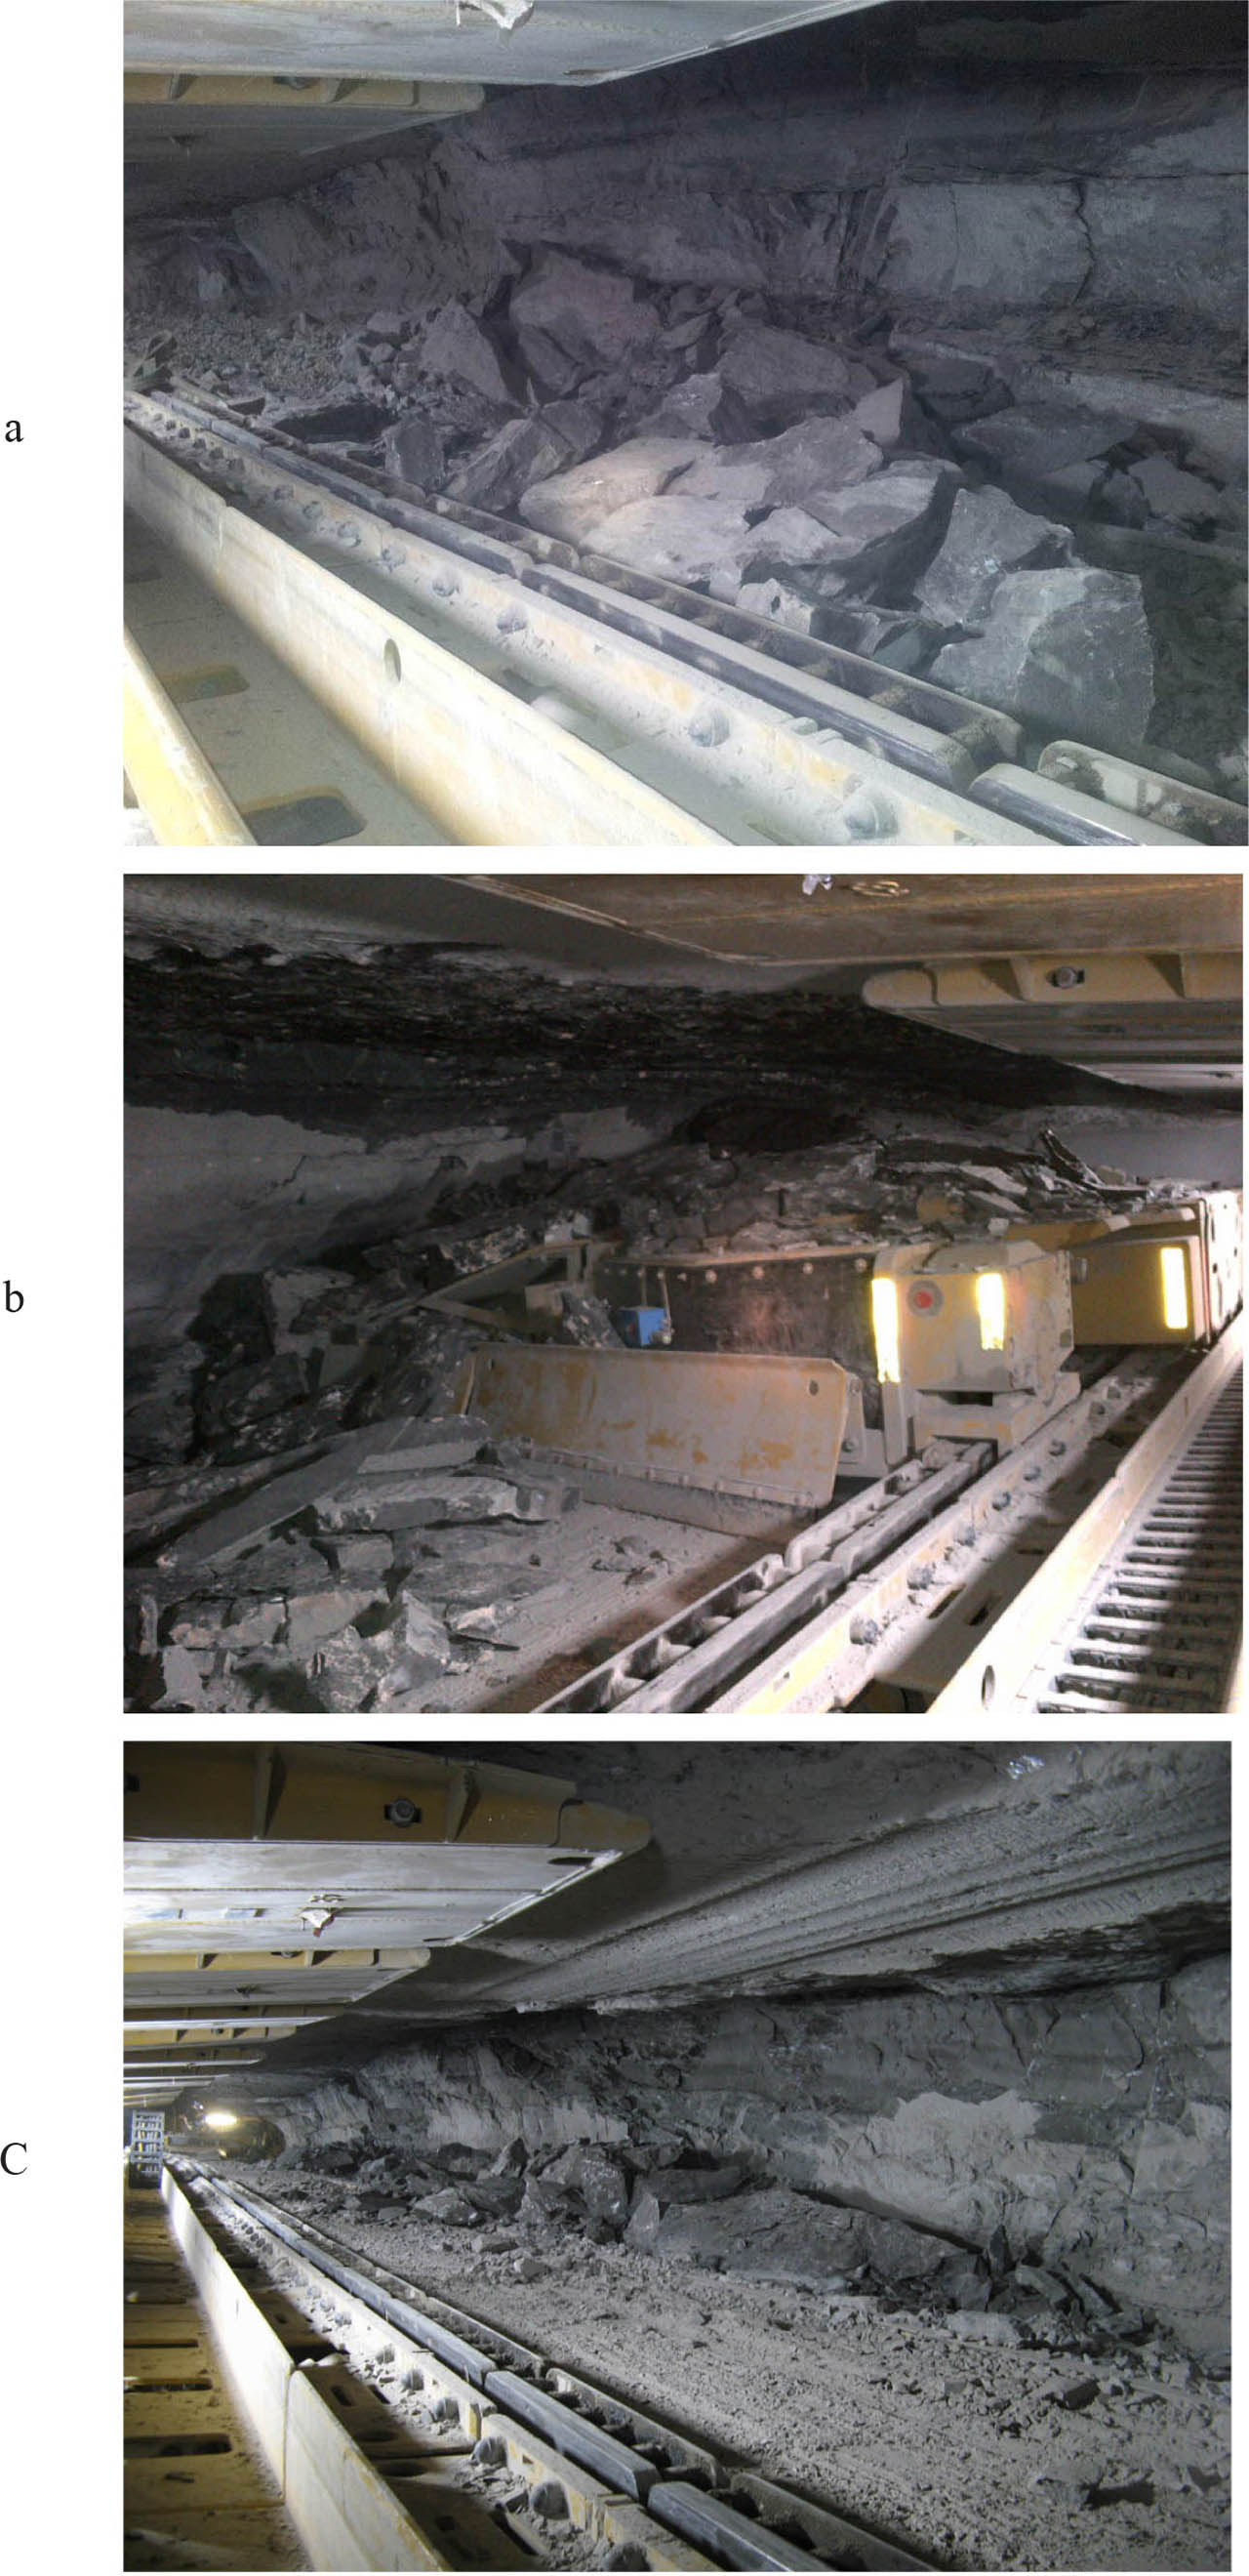
Figure 17
Examples of failures that occurred in the 5A/1 longwall: a, b) roof falls, c) wall spalling.
Table 6
Numerical calculation scenarios.
| Factor | Original designed parameters | Modified parameters |
|---|---|---|
| Tip-to-face distance | 3.0 m | 1.5 m |
| Average load-bearing capacity | 2600 kN | 4000 kN |
| Spacing of box crib | Every 6.0 m | Every 3.0 m, 1.5 m |
| Roof control method – hydraulic backfilling (sand) instead of box crib | No | Yes |
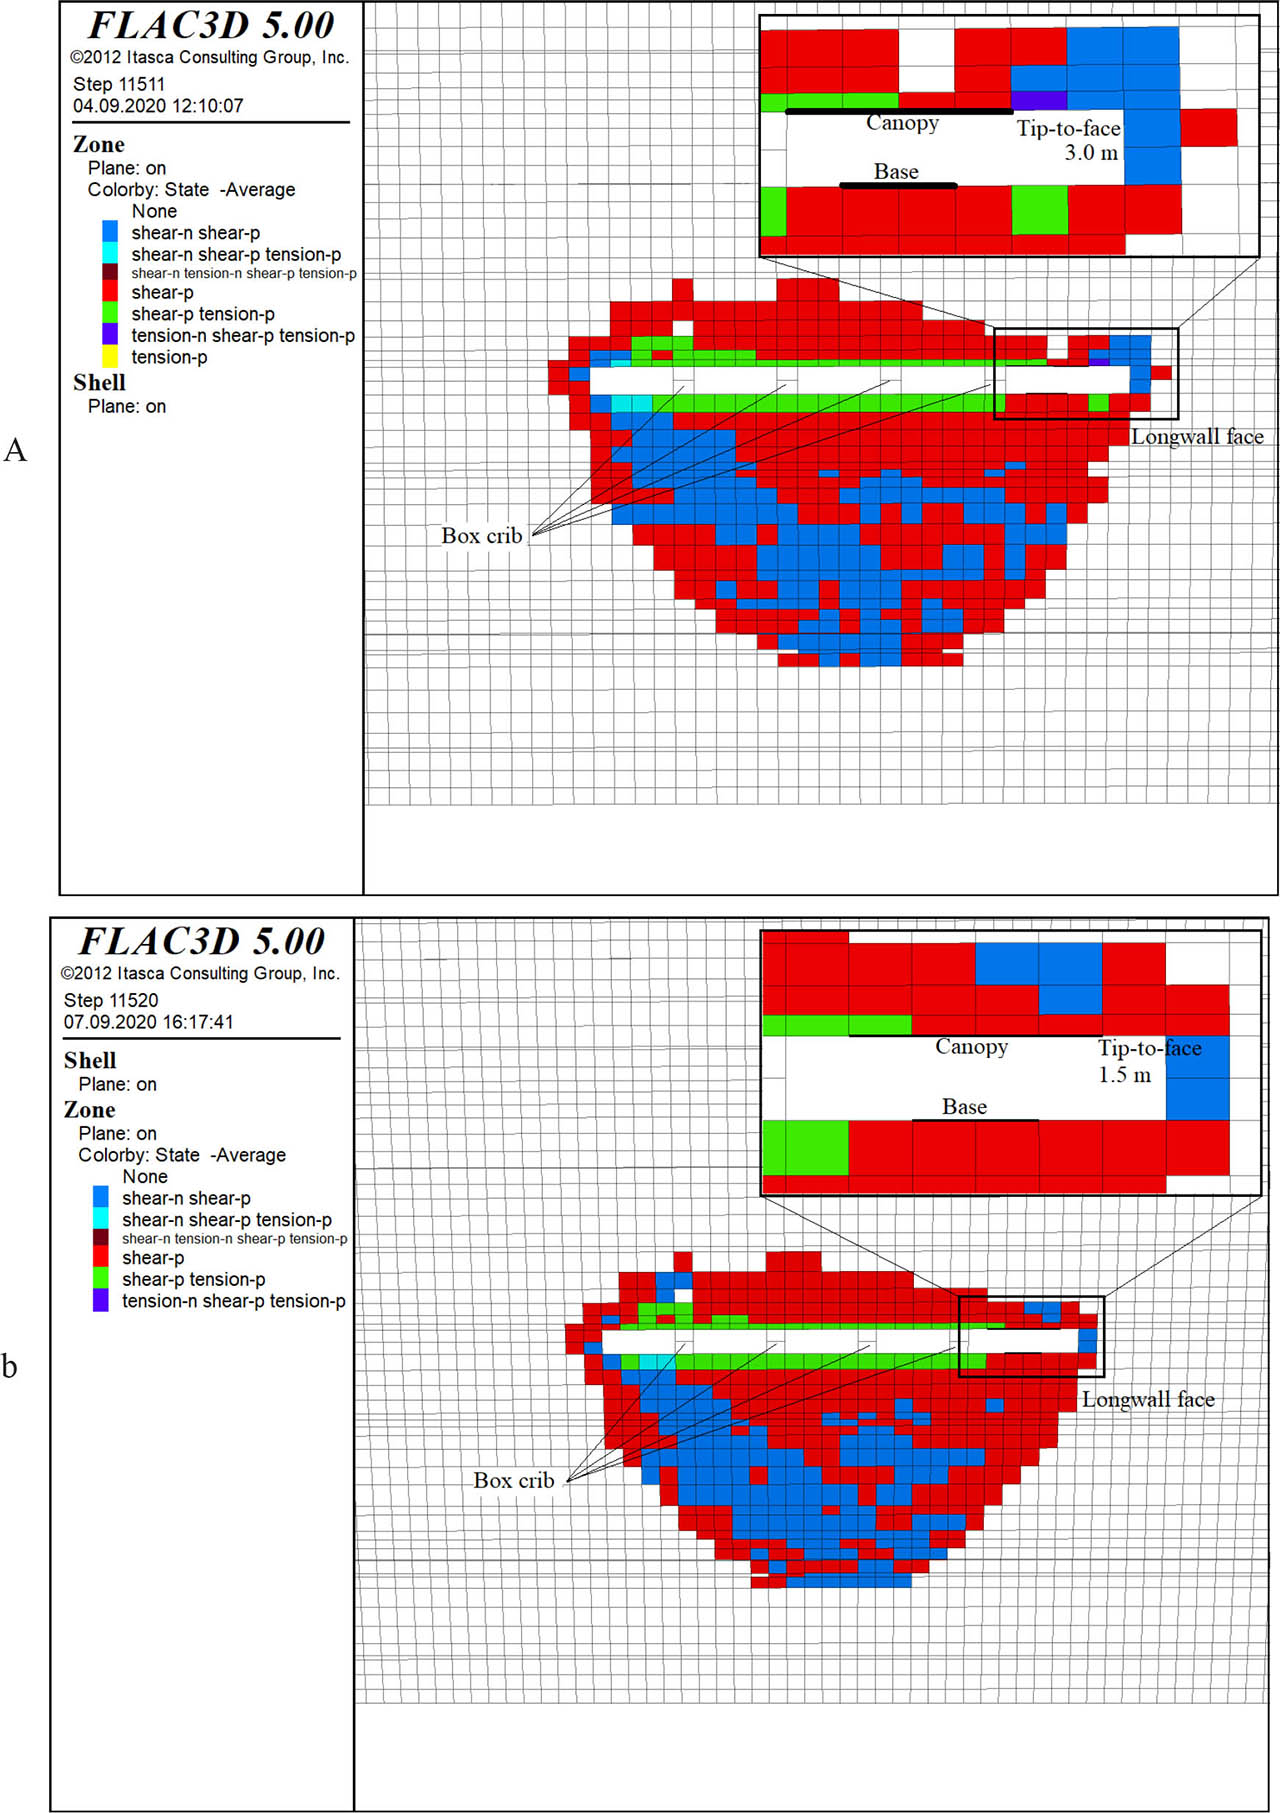
Figure 18
Plasticity around the longwall face with a) tip-to-face distance of 3 m, b) tip-to-face distance of 1.5 m.
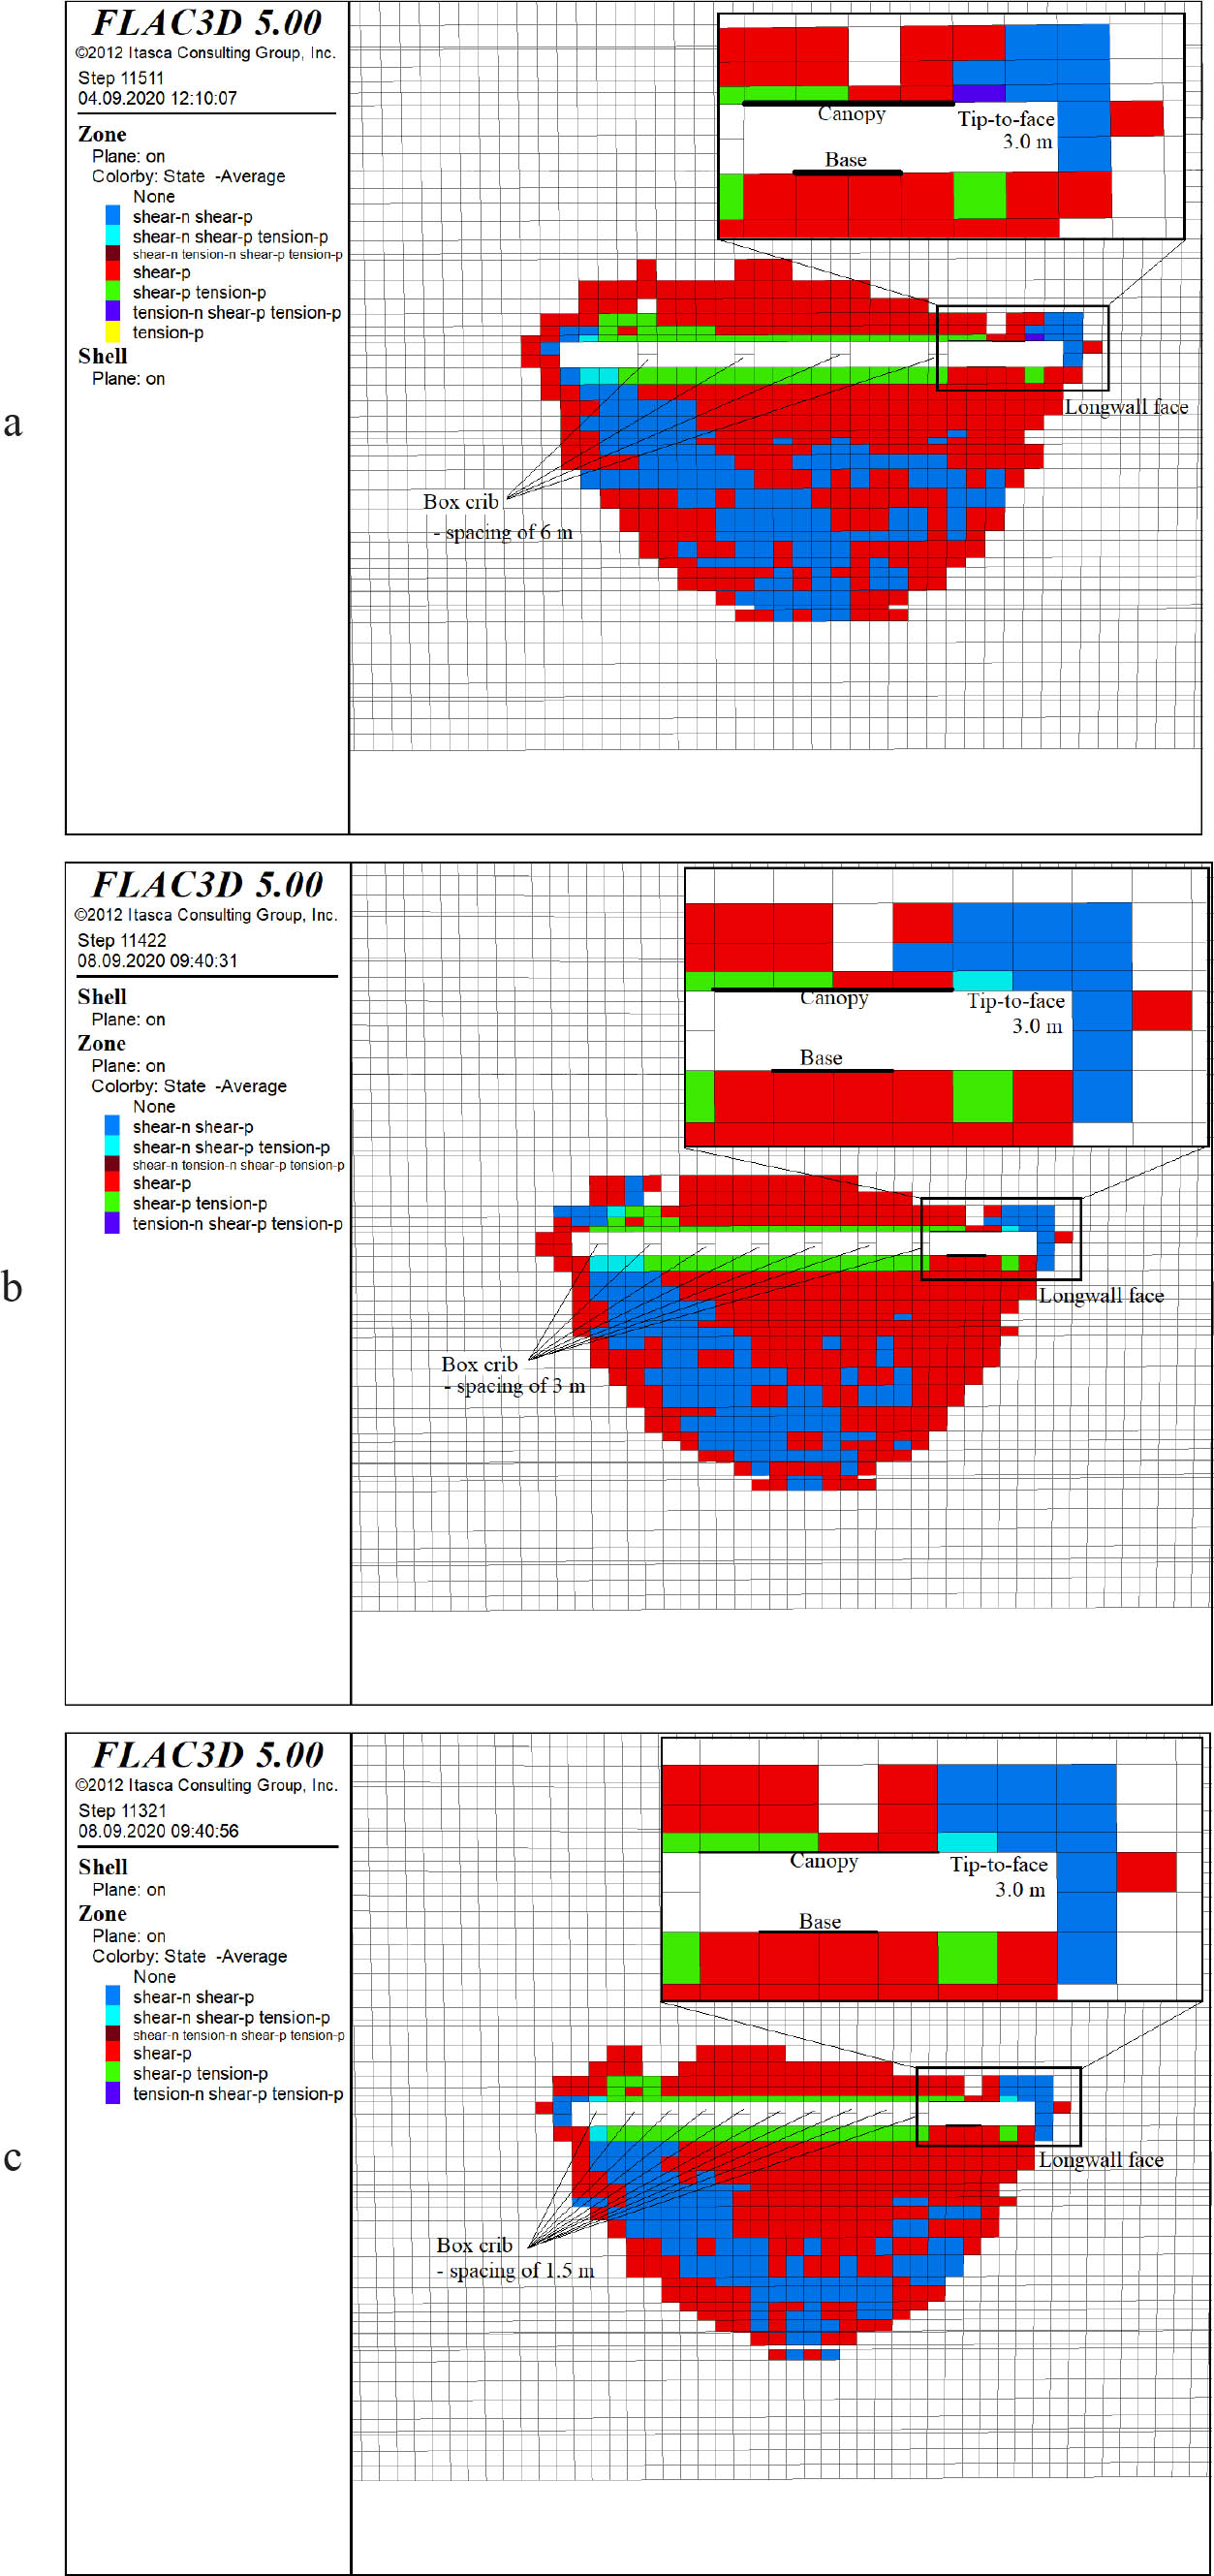
Figure 19
Plasticity around the longwall face with different spacing of the box crib: a) 6.0 m, b) 3.0 m and c) 1.5 m.
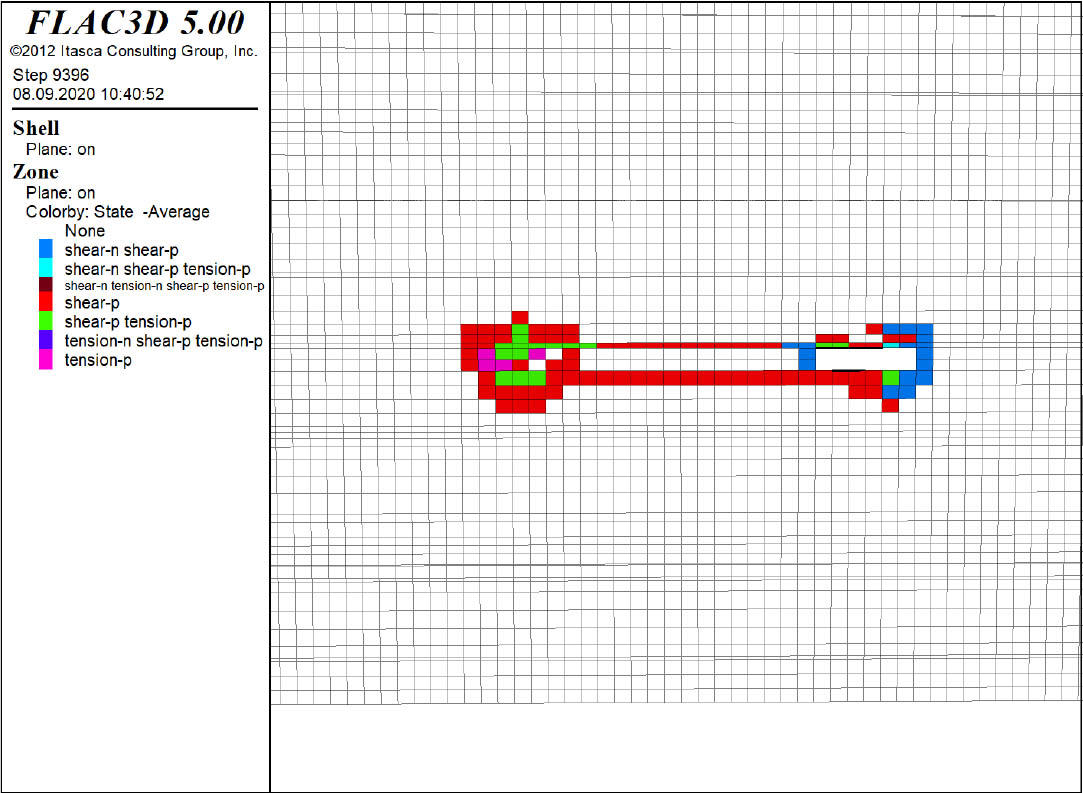
Figure 20
Plasticity around the longwall face with hydraulic backfilling (sand).
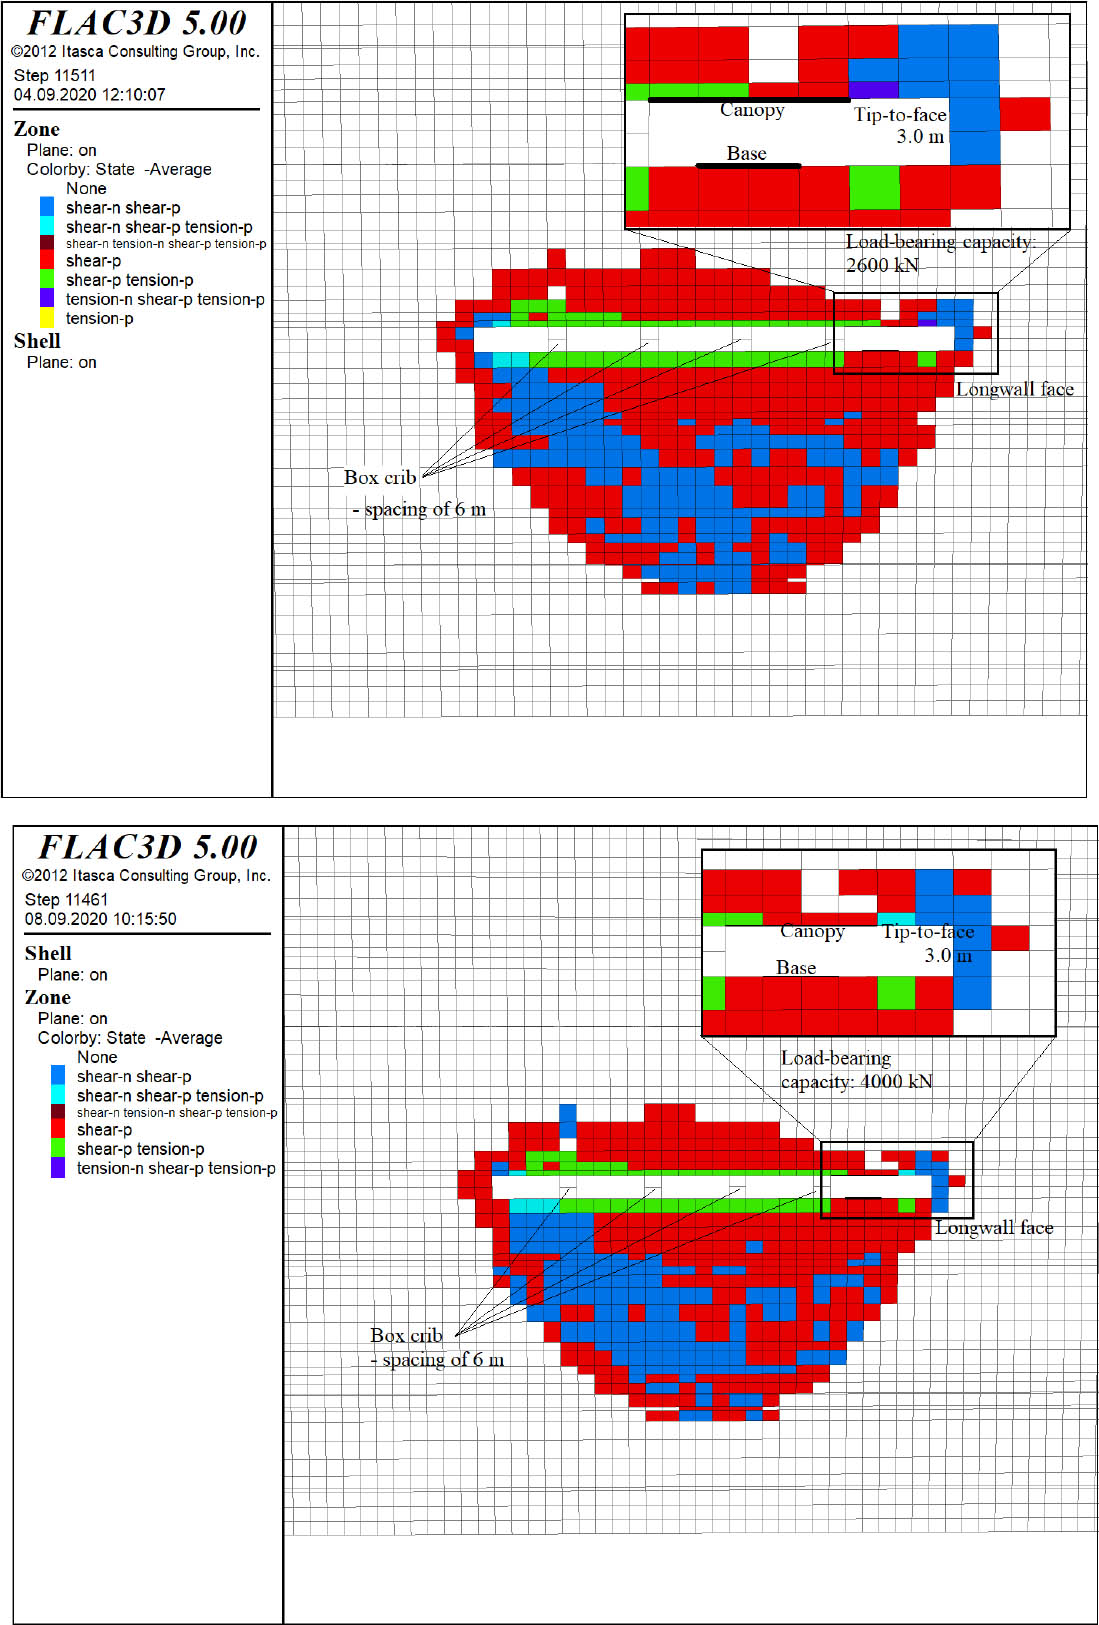
Figure 21
Plasticity around the longwall face with different load-bearing capacities of the powered roof support: a) 2600 kN b) 4000 kN.
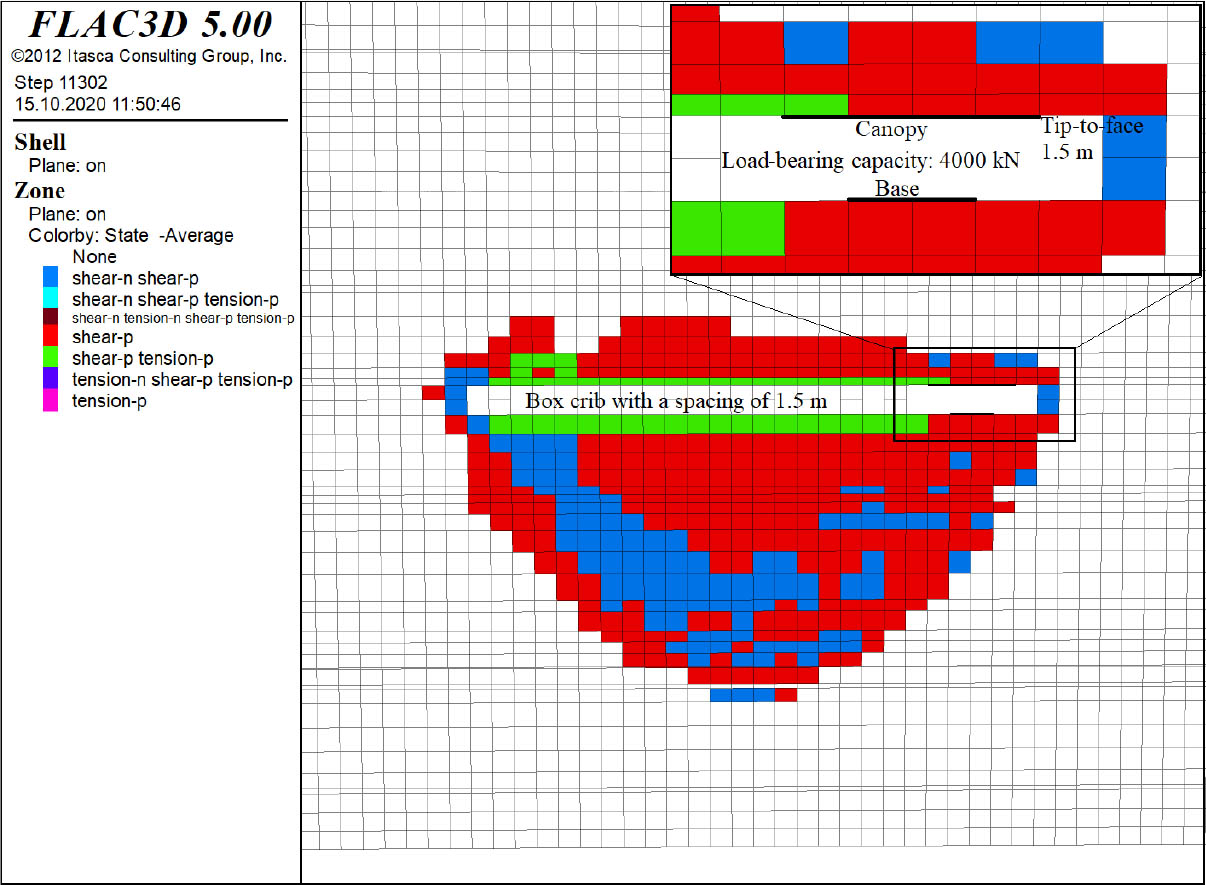
Figure 22
Plasticity around the longwall face with the selected influencing factors combined.