
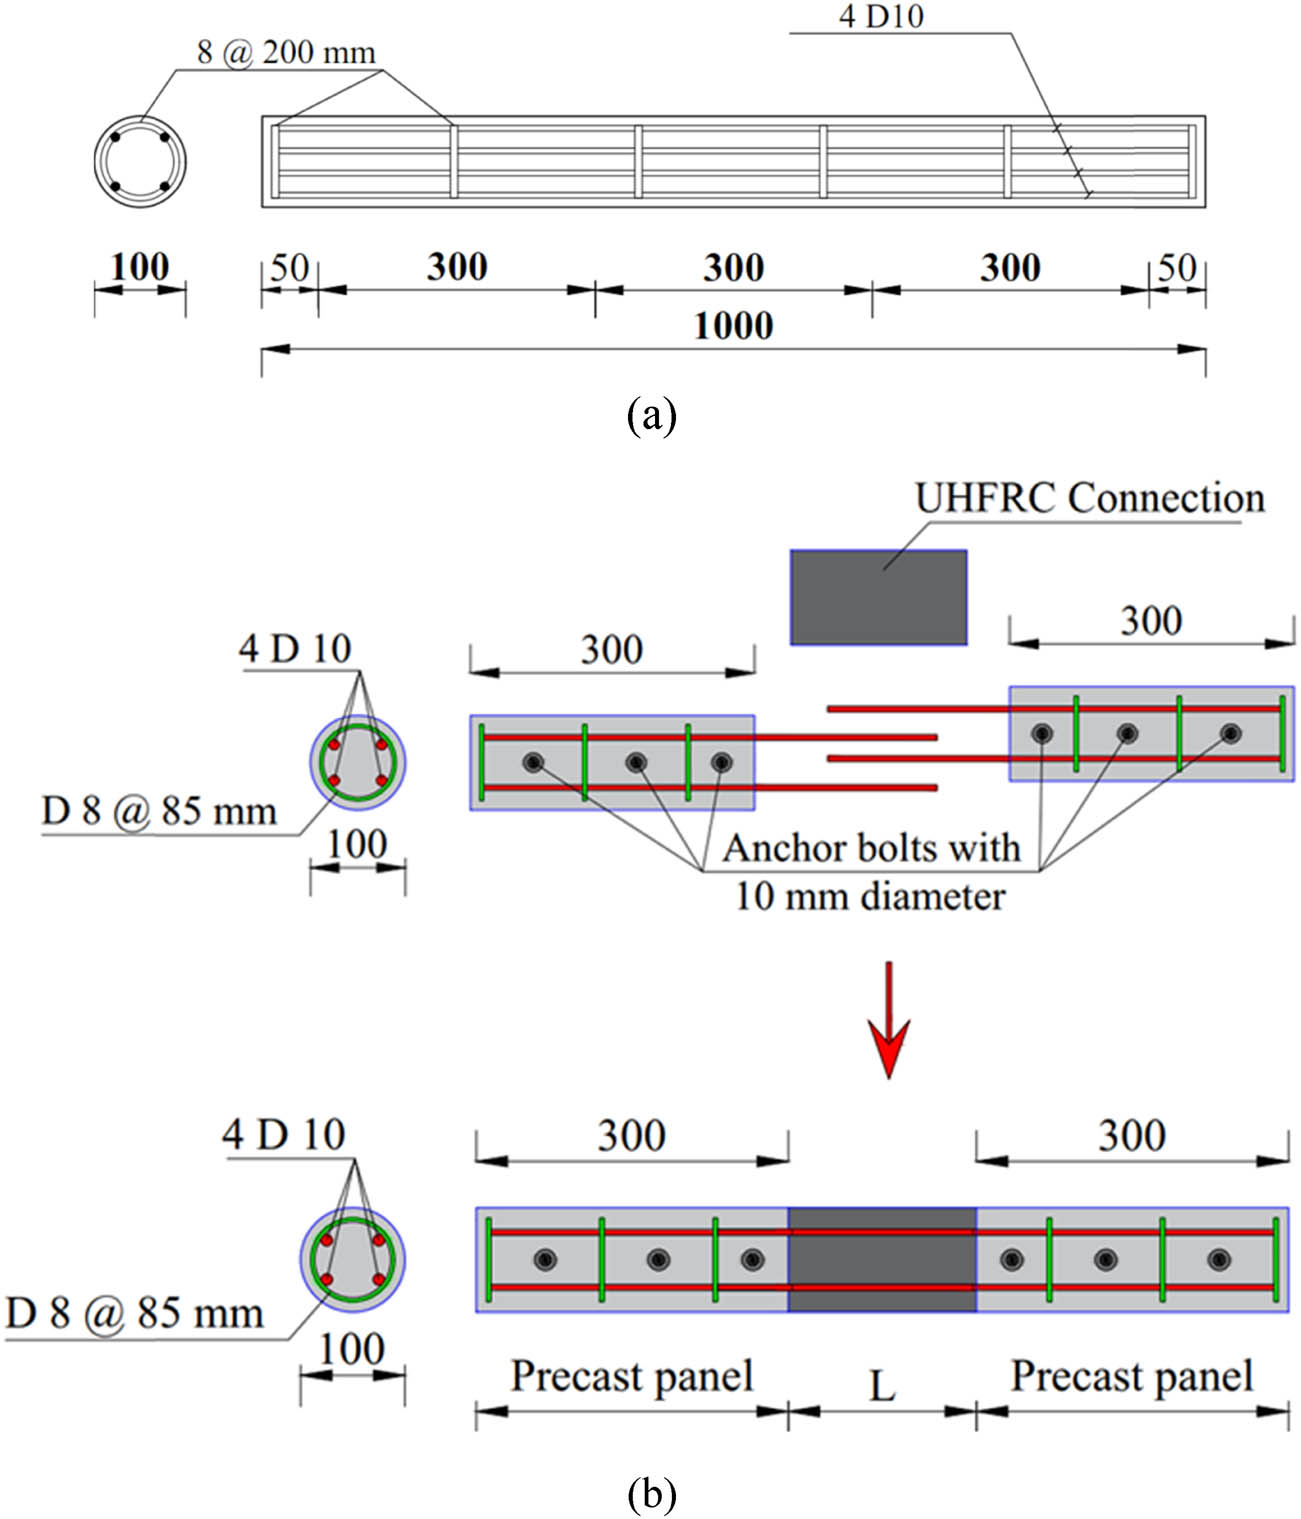
Figure 1
Geometric and reinforcement details: (a) reinforcement details for beam B0 and (b) details of the connection zone (units: mm).
Table 1
Test matrix.
| Group | Specimen’s ID | Concrete type | Connection length (L) | Objective |
|---|---|---|---|---|
| G1 | B0 | NC | — | Control beam |
| N-L1 | 15 cm | Impact of NC connection with varied lengths in connected beams under sagging moment | ||
| N-L2 | 20 cm | |||
| N-L3 | 30 cm | |||
| G2 | B0 | NC | — | Control beam |
| E-L1 | ECC | 15 cm | Impact of ECC connection with varied lengths in connected beams under sagging moment | |
| E-L2 | 20 cm | |||
| E-L3 | 30 cm | |||
| G3 | B0 | NC | — | Control beam |
| H-L1 | UHFRC | 15 cm | Impact of UHFRC connection with varied lengths in connected beams under sagging moment | |
| H-L2 | 20 cm | |||
| H-L3 | 30 cm |
The columns were composed of three segments: two segments made of precast NC-filled circular steel tubes connected by an intermediate joint of NC, ECC, or UHFRC, as illustrated in Figure 1. Each column had a circular cross-section with a diameter of 100 mm. The precast NC sections on the left and right sides were each 300 mm long, while the length of the intermediate segment varied according to the investigated length of the embedded steel bars (refer to Figure 1). All columns featured the same reinforcement, with four D10 bars as longitudinal reinforcement and ring stirrups in a closed form with an 8 mm diameter, spaced vertically at 85 mm intervals.
Table 2
Mix proportion and compressive strength of the used concrete.
| Concrete | Cement (kg/m3) | Fine aggregate (kg/m3) | Coarse aggregate (kg/m3) | Fly ash (kg/m3) | Water/binder | PVA/steel fiber (%) in volume | HRWR (kg/m3) | (MPa) |
|---|---|---|---|---|---|---|---|---|
| NC | 350 | 700 | 1,150 | — | 0.43 | — | — | 32.56 |
| ECC | 580 | 450 | — | 610 | 0.22 | 2.10 | 35.3 | 63.67 |
| UHFRC | 500 | 600 | 990 | 35 | 0.24 | 2.00 | 15.6 | 126.75 |
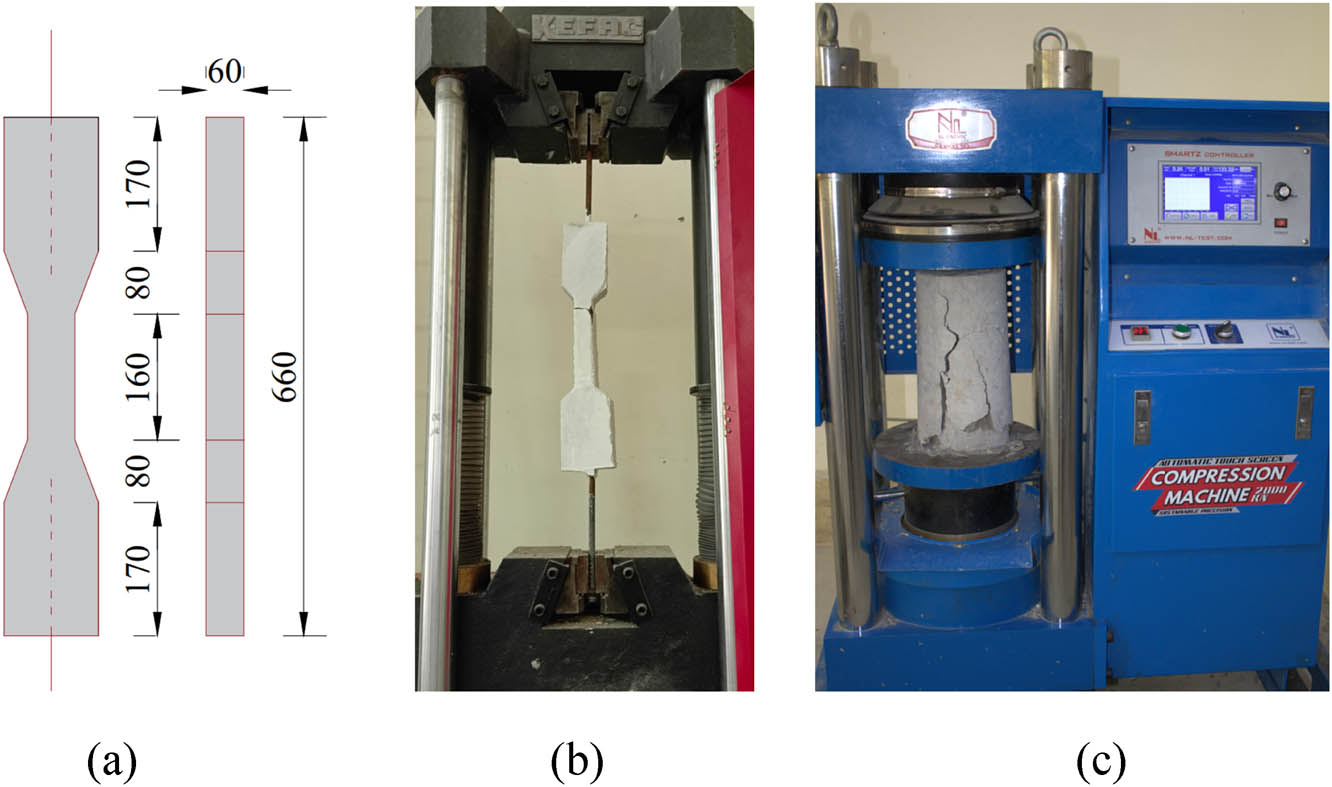
Figure 2
Uniaxial tensile and compressive tests for concrete: (a) concrete specimen dimensions for tension, (b) test of the concrete specimen under tension, and (c) test of the concrete specimen under compression.
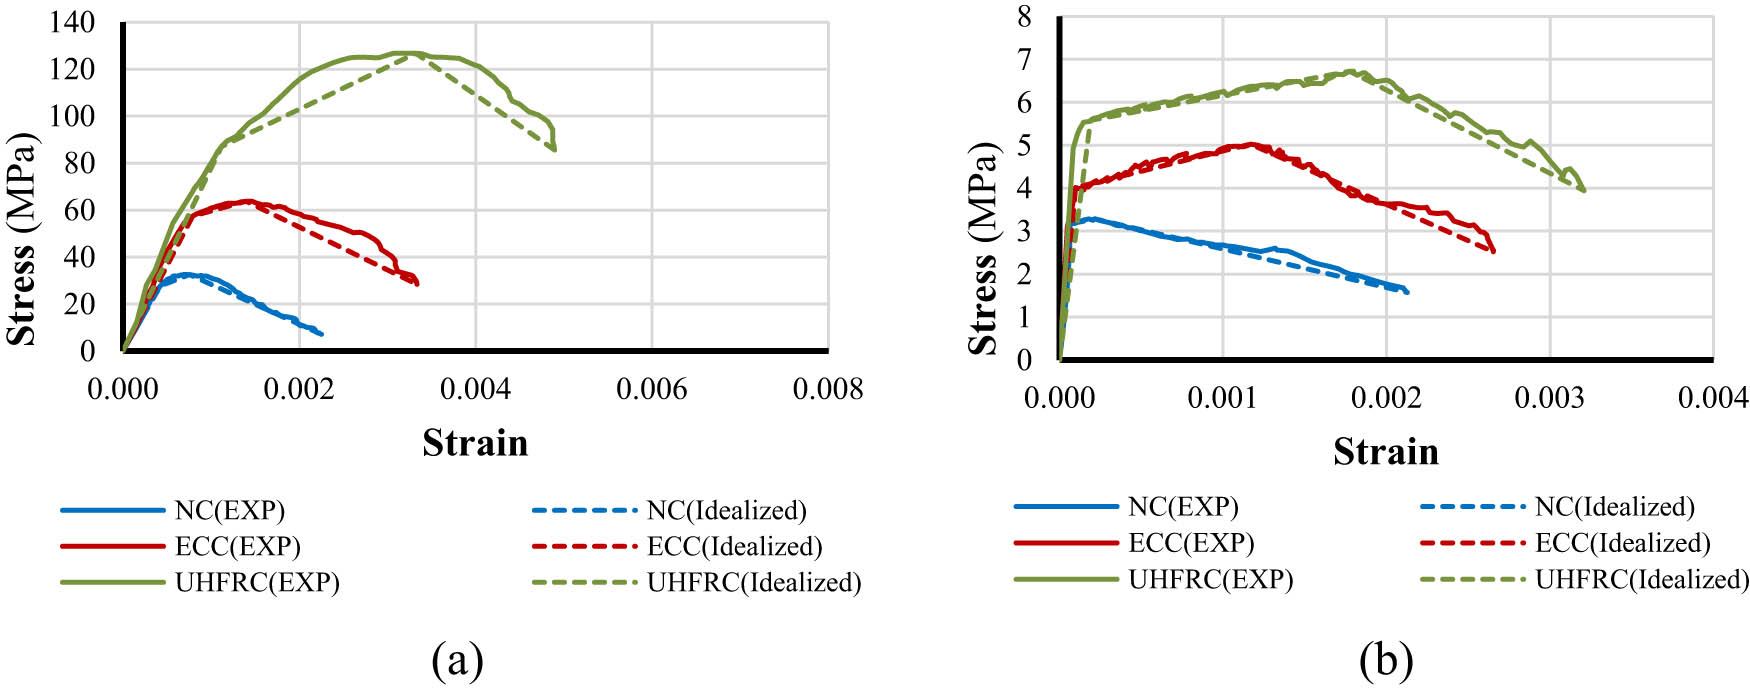
Figure 3
Constitutive stress–strain law for all concrete specimens: (a) under compression and (b) under tension.
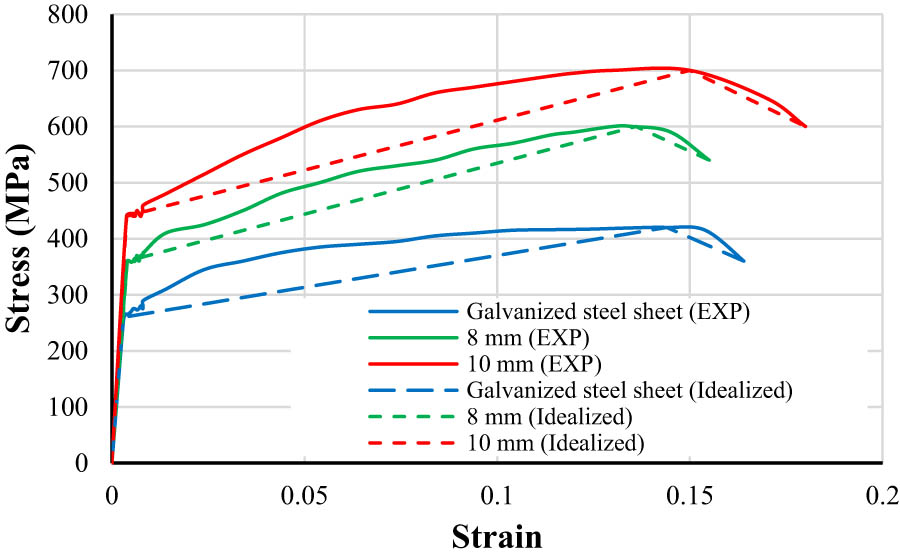
Figure 4
Actual and idealized stress strain law for steel elements.
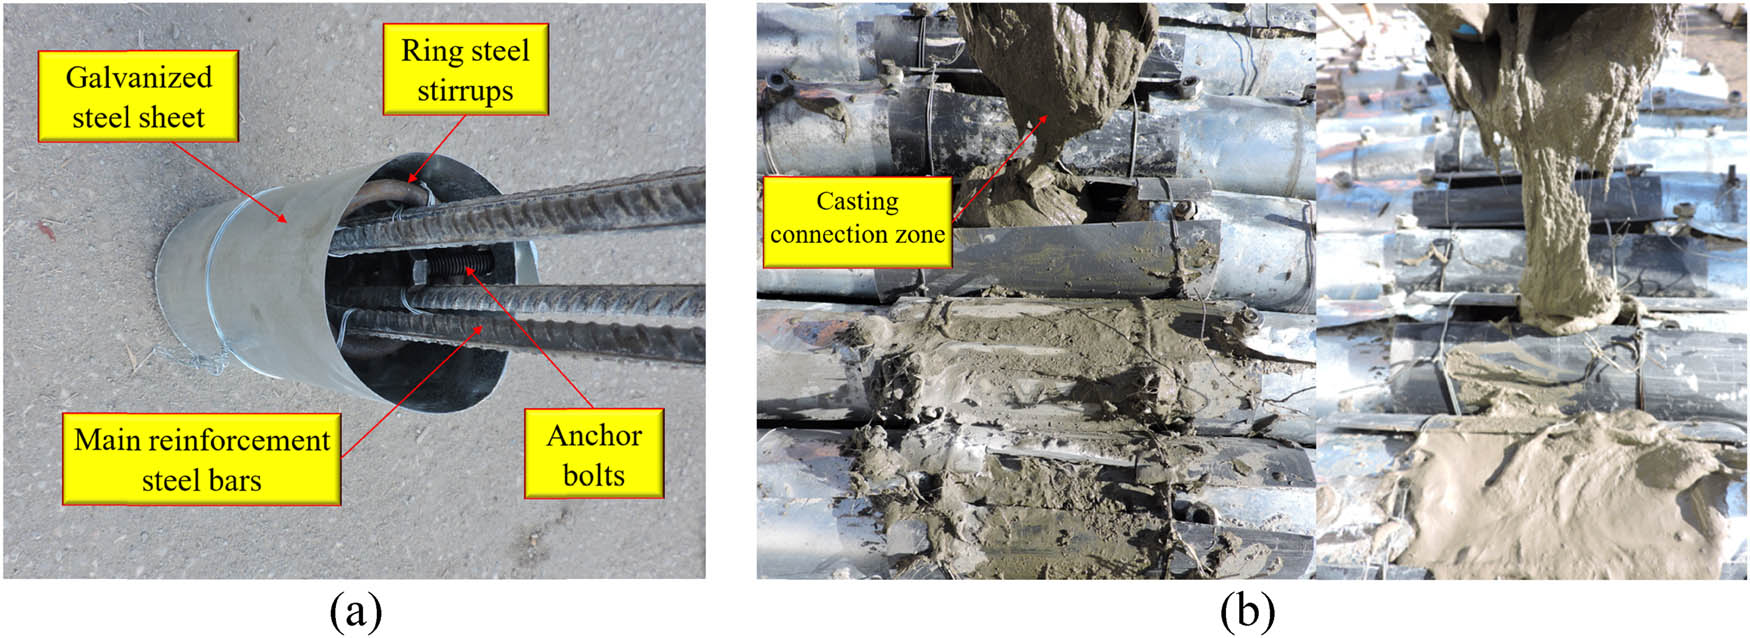
Figure 5
Preparation of connected beams: (a) preparation of pre-casted panels and (b) connecting of panels and casting of the connection zone.
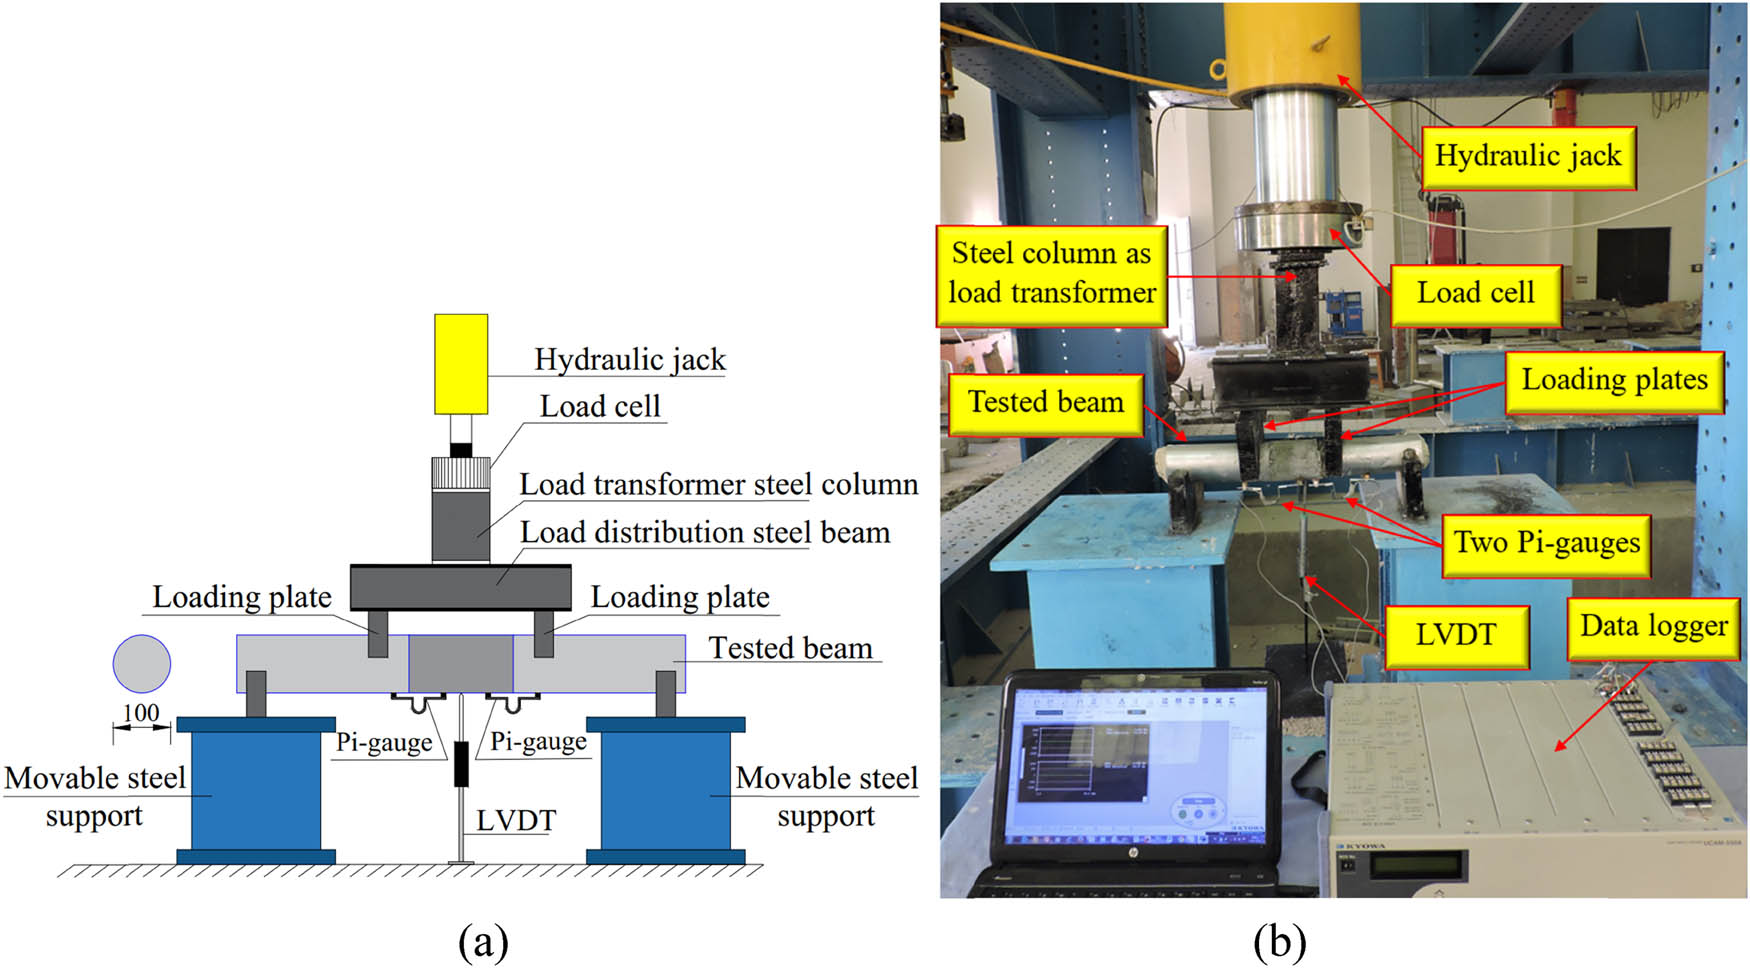
Figure 6
Test set-up and details of the instrumentations: (a) schematic of tested connected beam and (b) image of the beam during the test (units: mm).
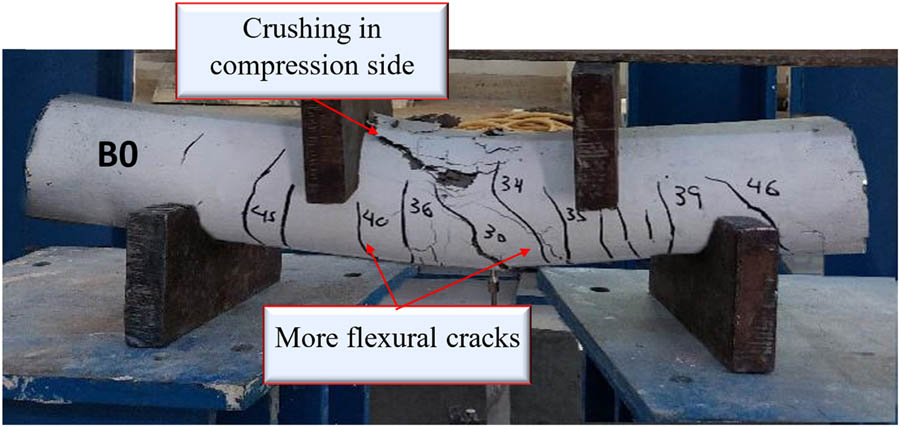
Figure 7
Failure mode of master beam (B0).
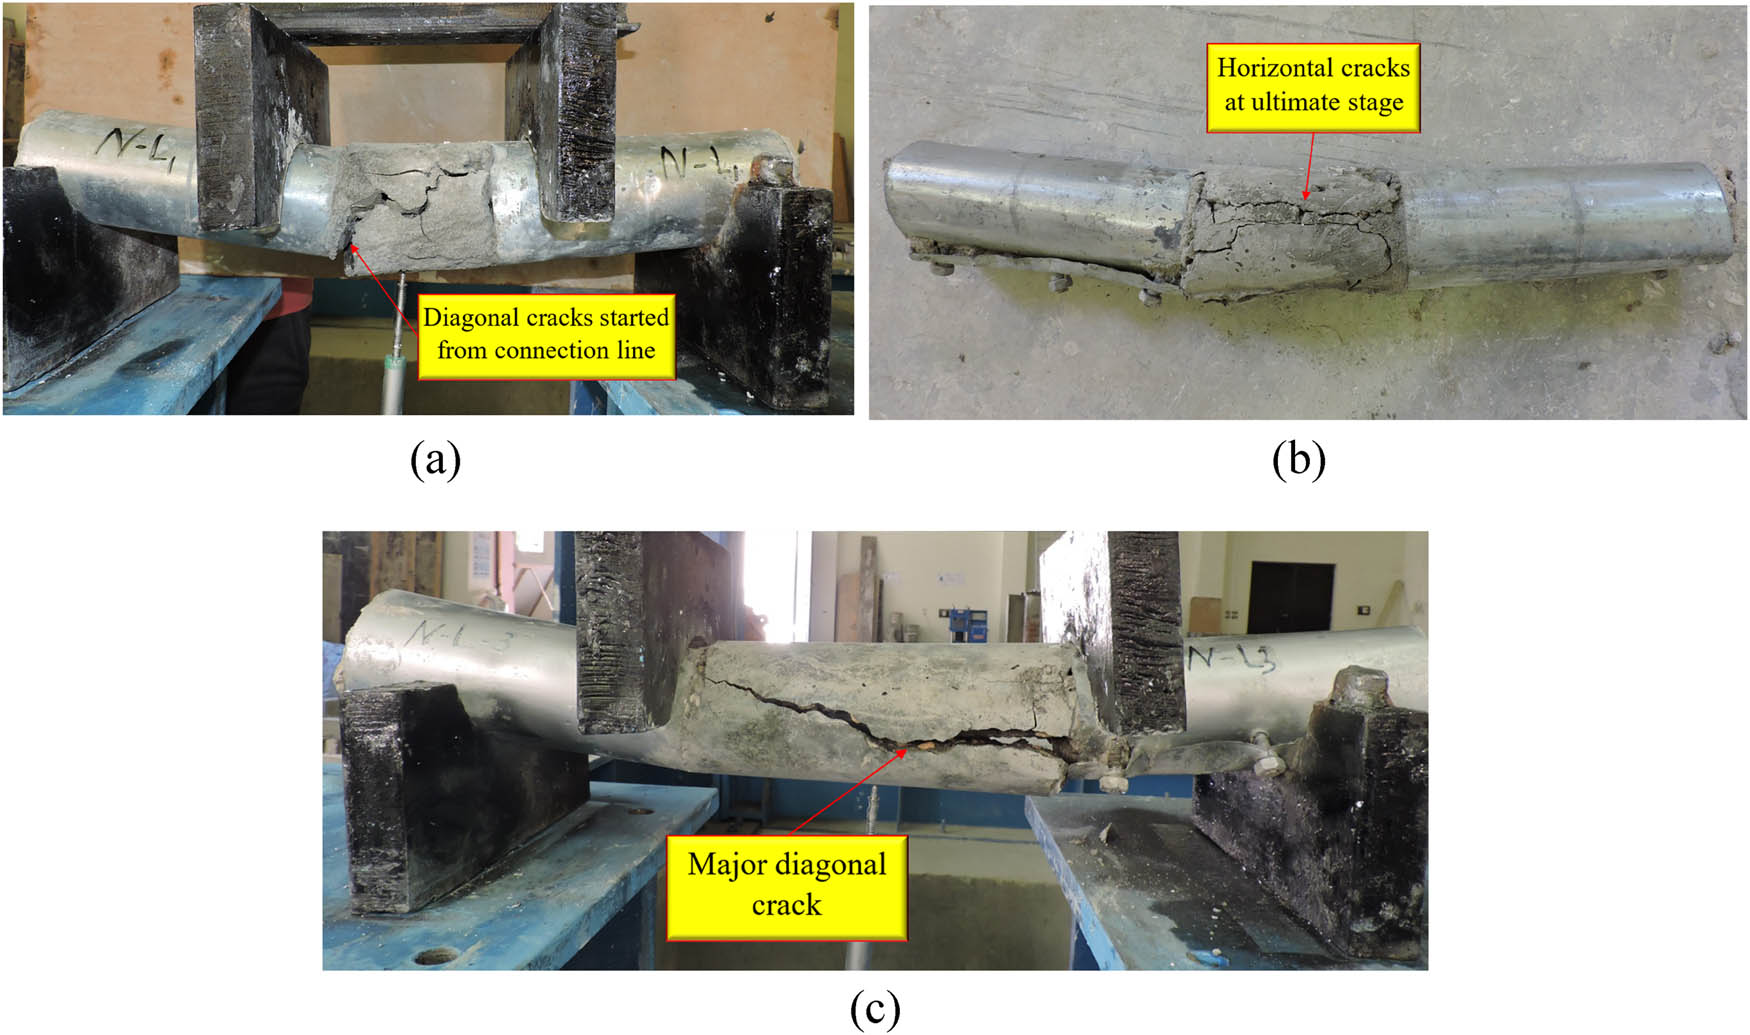
Figure 8
Failure modes of Group G1: (a) Beam N-L1, (b) Beam N-L2, and (c) Beam N-L3.
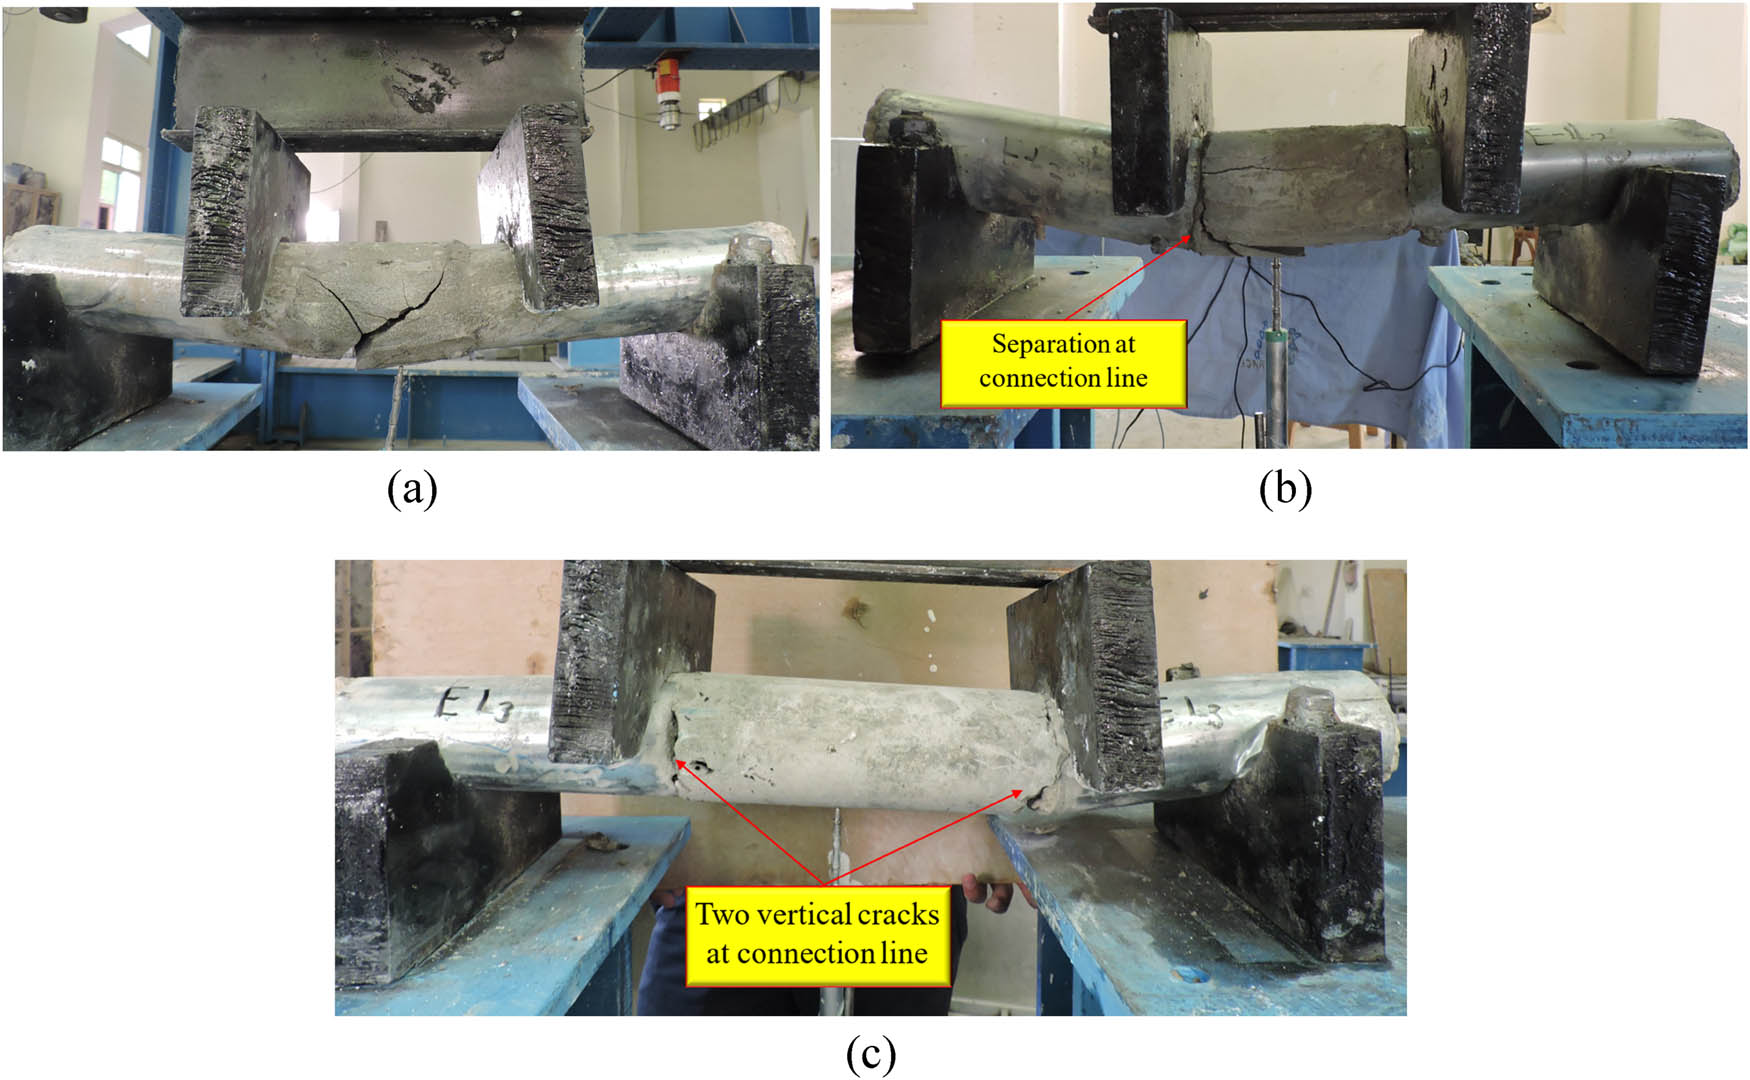
Figure 9
Failure modes of Group G2: (a) Beam E-L1, (b) Beam E-L2, and (c) Beam E-L3.
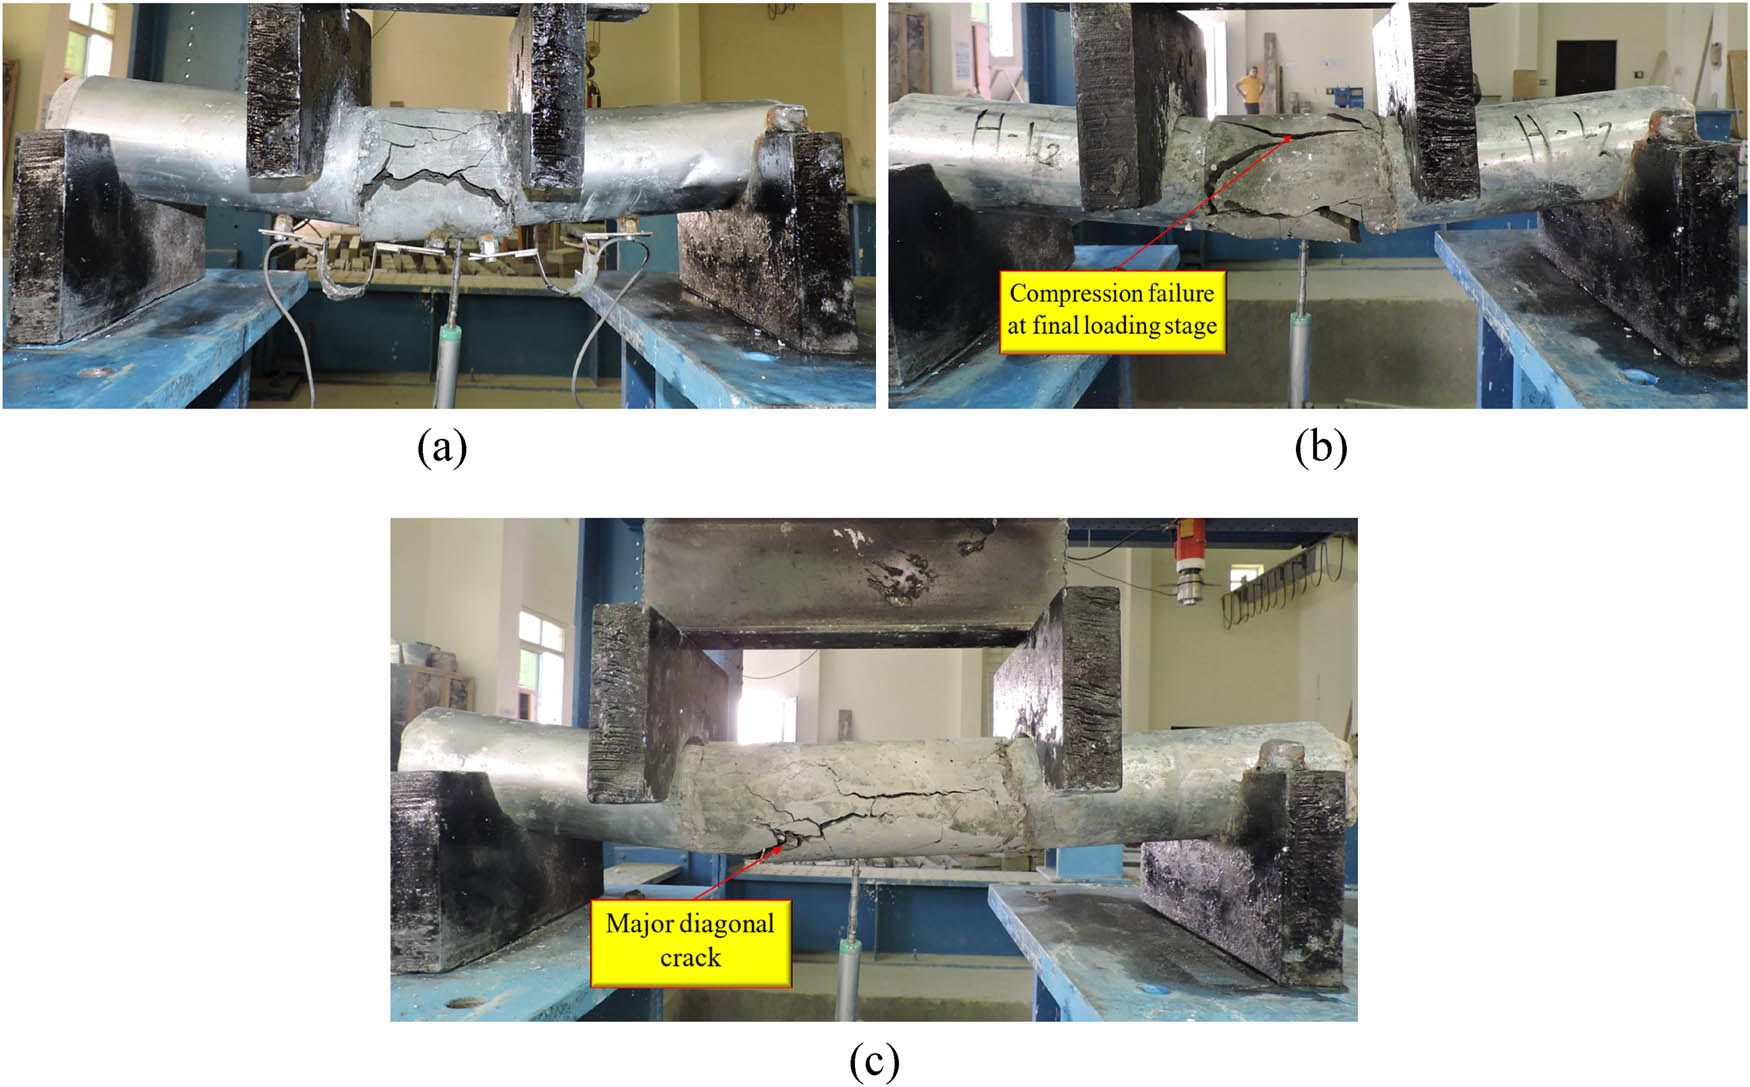
Figure 10
Failure modes of Group G3: (a) Beam H-L1, (b) Beam H-L2, and (c) Beam H-L3.
Table 3
Test results of the tested connected beams.
| Specimen’s ID | Cracking stage | Ultimate stage | Elastic stiffness index (K) | K B/K B0 | Absorbed energy (E) | E B/E B0 | |||||
|---|---|---|---|---|---|---|---|---|---|---|---|
| P cr (kN) | P crB/P crB0 | Δcr (mm) | P u (kN) | P uB/P uB0 | ΔPu (mm) | ||||||
| G1 | B0 | 12.95 | 1.00 | 0.66 | 44.01 | 1.00 | 3.92 | 19.62 | 1.00 | 148.35 | 1.00 |
| N-L1 | 10.21 | 0.79 | 0.99 | 38.27 | 0.87 | 3.82 | 10.31 | 0.53 | 98.81 | 0.67 | |
| N-L2 | 10.96 | 0.85 | 0.83 | 40.16 | 0.91 | 3.90 | 13.20 | 0.67 | 137.76 | 0.93 | |
| N-L3 | 11.32 | 0.87 | 0.78 | 42.43 | 0.96 | 3.74 | 14.51 | 0.74 | 135.54 | 0.91 | |
| G2 | B0 | 12.95 | 1.00 | 0.66 | 44.01 | 1.00 | 3.92 | 19.62 | 1.00 | 148.35 | 1.00 |
| E-L1 | 11.56 | 0.89 | 0.95 | 42.54 | 0.97 | 4.43 | 12.17 | 0.62 | 152.93 | 1.03 | |
| E-L2 | 12.32 | 0.95 | 0.77 | 46.08 | 1.05 | 4.11 | 16.00 | 0.82 | 208.01 | 1.40 | |
| E-L3 | 13.91 | 1.07 | 0.49 | 48.97 | 1.11 | 4.62 | 28.39 | 1.45 | 251.11 | 1.69 | |
| G3 | B0 | 12.95 | 1.00 | 0.66 | 44.01 | 1.00 | 3.92 | 19.62 | 1.00 | 148.35 | 1.00 |
| H-L1 | 13.84 | 1.07 | 0.61 | 46.85 | 1.06 | 3.21 | 22.69 | 1.16 | 130.14 | 0.88 | |
| H-L2 | 14.52 | 1.12 | 0.43 | 49.24 | 1.12 | 3.50 | 33.77 | 1.72 | 205.44 | 1.38 | |
| H-L3 | 15.26 | 1.18 | 0.37 | 51.37 | 1.17 | 3.89 | 41.24 | 2.10 | 252.77 | 1.70 | |
P cr: load at which the first crack appeared; Δcr: vertical deflection recorded at P cr; P u: ultimate load; ΔPu: vertical deflection recorded at P u; K: elastic index; E: absorbed energy.
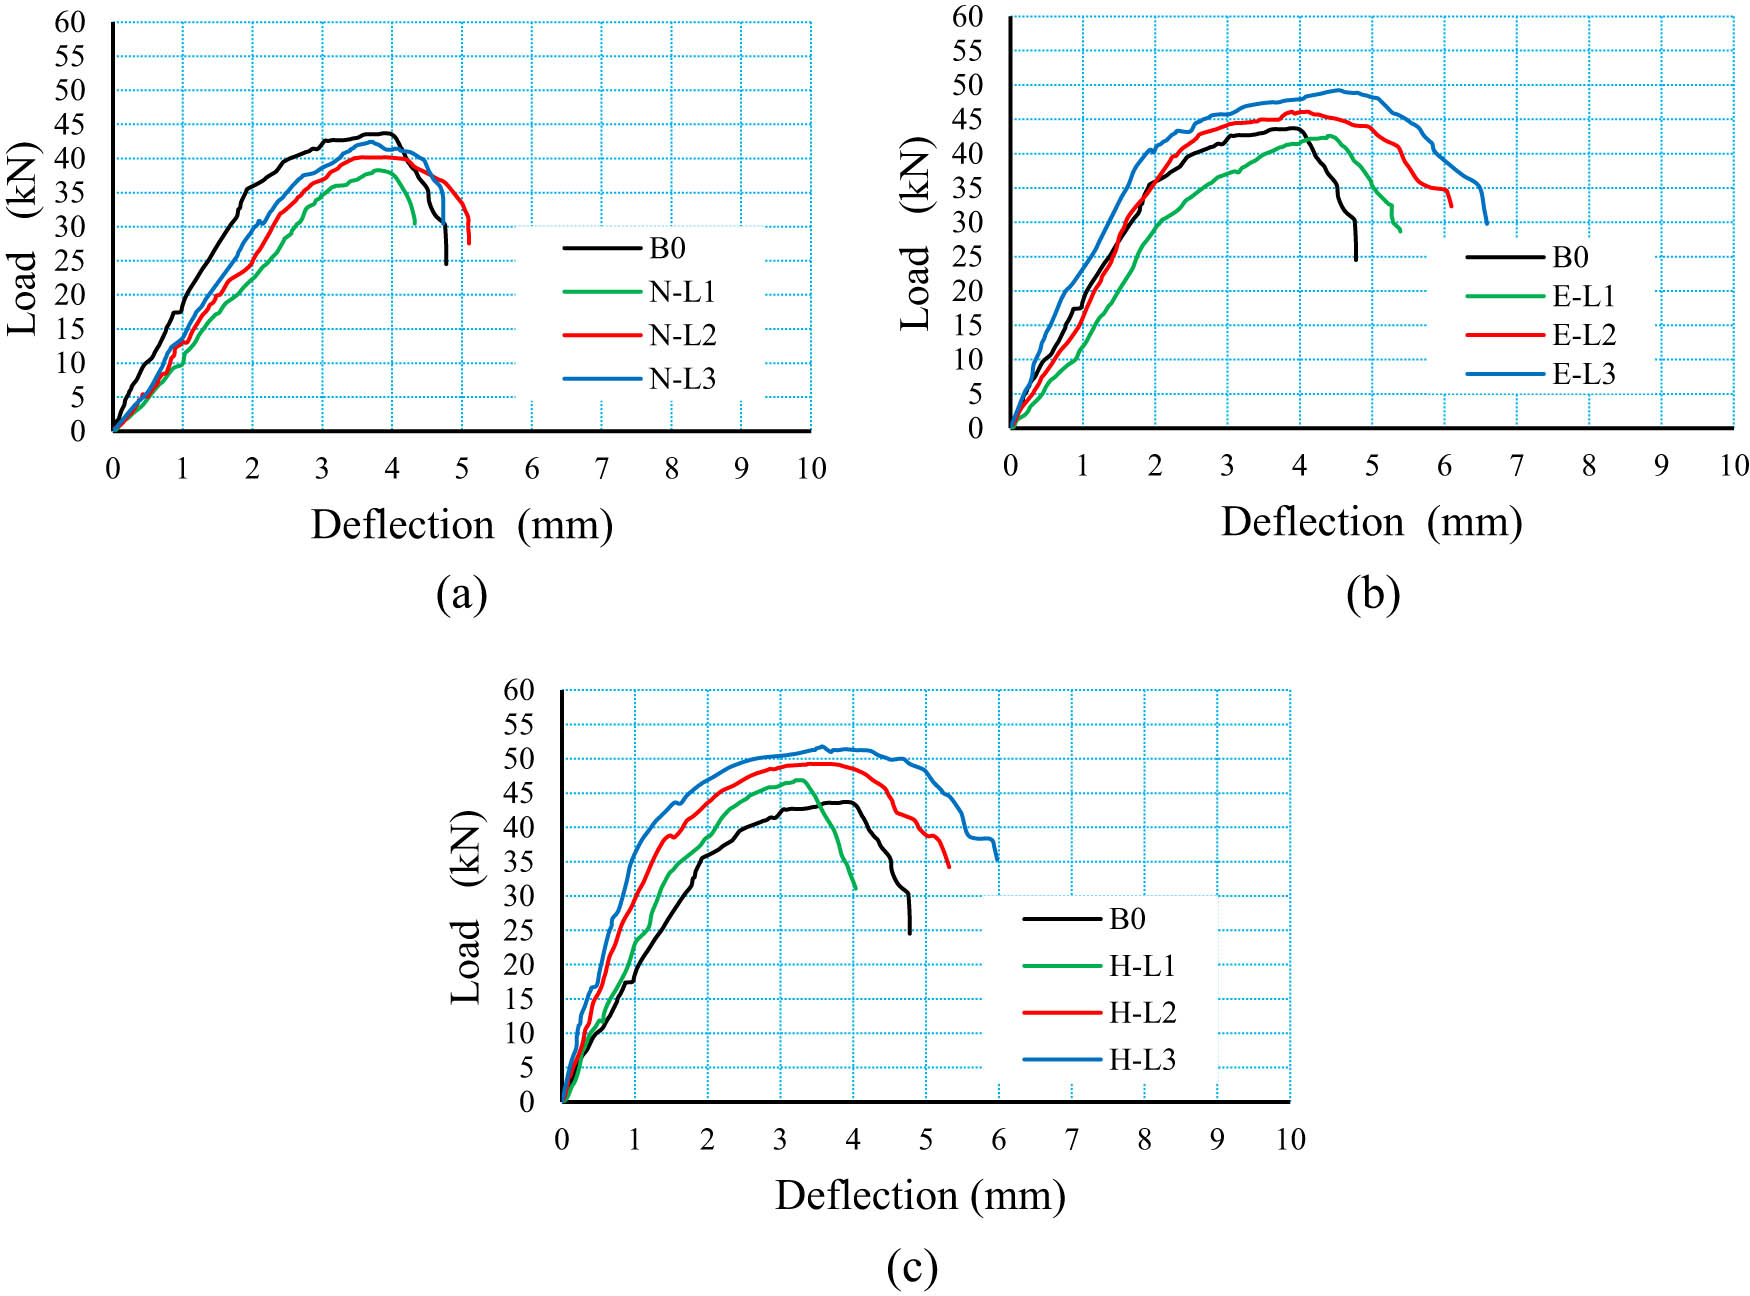
Figure 11
Load–deflection relationships for tested connected beams: (a) Group G1, (b) Group G2, and (c) Group G3.
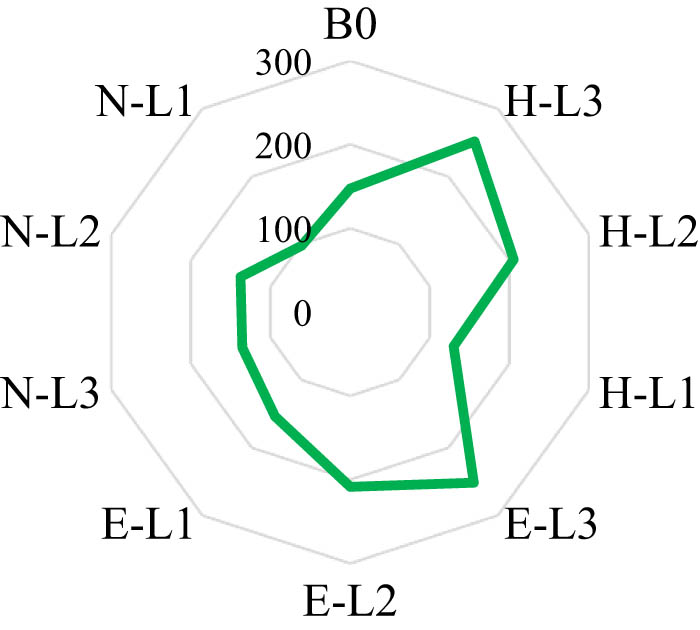
Figure 12
Absorbed energy (E) for all beams (kN mm).
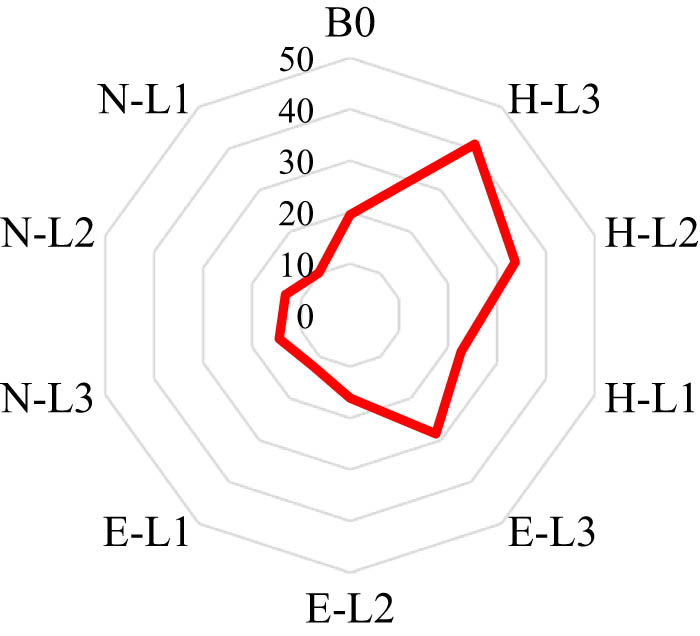
Figure 13
Elastic index (K) for all beams (kN/mm).